❌

Visualização normal

Antes de ontemProject Zero
  • ✇Project Zero
  • Windows Exploitation Techniques: Dangling COM Object Registrations James Forshaw
    This short blog post is about abusing a privilege escalation bug that Microsoft recently fixed in Windows, CVE-2026-66804, that I and 14 others reported. This issue is an incomplete fix for CVE-2026-50343, a bug dubbed “Dark Elevator” by Calif. The root cause of the bug was a dangling COM object registration for the CrossDevice COM object with the CLSID {E9F83CF2-E0C0-4CA7-AF01-E90C70BEF496}. A COM registration typically needs two parts: a server executable, which for in-process components is a
     

Windows Exploitation Techniques: Dangling COM Object Registrations

21 de Setembro de 2026, 04:00

This short blog post is about abusing a privilege escalation bug that Microsoft recently fixed in Windows, CVE-2026-66804, that I and 14 others reported. This issue is an incomplete fix for CVE-2026-50343, a bug dubbed “Dark Elevator” by Calif.

The root cause of the bug was a dangling COM object registration for the CrossDevice COM object with the CLSID {E9F83CF2-E0C0-4CA7-AF01-E90C70BEF496}. A COM registration typically needs two parts: a server executable, which for in-process components is a DLL and a CLSID entry under the HKEY_CLASSES_ROOT registry key which points to that DLL.

This object was registered in the system wide classes key, meaning it was accessible to all users on the system, including system services. However the server executable was missing. Specifically it was registered to use the DLL %PROGRAMDATA%\CrossDevice\CrossDevice.Streaming.Source.dll. Not only does this path not exist, it’s also within the C:\ProgramData directory. This is a common location for all users on the system and therefore permits anyone to create directories. Therefore you can create an arbitrary DLL file at that location and the COM object can be instantiated potentially leading to privilege escalation.

But how to get the COM object, and thus the DLL, loaded into a privileged process? The fixed bug Calif blogged about, CVE-2026-50343, abused a weak registry key permissions to add the class as a installer plugin and then get the InstallService to load it into memory. The issue with the InstallService was fixed, so we need an alternative way to abuse the unfixed dangling COM reference.

Abuse Custom COM Marshaling, Again

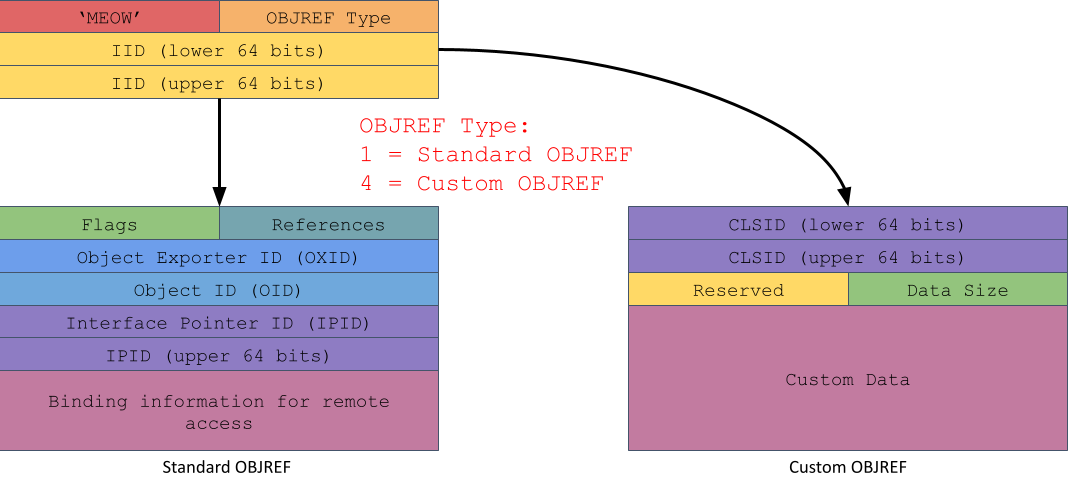
A technique I’ve used multiple times in the past to load an arbitrary DLL into a privileged process is to abuse custom COM marshaling. When you call an interface method which is implemented out-of-process, the COM runtime will marshal the parameters into an RPC call to send to the server. If a parameter is a COM object then the runtime marshals that object into an OBJREF structure that allows the object to be used in the server. The two main types of OBJREFs are shown in the diagram below, or you can read about them in the official DCOM documentation here:

The default COM marshaling strategy is by reference which produces a Standard OBJREF containing all the information needed to connect to the original object. The object might even be on a completely different computer. When the object is unmarshaled this information is used to create an RPC channel back to the caller so that the server can call methods on the object.

The runtime also supports an opt-in marshal by value mechanism if the object implements the IMarshal interface. This allows the object to specify an arbitrary CLSID to use as the unmarshaling object, which doesn’t have to be the same as the object being passed in. When the object is unmarshaled in the server the CLSID is used to lookup an in-process server DLL to load. 

Therefore an obvious technique to exploit the dangling COM object registration is to send a Custom OBJREF to a privileged COM service specifying the CLSID of the dangling object. When unmarshaled, which happens automatically in the runtime before the target method is called, the malicious DLL will be loaded and we’d get privilege escalation. The following code shows how trivial it is to specify the dangling COM class in an IMarshal implementation:

class FakeMarshal : public IMarshal {
    // Inherited via IMarshal
    HRESULT GetUnmarshalClass(REFIID riid, void* pv, 
                              DWORD dwDestContext, void* pvDestContext, 
                              DWORD mshlflags, CLSID* pCid) override
    {
        return CLSIDFromString(L"{E9F83CF2-E0C0-4CA7-AF01-E90C70BEF496}", pCid);
    }
    // ...
};

We need to find a privileged service to send the marshaled COM object to become an administrator. Unfortunately, finding such a service isn’t so simple. The fact that a custom marshaling object will cause an arbitrary DLL to be loaded into the process and code executed is a risky operation, especially across privilege boundaries. Therefore Microsoft implemented a mitigation which can be enabled to disable custom marshaling in the process unless the class is explicitly opted in, or is one of a small number of trusted components such as classes in the runtime library.

Since Windows 8 this mitigation is implemented through two mechanisms, the first and original method is setting the EOAC_NO_CUSTOM_MARSHAL capabilities flag when calling CoInitializeSecurity. The second, added to improve security in AppContainer sandboxes is set through the IGlobalOptions::Set method and specifying the COMGLB_UNMARSHALING_POLICY property type. As we’re not trying to escape from a sandbox the only value of importance is COMGLB_UNMARSHALING_POLICY_STRONG which disables custom marshaling similar to the capabilities flag.

As the dangling COM object isn’t registered as a trusted marshaler this means we need to find a privileged COM server that doesn’t enable these mitigations. The easiest approach is to scan the processes at runtime. The capability flags are stored in the value combase!gCapabilities while the marshaling policy is stored in combase!g_GLBOPT_UnmarshalingPolicy. 

However, I kept thinking there must be a COM service that runs as SYSTEM and doesn’t enable custom marshaling. After a bit of fiddling I found one, although there’s no doubt others. It turned out to be a COM service I’ve researched and exploited before, the Shell Create Object Handler object. This is an interesting COM object, in that while it runs in a SYSTEM service, it’s not directly instantiable:

PS> $cls = Get-ComClass -Clsid 135fd325-45b7-4c30-89f8-4386961669f0
PS> $o = New-ComObject -Class $cls
Exception calling "CreateInstanceAsObject" with "3" argument(s): "Class not registered"

PS> $cls.AppIdEntry | Select Name, RunAs, IsService
Name                        RunAs               IsService
----                        -----               ---------
Shell Create Object Handler nt authority\system     False

Normally, when a COM object is hosted by a privileged service, it’s registered with the name of a system service that RPCSS will start automatically when the object class is requested. However, in this case as there’s no service,creating the object fails with a “Class not registered” error. In order to create the COM server, the service needs to already be running as the SYSTEM user before you call CoCreateInstance. 

Instead you have to start the privileged server via the \Microsoft\Windows\Shell\CreateObjectTask scheduled task. Fortunately this task can be started by normal users, which you can verify with my Get-AccessibleScheduledTask command:

PS> Get-AccessibleScheduledTask -Executable | 
         ? Name -Match Shell\\CreateObjectTask
TokenId  Access                     Name
-------  ------                     ----
77E3156D GenericExecute|GenericRead ...\Shell\CreateObjectTask

Of course just starting this task is not enough, you also need to create a global named event, ShellCreateObjectTaskReadyEvent otherwise the task will immediately exit and not export the COM service. A simple script to create an instance is shown below:

PS> $ev = New-NtEvent -Win32Path "Global\ShellCreateObjectTaskReadyEvent" -InitialState $false
PS> Start-ScheduledTask -TaskPath "\Microsoft\Windows\Shell\" -TaskName "CreateObjectTask"
PS> $ev.Wait()
PS> $o = New-ComObject -Clsid "135fd325-45b7-4c30-89f8-4386961669f0"
PS> $o
InterfaceName Iid
------------- ---
IUnknown      00000000-0000-0000-c000-000000000046

You can verify that the object is hosted in a privileged process with the Get-ComProcess command and checking the CustomMarshalAllowed property. Note this command is currently broken on Windows 11 25H2 due to changing structures that I’ve not had a chance to update, it still works on previous versions.

PS> $objref = Get-ComObjRef -Object $o
PS> $p = Get-ComProcess -ProcessId $objref.ProcessId
PS> $p | Select Name, User, CustomMarshalAllowed
Name    User                CustomMarshalAllowed
----    ----                --------------------
dllhost NT AUTHORITY\SYSTEM                 True

At this point we have everything we need to exploit the dangling COM object, we’ve got a COM service running as SYSTEM with custom marshaling allowed. We can use the CoGetInstanceFromIStorage API to create the object, passing the “fake” marshaled object as the pstg parameter. This object will get marshaled to the COM server process and then unmarshaled unconditionally during object activation. We do need to implement a fake IStorage interface to get it past the local API implementation, which isn’t that difficult but I thought I’d see if there’s an easier way. Let’s look at the supported interfaces:

PS> Get-ComInterface -Object $o

Name                 IID               HasProxy   HasTypeLib     
----                 ---               --------   ----------     
IUnknown             00000000-0000-... False      False          
IMarshal             00000003-0000-... False      False          
IMarshal2            000001cf-0000-... False      False          
ICreateObject        75121952-e0d0-... True       False

PS> Get-ComInterface -Name ICreateObject | ConvertTo-ComSourceCode -Parse
[
  object,
  uuid(75121952-E0D0-43E5-9380-1D80483ACF72),
]
interface ICreateObject : IUnknown {
    HRESULT Proc3([in] GUID* p0, [in] IUnknown* p1, 
                  [in] GUID* p2, [out, iid_is(p2)] IUnknown** p3);
}

The COM object only has one unique interface, ICreateObject. Converting the interface proxy to IDL shows that it takes an IUnknown pointer as its second parameter. Therefore to exploit the dangling COM registration we can just pass the “fake” marshaled object to this parameter and get privileged code execution. I’ve attached an updated, fully working exploit of the bug to the original issue here.

It’s worth noting that while this exploitation technique makes it easy to exploit dangling COM registrations, it can also be used to exploit buggy COM class custom unmarshalers. Sometimes, just the act of loading a DLL into a process can cause a crash. 

Finding the Original Dangling COM Object Registration

As a footnote, a quick way to try and find other dangling COM servers would be to use the following PowerShell script with my OleViewDotNet and NtObjectManager modules installed:

function Test-ComServer {
    param($Server)
    try {
        Use-NtObject($lib = Import-Win32Module -Path $Server -Flags AsDataFile) {
            $true
        }
    } catch {
        $false
    }
}

PS> $db = Get-ComDatabase -LoadMode MachineOnly
PS> $cs = Get-ComClass -Database $db -ServerType InProcServer32
PS> $cs | ? { -not (Test-ComServer $_.DefaultServer) } | 
        Sort DefaultServer | Select Name, DefaultServer

This will print out any in-process COM class from the machine hive where LoadLibrary can’t find the DLL. It’s important to use LoadLibrary via the Import-Win32Module command as some of the COM registrations only specify the file name and you want to ensure these are resolved correctly according to the system path.

This script will find the dangling CrossDevice COM class on an unpatched system. Note, you’ll need to manually inspect the paths to see if a DLL can be planted at that location. You could make it smarter by checking if the path is in a directory that can be written to, or even test if an existing DLL can be modified, but that’s an exercise for the reader.

  • ✇Project Zero
  • Bypassing Administrator Protection by Abusing UI Access James Forshaw
    In my last blog post I introduced the new Windows feature, Administrator Protection and how it aimed to create a secure boundary for UAC where one didn’t exist. I described one of the ways I was able to bypass the feature before it was released. In total I found 9 bypasses during my research that have now all been fixed. In this blog post I wanted to describe the root cause of 5 of those 9 issues, specifically the implementation of UI Access, how this has been a long standing problem with UAC t
     

Bypassing Administrator Protection by Abusing UI Access

12 de Fevereiro de 2026, 05:00

In my last blog post I introduced the new Windows feature, Administrator Protection and how it aimed to create a secure boundary for UAC where one didn’t exist. I described one of the ways I was able to bypass the feature before it was released. In total I found 9 bypasses during my research that have now all been fixed.

In this blog post I wanted to describe the root cause of 5 of those 9 issues, specifically the implementation of UI Access, how this has been a long standing problem with UAC that’s been under-appreciated, and how it’s being fixed now.

A Question of Accessibility

Prior to Windows Vista any process running on a user’s desktop could control any window created by another, such as by sending window messages. This behavior could be abused if a privileged user, such as SYSTEM, displayed a user interface on the desktop. A limited user could control the UI and potentially elevate privileges. This was referred to as a Shatter Attack, and was usually fixed by removing user interface components from privileged code.

As UAC encouraged running processes at different privilege levels on the same desktop, Microsoft introduced an additional feature, User Interface Privacy Isolation (UIPI). This used the Mandatory Integrity Control feature in UAC to limit what windows a process could interact with. If the integrity level of a process was lower than the process which created a window then it would be blocked from operations such as sending messages to that window. As an additional protection, Vista no longer ran user processes on the “service” desktop so that even if UIPI was inadequate a user interface exposed by a service process was not accessible to limited processes.

To take an example, a limited user process has an assigned integrity level of “Medium” while a UAC administrator process is “High”. In this case UIPI would block the limited user process sending messages to any window created by the administrator process, excluding a small set of explicitly permitted messages. It would also block other UI functionality such as windows hooks.

This introduced a problem for any user who relied on accessibility technology, such as screen readers. If the accessibility process was running as the limited user it could no longer interact with administrator processes created on the desktop. It would be blocked from both reading the contents of windows as well as performing operations such as clicking a button. This was not an acceptable compromise, so Vista needed a way to allow these applications to continue to work.

The solution Microsoft chose was to allocate a flag for the access token of a process called UI Access. If the process’ access token had this flag set when it initialized its connection to the Win32 subsystem, the process would be granted special permissions to bypass many of the restrictions imposed by UIPI. Enabling this flag through a call to NtSetInformationToken with the TokenUIAccess information class was gated behind a check for SE_TCB_NAME privilege, and so it couldn’t be performed by a limited user. Therefore in order to create a UI Access capable process a system service was necessary to enable the flag and create the new process.

UAC already needed a system service, so creating a UI Access process was made part of the same flow that was used for launching an administrator process through the RAiLaunchAdminProcess RPC call. When a UI Access process is created through this RPC call it does not show the consent prompt unlike administrator elevation. This is important as otherwise there was a risk that a user couldn’t create the accessibility application needed by them to click the consent prompt for elevation.

In order to prevent malware just claiming to be an accessibility application the service imposed some additional checks on the executable file which must be met to enable the UI access flag on the new process:

  • It must have an embedded manifest with the uiAccess attribute set to true.
  • It must be signed by a code signing certificate that’s trusted by the local machine root certificate store. There was no special requirement for the certificate outside of this, for example it doesn’t need to have a special EKU or cross signing by Microsoft.
  • It must be stored in an administrator only location on the system drive, such as:
    • The Program Files directory
    • The Windows directory (excluding some known writable locations)
    • The System32 directory (excluding some known writable locations)

If all the criteria are met then when the process is launched via RAiLaunchAdminProcess the service will take a copy of the caller’s access token, enable the UI Access flag and increase the integrity level as follows based on the caller:

  • If the caller is a limited user of an UAC administrator it will set the integrity level to High.
  • If the caller is an administrator then it will set the integrity level to High (normally a no-op).
  • If the caller is a normal user, the integrity level is set to the caller’s integrity plus 16 up to a maximum of High.

A High integrity level is the absolute maximum allowed to be set, although there exists a higher level, “System” that’s reserved for service processes. Also note that the integrity level of the token is not changed if the caller already has the UI Access flag enabled, this is only important for normal users who don’t automatically get set to High integrity. One benefit of setting an elevated integrity level is the created process cannot be opened for read or write access by a lower integrity process, preventing a limited user from injecting code into the new process and by extension getting access to the UI Access flag.

As an aside, you can disable the UI Access flag on the token without TCB privilege. A valid UI Access process running as a normal user can “ratchet” itself up to High integrity by clearing the flag on its own token then respawning another copy of itself via the UAC service. As there’s 4096 levels between Medium and High that would require calling the UAC service 255 times which is a little on the noisy side but it does work.

Importantly, the UI Access flag only permits bypassing a limited set of operations such as sending window messages to other higher integrity processes. It doesn’t permit using things like windows hooks which allow for code injection into a process. Therefore for a UI Access process running as a normal user with integrity level less than High it can interact with a spawned administrator process through messages, but it couldn’t do something more invasive like hooking the window message queue.

However, if a limited user creates a UI access process, it would run with a High integrity level and could take over any administrator process that contains a window. A service process with a System integrity level could only be interacted with using windows messages. But there’s no security boundary between an administrator and a system service so this is meaningless in practice.

The end result is having the UI Access flag without having a High integrity level isn’t sufficient to trivially compromise an administrator process, you would need the process to expose a user interface that could be automated to get privileged code to run. For example, an administrator command prompt can be sent key strokes to run an arbitrary command.

However, if you have the same integrity level as the target process, the UI Access flag becomes irrelevant and you can directly compromise the process with at least one window by using windows hooks to inject a DLL. This window doesn’t need to present a user interface, in fact technologies such as COM use message-only windows under the hood that can be used to compromise the process without ever showing anything to the user.

Of course this is how things worked in UAC, but what about the new and improved Administrator Protection? Exactly the same as for the existing admin-approval UAC. The UI Access process will run under the caller’s token, which in this case will be the limited user, not the shadow administrator. The process will have the UI Access flag enabled as well as the integrity level set to High.

This is a problem, having a process running at High integrity level allows you to compromise any other process running at that level on the same desktop even if that process runs as a different user. As the UI Access process is running as the limited user there’s no profile separation which is one of the key improvements in Administrator Protection.

The elevation to High integrity is also silent, so at a minimum it’d be possible to break the security boundary without prompting the user, assuming there was a suitable administrator process to exploit. All we now need is a way of getting arbitrary code execution in a High integrity UI Access process. Fortunately, there are plenty of ways of doing this.

Achieving Arbitrary UI Access Execution

Over the years there’s been a number of ways to get arbitrary code executing as a High integrity level UI Access process. While Microsoft had made it clear that they were not a priority to be fixed, they sometimes were. Let’s break it down in a series of categories with some historical detail as well as my more recent research.

Bypassing the Secure Application Directory Check

One approach to getting arbitrary code to run is by bypassing the secure directory location check in the UAC service. If you could bypass this check, you could place either your own signed executable, or an existing executable that can be hijacked, say through DLL planting.

One approach is to find a bug in the AiCheckSecureApplicationDirectory method in appinfo.dll which implements the check. This method first opens the file path provided via RAiLaunchAdminProcess, then calls GetFinalPathNameByHandle on the handle to ensure the path isn’t redirected to an insecure location. It then does a simple string check on the path looking for included and excluded directories. I found a bypass for the check back in 2017 and reported it to MSRC. The check didn’t take into account that it’s possible to write an NTFS named stream to a directory if the limited user has write access to that directory.

For example the directory C:\Windows\tracing is writable by a limited user but the tracing subdirectory is explicitly excluded in the check so that C:\Windows\tracing\file.exe would not be considered secure. However, with the same access you could write a named stream on the directory so that C:\Windows\tracing:file.exe would be considered inside the C:\Windows directory and thus secure. This bug wasn’t fixed as a security bulletin but it did eventually get resolved in a later version of Windows and is not applicable to Windows 11.

Another approach is to find a writable file or directory in a secure location that is not explicitly excluded in the check. If you find a writable file then you could overwrite it with the executable file as the CreateProcessAsUser API used by the UAC service doesn’t need a specific file extension for the executable file to be used. If you find a directory then you can just copy the executable file into that location.

On a default installation there doesn’t seem to be any location that’s not covered. One location I did find during the research is that sometimes on major Windows updates the Tasks directory is copied to the Tasks_Migrated directory as a backup. This backup directory is writable like the original Tasks and was not included in the list of excluded directories. However, you have no known way of forcing it to be created, and since I pointed it out Microsoft have added it to the list of directories to exclude.

Note: Microsoft did forget to add a check for named streams on Tasks_Migrated, however due to the access control on the directory it’s not possible to exploit as a normal user.

You can use my PowerShell tools to find potential candidates using the following command. For best results run it as an administrator and replace <PID> with a process ID of a limited user process. It doesn’t filter out excluded directories, so you’d have to check yourself.

PS> $paths = "C:\Windows","C:\Program Files","C:\Program Files (x86)"
PS> Get-AccessibleFile -Win32Path $paths -Access Execute,WriteData `
       -DirectoryAccess AddFile -Recurse -ProcessId <PID>

A final approach is finding a way to write a file to an existing secure location though a separate mechanism that doesn’t require bypassing the access control of that directory. I found just such an issue in my recent research. The Windows installer will install MSIX files into the C:\Program Files\WindowsApps directory, which is not excluded by the check. Windows 11 is configured by default to permit installing signed MSIX files without needing administrator privileges.

Therefore you can package up a UI Access executable into an MSIX installer, sign the installer with an arbitrary certificate then when installed the executable will be in a secure location. Of course to do this you’d need a code signing certificate but that isn’t as big of a challenge as it seems. You might even be able to slip the signed UI Access executable file into a store application if you were so inclined. But this is now fixed as the WindowsApps directory is also excluded.

Interestingly there is a uiAccess restricted capability you can add to the manifest when building the MSIX which will elevate the packaged executable to High integrity UI Access. However, when you do that, installing the package requires administrator privileges as shown below and so it’s not a bypass.

Windows dialog showing the installation of a PoC application which has the uiAccess capability set. It's requiring running the installer as an administrator.

Repurposing an Existing Secure UI Access Executable

A second category is finding functionality inside an UI Access capable executable file that’s already in a secure location that can be abused. You have full control over the UI Access process’ command line, perhaps there’s an option to load an arbitrary DLL?

Before you can find exploitable behavior you need to find candidate executables that you can reverse engineer. You can use my PowerShell tools to find executable files which have the uiAccess manifest option set to true.

PS> $paths = "C:\Windows","C:\Program Files","C:\Program Files (x86)"
PS> Get-ChildItem -Path $paths -Include *.exe -Recurse | 
  % { 
       Get-Win32ModuleManifest $_.FullName 
  } | Where-Object UiAccess | Select-Object -ExpandProperty FullPath

With the list of candidates you’ll need to do some reverse engineering. I’ll leave that up to you.

Shared Profile and Environment

One of the big changes in Administrator Protection was the separation of the shared profile between the limited user and the administrator. The goal was to prevent privilege escalation by modifying the user’s profile on disk or the registry. Unfortunately as UI Access processes are created based on the limited user, the same as it was with UAC, this separation doesn’t apply and you can find ways of exploiting this behavior.

A simple way of inspecting for potential exploitable behavior is to run Process Monitor and capture events accessing the limited user’s registry hive or profile directory. It’s also possible to hijack things like the user’s C: drive mapping as the logon session is the same between the limited user and its UI Access processes.

Screenshot of process monitor showing osk.exe accessing registry keys in the current user's registry hive.

This is a well known issue with UI Access and UAC so when I found it in Administrator Protection I didn’t really need to report it, but felt I should. To ensure it got handled appropriately I found a specific exploitable condition and sent an accompanying proof-of-concept. In this case I found that the On-Screen Keyboard loaded a DLL from a path based on the CommonProgramFiles environment variable. By overriding this variable in the user’s registry hive I could redirect the DLL load and get arbitrary code execution in the UI Access process.

During my research I stumbled upon a public bypass, originally for UAC but it still worked with Administrator Protection. This bypass was in the Quick Assist application, which seems to be an optional component but is installed by default on Windows 11. It abused the fact that the Quick Assist application would load the WebView2 APIs to display HTML content. WebView2 would look in the user’s hive for an overridable installation location to load its library, by overriding this to a location under the user’s control it’s possible to force a DLL to be loaded into the UI Access process.

One of the most interesting aspects of this bypass is it uses an API I didn’t know existed, GetProcessHandleFromHwnd, to get a kernel handle to the process which created a window to get arbitrary code execution in the UI Access process.

Exploit RAiLaunchAdminProcess

To launch a UI Access process, the shell calls the RAiLaunchAdminProcess RPC method in the UAC service. As is all too common with APIs that are not directly exposed or documented they can hide functionality that can result in exploitable behavior.

I reported two issues that allowed me to get arbitrary code execution in a UI Access process, one was a publicly known bypass while the other was a TOCTOU in the handling of the path to the executable file. The public bypass was described by myself in a blog post about using my PowerShell tooling to call local RPC methods. The example I gave was of calling RAiLaunchAdminProcess and abusing the fact the service doesn’t sanitize the process creation flags.

You could pass the DEBUG_PROCESS flag, and from that get full control over the created process. The blog post described this in the context of a UAC bypass, but of course it applied equally well to UI Access processes as I detailed in the report I sent to MSRC. This was one of those bugs that I was concerned hadn’t been remediated during the development of Administrator Protection, but as it was just a UAC bypass it’d clearly slipped through the cracks.

The second issue is in the handling of the path to the executable file, which allows us to compromise a UI Access process. The RAiLaunchAdminProcess RPC method has a very similar set of parameters to the CreateProcessAsUser API that’s ultimately called to create the new process. This includes having a separate string representing the path to the executable to create and the command line to pass to the new process.

As I already described in the section on the secure application directory check, the validation is not done using the untrusted path string provided by the user but instead the file is opened and the final resolved path extracted to do the comparison. However, this resolved path is only used during the check, when it comes to create the process the original untrusted path is passed to CreateProcessAsUser’s lpApplicationName parameter.

For example, if you passed the path Z:\osk.exe as the executable file the service would try to open that path then resolve the final name. If the Z: drive was mapped to the C:\Windows\system32 directory it would find the executable located at C:\Windows\system32\osk.exe which would be a permitted secure directory. However, Z:\osk.exe would then be passed as lpApplicationName to CreateProcessAsUser.

What use is this? The new process needs a base directory from where it’ll check for local DLL loads, and the CreateProcessAsUser API uses the lpApplicationName parameter, with the executable filename removed, for this base directory. This means that you can start a UI Access process using the Z:\osk.exe path; it will try to load unknown DLLs first from the Z:\ directory. If you remap the Z: drive to an untrusted location between the process being created and when it tries to load DLLs you can force an untrusted DLL to be loaded into the process and get arbitrary code execution. This is easy to do, as the UI Access process can be created suspended by passing the CREATE_SUSPENDED when calling RAiLaunchAdminProcess, remapping the drive, then resuming the process.

Access Token Stealing

The final category I’ll mention is access token stealing. This is somewhat different from the others as you commonly can’t get High integrity level from it, instead you get a process with the UI Access flag enabled which can be used to control higher integrity UI, just not abuse things like windows hooks.

As I described in an old blog post, if you create a UI Access process, you can open the process’ access token, duplicate it, reduce the integrity level to Medium and finally create a new process using that token. No step in that process disabled the UI Access flag on the token.

Subsequent to the blog post Microsoft made a change. Now if the integrity level of a token is reduced via the NtSetInformationToken system call, it will also disable the UI Access flag. If you can’t reduce the integrity level to Medium it’s not possible to impersonate the token or use it for a new process, thereby mitigating the issue.

However, I noticed that there are some places in the kernel that lower the integrity level of the token which do not go through NtSetInformationToken and thus do not end up disabling the UI Access flag. One option was the creation of an App Container token via the NtCreateLowBoxToken system call. This will set the integrity level to Low which will allow the new token to be used to create a process. Even though the process would then run in an App Container sandbox it was still sufficient to send arbitrary window messages to more privileged processes.

Silently Bypass Windows Administrator Protection

Let’s assume we now have code execution in a High integrity level UI Access process. How do we exploit that to bypass Administrator Protection? We need a process to be created silently as the shadow administrator that creates a window during its execution. From that we can use the SetWindowsHookEx, to force an arbitrary DLL to be loaded into the new process.

The best vector I found was using the fact that scheduled tasks can be configured to run with administrator privileges when executed. This still works when Administrator Protection is enabled, just the task process runs as the shadow administrator. We need a task that is enabled, can be started by the limited user and runs with administrator privileges. We can use my PowerShell tools Get-AccessibleScheduledTask command to find one:

PS> Get-AccessibleScheduledTask -Access Execute | 
   ? { $_.AllowDemandStart -and $_.Enabled -and ($_.RunLevel -eq "Highest") } |
   Select-Object Name

Name
----
\Microsoft\Windows\DiskCleanup\SilentCleanup
\Microsoft\Windows\Input\LocalUserSyncDataAvailable
\Microsoft\Windows\Input\MouseSyncDataAvailable
...

The first task in the list SilentCleanup is well known to me. It’s been used multiple times to bypass UAC, such as by abusing the fact it uses environment variables to find the executable file which a limited user can override. Unexpectedly the issue with environment variables wasn’t fixed in the version of Administrator Protection I tested, so I reported that as a separate issue.

If we ignore the issue in handling environment variables, we can abuse this task as it’ll create a window when the process runs, so we just setup a hook, start the task, wait for your hook DLL to be loaded by the cleanmgr.exe process and you’ve bypassed administrator protection. You can find a full PoC using this approach here.

Note: If you want to use the GetProcessHandleFromHwnd API, like the QuickAssist public bypass does, you’ll probably need to win a race between the process creating a window and it terminating. For example, QuickAssist uses a file oplock to cause the task process to hang when it opens a specific file. If you use the windows hooks approach you don’t need to worry about this.

Conclusions

All of the issues I reported were fixed, but that doesn’t mean there’s nothing left to find. Hopefully it’s a little bit harder than before. However, it’s still the case that if you can get code execution in a High integrity level process, with UI Access enabled or not, then you can leverage that to bypass Administrator Protection. Hopefully anything which is now found allowing code execution in a UI Access process is a serviceable security vulnerability and will be fixed.

One big change to UI Access processes over the original design of Administrator Protection is they now no longer run as the limited user. This change was introduced to fix issue 437868751. Instead they are created with a filtered copy of the shadow administrator token. This eliminates the shared profile issues, introducing much clearer separation between the administrator processes and the limited user.

Time will tell whether Administrator Protection is successful as a security boundary or not. Microsoft is taking it seriously, but more rigorous testing during development would have prevented many pre existing UAC bypasses from being missed. I’d recommend anyone interested in this feature to take a look now it’s released and the previously known bugs have been fixed.

  • ✇Project Zero
  • Bypassing Windows Administrator Protection James Forshaw
    A headline feature introduced in the latest release of Windows 11, 25H2 is Administrator Protection. The goal of this feature is to replace User Account Control (UAC) with a more robust and importantly, securable system to allow a local user to access administrator privileges only when necessary. This blog post will give a brief overview of the new feature, how it works and how it’s different from UAC. I’ll then describe some of the security research I undertook while it was in the insider prev
     

Bypassing Windows Administrator Protection

26 de Janeiro de 2026, 05:00

A headline feature introduced in the latest release of Windows 11, 25H2 is Administrator Protection. The goal of this feature is to replace User Account Control (UAC) with a more robust and importantly, securable system to allow a local user to access administrator privileges only when necessary.

This blog post will give a brief overview of the new feature, how it works and how it’s different from UAC. I’ll then describe some of the security research I undertook while it was in the insider preview builds on Windows 11. Finally I’ll detail one of the nine separate vulnerabilities that I found to bypass the feature to silently gain full administrator privileges. All the issues that I reported to Microsoft have been fixed, either prior to the feature being officially released (in optional update KB5067036) or as subsequent security bulletins.

Note: As of 1st December 2025 the Administrator Protection feature has been disabled by Microsoft while an application compatibility issue is dealt with. The issue is unlikely to be related to anything described in this blog post so the analysis doesn’t change.

The Problem Administration Protection is Trying to Solve

UAC was introduced in Windows Vista to facilitate granting a user administrator privileges temporarily, while the majority of the user’s processes run with limited privileges. Unfortunately, due to the way it was designed, it was quickly apparent it didn’t represent a hard security boundary, and Microsoft downgraded it to a security feature. This was an important change as it made it no longer a priority to fix bypasses of the UAC which allowed a limited process to silently gain administrator privileges.

The main issue with the design of UAC was that both the limited user and the administrator user were the same account just with different sets of groups and privileges. This meant they shared profile resources such as the user directory and registry hive. It was also possible to open an administrators process’ access token and impersonate it to grant administrator privileges as the impersonation permission checks didn’t originally consider if an access token was “elevated” or not, it just considered the user and the integrity level.

Even so, on Vista it wasn’t that easy to silently acquire administrator privileges as most routes still showed a prompt to the user. Unfortunately, Microsoft decided to reduce the number of elevation prompts a user would see when modifying system configuration and introduced an “auto-elevation” feature in Windows 7. Select Microsoft binaries could be opted in to be automatically elevated. However, it also meant that in some cases it was possible to repurpose the binaries to silently gain administrator privileges. It was possible to configure UAC to always show a prompt, but the default, which few people change, would allow the auto-elevation.

A good repository of known bypasses is the UACMe tool which currently lists 81 separate techniques for gaining administrator privileges. A proportion of those have been fixed through major updates to the OS, even though Microsoft never officially acknowledges when a UAC bypass is fixed. However, there still exist silent bypasses that impact the latest version of Windows 11 that remain unfixed.

The fact that malware is regularly using known bypasses to gain administrator privileges is what Administrator Protection aims to solve. If the weaknesses in UAC can be mitigated then it can be made a secure boundary which not only requires more work to bypass but also any vulnerabilities in the implementation could be fixed as security issues.

In fact there is already a more secure mechanism that UAC can use that doesn’t suffer from many of the problems of the so-called “admin approval” elevation. This mechanism is used when the user is not a member of the administrators group, it’s referred to as “over-the-shoulder” elevation. This mechanism requires a user to know the credentials of a local administrator user which must be input into the UAC elevation prompt. It’s more secure than admin approval elevation for the following reasons:

  • The profile data is no longer shared, which prevents the limited user from modifying files or registry keys which might be used by an elevated administrator process.
  • It’s no longer possible to get an access token for the administrator user and impersonate it as limited users cannot impersonate other user accounts.
  • Auto-elevation of Microsoft binaries is not supported, all elevation requests require confirmation through a prompt.

Unfortunately, the mechanism is difficult to use securely in practice as sharing the credentials to another local administrator account would be a big risk. Thus it’s primarily useful as a means for technical support where a sysadmin types in the credentials over the user’s shoulder.

Administrator Protection improves on over-the-shoulder elevation by using a separate shadow administrator account that is automatically configured by the UAC service. This has all the benefits of over-the-shoulder elevation plus the following:

  • The user does not need to know the credentials for the shadow administrator as there aren’t any. Instead UAC can be configured to prompt for the limited user’s credentials, including using biometrics if desired.
  • A separate local administrator account isn’t required, only the user needs to be configured to be a member of the administrators group making deployment easier.

While Microsoft is referring to Administrator Protection as a separate feature it can really be considered a third UAC mechanism as it uses the same infrastructure and code to perform elevation, just with some tweaks. However, the feature replaces admin-approval mode so you can’t use the “legacy” mode and Administrator Protection at the same time. If you want to enable it there’s currently no UI to do so but you can modify the local security policy to do so.

The big question, will this make UAC a securable boundary so malware no longer has a free ride? I guess we better take a look and find out.

Researching Administrator Protection

I typically avoid researching new Windows features before they’re released. It hasn’t been a good use of time in the past where I’ve found a security issue in a new feature during the insider preview stages only for that bug to be due to temporary code that is subsequently removed. Also if security issues are fixed in the insider preview stage they do not result in a security bulletin, making it harder to track when something is fixed. Therefore, there’s little incentive to research features until they are released when I can be confident any bugs that are discovered are real security issues and they’re fixed in a timely manner.

This case was slightly different, Microsoft reached out to me to see if I wanted to help them find issues in the implementation during the insider preview stage. No doubt part of the reason they reached out was my history of finding complex logical UAC bypasses. Also, I’d already taken a brief look and noted that the feature was still vulnerable to a few well known public bypasses such as my abuse of loopback Kerberos.

I agreed to look at a design document and provide feedback without doing a full “pentest”. However, if I did find issues, considering the goal was for Administration Protection to be a securable boundary I was assured that they would be fixed through a bulletin, or at least would be remediated before the final release of the feature.

The Microsoft document provided an overview, but not all design details. For example, I did have a question around what the developers considered the security boundary. In keeping with the removal of auto-elevation I made the assumption that bypassing the boundary would require one or more of the following:

  • Compromising the shadow administrators profile, such as writing arbitrary files or registry keys.
  • Hijacking an existing process running as the shadow administrator.
  • Get a process executing as an administrator without showing a prompt.

The prompt being a boundary is important, there’s a number of UAC bypasses, such as those which rely on elevated COM objects that would still work in Administrator Protection. However as auto-elevation is no longer permitted they will always show a prompt, therefore these are not considered bypasses. Of course, what is shown in the prompt, such as the executable being elevated, doesn’t necessarily correlate with the operation that is about to be performed with administrator rights.

In the document there was some lack of consideration of some associated UAC features such as UI Access processes (this will be discussed in part 2 of this series) but even so some descriptions stuck out to me. Therefore, I couldn’t help myself and decided to at least take a look at the current implementation in the canary build of insider preview. This research was a mix of reverse engineering of the UAC service code in appinfo.dll as well as behavioral analysis.

At the end of the research I found 9 separate means to bypass the feature and silently gain administrator privileges. Some of the bypasses were long standing UAC issues with publicly available test cases. Others were due to implementation flaws in the feature itself. But the most interesting bug class was where there wasn’t a bug at all, until the rest of the OS got involved.

Let’s dive into this most interesting bypass I identified during the research. If you want to skip ahead you can read the full details on the issue tracker. This issue is interesting, not just because it allowed me to bypass the protection but also because it was a potential UAC bypass that I had known about for many years, but only became practically exploitable because of the introduction of this feature.

Logon Sessions

First a little bit of background knowledge to understand the vulnerability. When a user authenticates to a Windows system successfully they’re assigned a unique logon session. This session is used to control the information about the user, for example it keeps a copy of the user’s credentials so that they can be used for network authentication.

The logon session is added as a reference in the access token created during the logon process, so that it can be easily referred to during any kernel operations using the token. You can find the unique 64-bit authentication ID for the session by querying the token using the NtQueryInformationToken system call. In UAC, separate logon sessions are assigned to the limited and the linked administrator access tokens as shown in the following script where you can observe that the limited token and linked token have distinct authentication ID LUID values:

# Get authentication ID of current token
PS> Get-NtTokenId -Authentication
LUID
----
00000000-11457F17

# Query linked administrator token and get its authentication ID.
PS> $t = Get-NtToken -Linked
PS> Get-NtTokenId -Authentication -Token $t
LUID
----
00000000-11457E9E

One important place the logon session is referenced by the kernel is when looking up DOS drive letters. From the kernels perspective drive letters are stored in a special object directory \??. When this path is looked up by the kernel it’ll first see if there’s a logon session specific directory to check, this is stored under the path \Sessions\0\DosDevices\X-Y, where X-Y is the hexadecimal representation of the authentication ID for the logon session. If the drive letter symbolic link isn’t found in that directory the kernel falls back to checking the \GLOBAL?? directory. You can observe this behavior by opening the \?? object directory using the NtOpenDirectoryObject system call as shown:

PS> $d = Get-NtDirectory "\??"
PS> $d.FullPath
\Sessions\0\DosDevices\00000000-11457f17

It’s well known that if you can write a symbolic link to a DOS device object directory you can hijack the C: drive of any process running with that access token in that logon session. Even though the C: drive is defined in the global object directory, the logon session specific directory is checked first and so it can be overridden.

If a user can write into another logon session’s DOS device object directory they can redirect any file access to the system drive. For example you could redirect system DLL loading to force arbitrary code to run in the context of a process running in that logon session. In the case of UAC this isn’t an issue as the separate DOS device object directories have different access control and therefore the limited user can’t hijack the C: drive of an administrator process. The access control for the administrator’s DOS device object directory is shown below:

PS> Get-NtTokenSid
Name           Sid
----           ---
DOMAIN\user    S-1-5-21-5242245-89012345-3239842-1001

PS> $d = Get-NtDirectory "\??"
PS> Format-NtSecurityDescriptor $d -Summary
<Owner> : BUILTIN\Administrators
<Group> : DOMAIN\Domain Users
<DACL>
NT AUTHORITY\SYSTEM: (Allowed)(ObjectInherit, ContainerInherit)(Full Access)
BUILTIN\Administrators: (Allowed)(ObjectInherit, ContainerInherit)(Full Access)
BUILTIN\Administrators: (Allowed)(None)(Full Access)
CREATOR OWNER: (Allowed)(ObjectInherit, ContainerInherit, InheritOnly)(GenericAll)

Creating a DOS Device Object Directory

A question you might have is who creates this DOS device object directory? It turns out the kernel creates it on demand when the directory is first accessed. The code to do the creation is in SeGetTokenDeviceMap, which looks roughly like the following:

NTSTATUS SeGetTokenDeviceMap(PTOKEN Token, PDEVICE_MAP *ppDeviceMap) {
  *ppDeviceMap = Token->LogonSession->pDeviceMap;
  if (*ppDeviceMap) {
    return STATUS_SUCCESS;
  }
  WCHAR path[64];
    swprintf_s(
      path,
      64,
      L"\\Sessions\\0\\DosDevices\\%08x-%08x",
      Token->AuthenticationId.HighPart,
      Token->AuthenticationId.LowPart);
  PUNICODE_STRING PathString;
  RtlInitUnicodeString(&PathString, path);
  OBJECT_ATTRIBUTES ObjectAttributes;
  InitializeObjectAttributes(&ObjectAttributes, 
                             &PathString, 
                             OBJ_CASE_INSENSITIVE |
                             OBJ_OPENIF |
                             OBJ_KERNEL_HANDLE |
                             OBJ_PERMANENT, 0, NULL);
  HANDLE Handle;
  NTSTATUS status = ZwCreateDirectoryObject(&Handle, 
                                            0xF000F, 
                                            &ObjectAttributes);
  if (NT_ERROR(status)) {
    return status;
  }
  status = ObpSetDeviceMap(Token->LogonSession, Handle);
  if (NT_ERROR(status)) {
    return status;
  }
  *ppDeviceMap = Token->LogonSession->pDeviceMap;
  return STATUS_SUCCESS;
}

One thing you might notice is that the object directory is created using the ZwCreateDirectoryObject system call. One important security detail of using a Zw system call in the kernel is it disables security access checking unless the optional OBJ_FORCE_ACCESS_CHECK flag is set in the OBJECT_ATTRIBUTES, which isn’t the case here.

Bypassing access checking is necessary for this code to function correctly; let’s look at the access control of the \Sessions\0\DosDevices directory.

PS> Format-NtSecurityDescriptor -Path \Sessions\0\DosDevices -Summary
<Owner> : BUILTIN\Administrators
<Group> : NT AUTHORITY\SYSTEM
<DACL>
NT AUTHORITY\SYSTEM: (Allowed)(ObjectInherit, ContainerInherit)(Full Access)
BUILTIN\Administrators: (Allowed)(ObjectInherit, ContainerInherit)(Full Access)
CREATOR OWNER: (Allowed)(ObjectInherit, ContainerInherit, InheritOnly)(GenericAll)

The directory cannot be written to by a non-administrator user, but as this code is called in the security context of the user it needs to disable access checking to create the directory as it can’t be sure the user is an administrator. Importantly the access control of the directory has an inheritable rule for the special CREATOR OWNER group granting full access. This is automatically replaced by the assigned owner of the access token used during object creation.

Therefore even though the access checking has been disabled the final directory that’s created can be accessed by the caller. This explains how the UAC administrator DOS device object directory blocks access to the limited user. The administrator token is created with the local administrators group set as its owner and so that’s what CREATOR OWNER is replaced with. However, the limited user can only set their own SID as the owner and so it just grants access to the user.

How is this useful? I noticed a long time ago that this behavior is a potential UAC bypass, in fact it’s a potential EoP, but UAC bypass was the most likely outcome. Specifically it’s possible to get a handle to the access token for the administrator user by calling NtQueryInformationToken with the TokenLinkedToken information class. For security reasons this token is limited to SecurityIdentification impersonation level so it can’t be used to grant access to any resources.

However if you impersonate the token and open the \?? directory then the kernel will call SeGetTokenDeviceMap using the identification token and if it’s not currently created it’ll use ZwCreateDirectoryObject to create the DOS device object directory. As access checking is disabled the creation will still succeed, however once it’s created the kernel will do an access check for the directory itself and will fail due to the identification token being impersonated.

This might not seem to get us very much, while the directory is created it’ll use the owner from the identification token which would be the local administrator’s group. But we can change the token’s owner SID to the user’s SID before impersonation, as that’s a permitted operation. Now the final DOS device object directory will be owned by the user and can be written to. As there’s only a single logon session used for the administrator side of UAC then any elevated process can now have its C: directory hijacked.

There’s just one problem with this as a UAC bypass, I could never find a scenario where the limited user got code running before any administrator process was created. Once the process was created and running there’s almost a certainty that some code would open a file and therefore access the \?? directory. By the time the limited user has control the DOS device object directory has already been created and assigned the expected access control. Still as UAC is not a security boundary there was no point reporting it, so I filed this behavior away for another day in case it ever became relevant.

Bypassing Administrator Protection

Fast forward to today, and along comes Administrator Protection. For reasons of compatibility Microsoft made calling NtQueryInformationToken with the TokenLinkedToken information class still returns an identification handle to the administrator token. But in this case it’s the shadow administrator’s token instead of the administrator version of the user’s token. But a crucial difference is while for UAC this token is the same every time, in Administrator Protection the kernel calls into the LSA and authenticates a new instance of the shadow administrator. This results in every token returned from TokenLinkedToken having a unique logon session, and thus does not currently have the DOS device object directory created as can be seen below:

PS> $t = Get-NtToken -Linked
PS> $auth_id = Get-NtTokenId -Authentication -Token $t
PS> $auth_id
LUID
----
00000000-01C23BB3

PS> Get-NtDirectory "\Sessions\0\DosDevices\$auth_id"
Get-NtDirectory : (0xC0000034) - Object Name not found.

While in theory we can now force the creation of the DOS device object directory, unfortunately this doesn’t help us much. As the UAC service also uses TokenLinkedToken to get the token to create the new process with it means every administrator process currently running or will run in the future doesn’t share logon sessions, thus doesn’t share the same DOS device object directories and we can’t hijack their C: drives using the token we queried in our own process.

To exploit this we’d need to use the token for an actual running process. This is possible, because when creating an elevated process it can be started suspended. With this suspended process we can open the process token for reading, duplicate it as an identification token then create the DOS device object directory while impersonating it. The process can then be resumed with its hijacked C: drive.

There’s only two problems with this as a bypass, first creating an elevated process suspended will require clicking through an elevation prompt. For UAC with auto-elevation this wasn’t a problem, but for Administrator Protection it will always prompt, and showing a prompt isn’t considered to be crossing the security boundary. There are ways around this, for example the UAC service exposes the RAiProcessRunOnce API which will run an elevated binary silently. The only problem is the process isn’t suspended and so you’d have to win a race condition to open the process and perform the bypass before any code runs in that process. This is something which should be doable, say by playing with thread priorities to prevent the new process’ main thread from being scheduled.

The second issue seems more of a deal breaker. When setting the owner for an access token it will only allow you to set a SID that’s either the user SID for the token, or a member group that has the SE_GROUP_OWNER flag set. The only group with the owner flag is the local administrators group, and of course the shadow administrator’s SID differs from the limited user’s. Therefore setting either of these SIDs as the owner doesn’t help us when it comes to accessing the directory after creation.

Turns out this isn’t a problem as I was not telling the whole truth about the owner assignment process. When building the access control for a new object the kernel doesn’t trust the impersonation token if it’s at identification level. This is for a good security reason, an identification token is not supposed to be usable to make access control decisions, therefore it makes no sense to assign its owner when creating the object. Instead the kernel uses the primary token of the process to make that decision, and so the assigned owner is the limited user’s SID. In fact setting the owner SID for the UAC bypass was never necessary, it was never used. You can verify this behavior by creating an object without a name so that it can be created while impersonating an identification token and checking the assigned owner SID:

PS> $t = Get-NtToken -Anonymous
# Impersonate anonymous token and create directory
PS> $d = Invoke-NtToken $t { New-NtDirectory }
PS> $d.SecurityDescriptor.Owner.Sid.Name
NT AUTHORITY\ANONYMOUS LOGON
# Impersonate at identification level
PS> $d = Invoke-NtToken $t -ImpersonationLevel Identification {
      New-NtDirectory
}
PS> $d.SecurityDescriptor.Owner.Sid.Name
DOMAIN\user

One final question you might have is how come creating a process with the shadow admin’s token doesn’t end up accessing some DOS drive’s file resource as that user thus causing the DOS device object directory to be created? The implementation of the CreateProcessAsUser API runs all its code in the security context of the caller, regardless of what access token is being assigned so by default it wouldn’t ever open a file under the new logon session.

However, if you know about how to securely create a process in a system service you might expect that you’re supposed to impersonate the new token over the call to CreateProcessAsUser to ensure you don’t allow a user to create a process for an executable file they can’t access. The UAC service is doing this correctly, so surely it must have accessed a drive to create the process and the DOS device object directory should have been created, why isn’t it?

In a small irony what’s happening is the UAC service is tripping over a recently introduced security mitigation to prevent the hijack of the C: drive when impersonating a low privileged user in a system service. This mitigation kicks in if the caller of a system call is the SYSTEM user and it’s trying to access the C: drive. This was added by Microsoft in response to multiple vulnerabilities in manifest file parsing, if you want an overview here’s a video of the talk me and Maddie Stone did at OffensiveCon 23 describing some of the attack surface.

It just so happens that the UAC service is running as SYSTEM and as long as the elevated executable is on the C: drive, which is very likely, the mitigation ignores the impersonated token’s DOS device object directory entirely. Thus SeGetTokenDeviceMap never gets calls and so the first time a file is accessed under the logon session is once the process is up and running. As long as we can perform the exploit before the new process touches a file we can create the DOS device object directory and redirect the process’ C: drive.

To conclude, the steps to exploit this bypass is as follows:

  1. Spawn a shadow admin process through RAiProcessRunOnce, which will run the runonce.exe from the C: drive.
  2. Open the new process before it has accessed a file resource, and query the primary token.
  3. Duplicate the token to an identification token.
  4. Force the DOS device object directory to be created while impersonating the shadow admin token. This can be done by opening \?? through a call to NtOpenDirectoryObject.
  5. Create a C: drive symlink in the new DOS device directory to hijack the system drive.
  6. Let the process resume and wait for a redirected DLL to be loaded.

Final Thoughts

The bypass was interesting because it’s hard to point to the specific bug that causes it. The vulnerability is a result of 5 separate OS behaviors:

  • The Administrator Protection feature changes to the TokenLinkedToken query generates a new logon session for every shadow admin token.
  • The per-token DOS device directory is lazily initialized for each new logon session meaning when the linked token is first created the directory does not currently exist.
  • The kernel creates the DOS device directory when it’s accessed by using Zw functions, which disables access checking. This allows a limited user to impersonate the shadow admin token at identification level and create the directory by opening \??.
  • If a thread impersonates a token at identification level any security descriptor assignment takes the owner SID from the primary token, not the impersonation token. This results in the limited user being granted full access to the shadow admin token’s DOS device object directory.
  • The DOS device object directory isn’t already created once the low-privileged user gets access to the process token because of the security mitigation which disables the impersonated DOS device object directory when opening files from the C: drive in a SYSTEM process.

I don’t necessarily blame Microsoft for not finding this issue during testing. It’s a complex vulnerability with many moving pieces. It’s likely I only found it because I knew about the weird behavior when creating the DOS device object directory.

The fix Microsoft implemented was to prevent creating the DOS device object directory when impersonating a shadow administrator token at identification level. As this fix was added into the final released build as part of the optional update KB5067036 it doesn’t have a security bulletin associated with it. I would like to thank the Administrator Protection team and MSRC for the quick response in fixing all the issues and demonstrating that this feature will be taken seriously as a security boundary. I’d also like to thank them for providing additional information such as the design document which aided in the research.

As for my views on Administrator Protection as a feature, I feel that Microsoft have not been as bold as they could have been. Making small tweaks to UAC resulted in carrying along the almost 20 years of unfixed bypasses which manifest as security vulnerabilities in the feature. What I would have liked to have seen was something more configurable and controllable, perhaps a proper version of sudo or Linux capabilities where a user can be granted specific additional access for certain tasks.

I guess app compatibility is ultimately the problem here, Windows isn’t designed for such a radical change. I’d have also liked to have seen this as a separate configurable mode rather than replacing admin-approval completely. That way a sysadmin could choose when people are opted in to the new model rather than requiring everyone to use it.

I do think it improves security over admin-approval UAC assuming it becomes enabled by default. It presents a more significant security boundary that should be defendable unless more serious design issues are discovered. I expect that malware will still be able to get administrator privileges even if that’s just by forcing a user to accept the elevation prompt, but any silent bypasses they might use should get fixed which would be a significant improvement on the current situation. Regardless of all that, the safest way to use Windows is to never run as an administrator, with any version of UAC. And ideally avoid getting malware on your machine in the first place.

  • ✇Project Zero
  • Windows Exploitation Techniques: Winning Race Conditions with Path Lookups James Forshaw
    This post was originally written in 2016 for the Project Zero blog. However, in the end it was published separately in the journal PoC||GTFO issue #13 as well as in the second volume of the printed version. In honor of our new blog we’re republishing it on this blog and included an updated analysis to see if it still works on a modern Windows 11 system. During my Windows research I tend to find quite a few race condition vulnerabilities. A fairly typical exploitable form look something like thi
     

Windows Exploitation Techniques: Winning Race Conditions with Path Lookups

16 de Dezembro de 2025, 05:00

This post was originally written in 2016 for the Project Zero blog. However, in the end it was published separately in the journal PoC||GTFO issue #13 as well as in the second volume of the printed version. In honor of our new blog we’re republishing it on this blog and included an updated analysis to see if it still works on a modern Windows 11 system.

During my Windows research I tend to find quite a few race condition vulnerabilities. A fairly typical exploitable form look something like this:

  1. Do some security check
  2. Access some resource
  3. Perform secure action

If you can change the state of the system between steps 1 and 3 you might be able to bypass a security check or cause other security issues. The big problem is the race window is generally extremely short. In some cases it might be exploitable by running an exploit enough times and hope you hit it at least once. In other cases you might have one shot at success, if you can’t guarantee you’ll win the race every time it might be effectively unexploitable (however, that’s not to say you shouldn’t report it to the vendor anyway).

Over the years I’ve come up with various techniques to expand the race window, including file Opportunistic Locks and trapping virtual memory access. However, those techniques are not always appropriate, so I wanted to find a way of increasing the time window to win the race in cases where the code accesses a resource we control. Specifically, we’re going to attack the lookup process for a named resource. The following is an overview of my thought process to come up with a working solution.

Investigating Object Manager Lookup Performance

Hidden under the hood of Windows NT is the Object Manager Namespace (OMNS). You wouldn’t typically interact with it directly, the Win32 API for the most part hides it away. The NT kernel defines a set of objects, such as Files, Events, Registry Keys, which can all have a name associated with the object. The OMNS provides the means to lookup these named objects. It acts like a file system, so for example you can specify a path to an NT system call such as \BaseNamedObjects\MyEvent and an event object can be looked up and opened.

There are two special object types which are for use in the OMNS, Object Directories and Symbolic Links. Object Directories act as named containers for other objects, whereas Symbolic Links allow a name to be redirected to another OMNS path. Symbolic Links are used quite a lot, for example the Windows drive letters are really a symbolic link to the real volume device object. When we call an NT system call the kernel must lookup the entire path, following any symbolic links until it reaches the named object, or fails to find a match.

To create a useful exploitation technique, we want to make the process of looking up a resource we control as slow as possible. For example, if we could make it take 1 or 2 seconds, then we’ve got a massive window of opportunity to win the race condition. Therefore, I want to find a way of manipulating the Object Manager lookup process in such a way that we achieve this goal.

A note about the testing setup: all tests will open a named event object, which is simulating step 2 in the previous list of exploitable operations. The system used is a new Surface Pro 11th Edition CoPilot+ PC with a Snapdragon X Elite running at 3.40GHz. This system has Windows 11 24H2 installed, however from what I can tell, no AI feature was harmed in the making of these results.

First, let’s just measure the time it takes to do a normal lookup. To try and minimize overhead, we’ll write the test in C++ as follows. It creates a named event, then opens the event with a specified number of iterations. Finally it’ll return the time in μs that a single iteration took based on the measurement from the QueryPerformanceCounter API. I’ve not included the support classes in the listing, that’ll be available in the project I’ll link to later.

static double RunTest(const wstring name, int iterations, 
        wstring create_name = L"", HANDLE root = nullptr) {
    if (create_name.empty()) {
        create_name = name;
    }
    ScopedHandle event_handle = CreateEvent(create_name, root);
    ObjectAttributes obja(name);
    vector<ScopedHandle> handles;
    Timer timer;
    for (int i = 0; i < iterations; ++i) {
        HANDLE open_handle;
        Check(NtOpenEvent(&open_handle, MAXIMUM_ALLOWED, &obja));
        handles.emplace_back(open_handle);
    }
    return timer.GetTime(iterations);
}

For the test I’ll pick a simple unique name, such as \BaseNamedObjects\MyEvent. With an iteration count of 1000 the results on my test system are probably what we’d expect, the lookup process for a simple named event is approximately 2μs. That includes the system call transition, lookup process and the access check on the event object.

While, in theory, you could win a race with this amount of time, it seems pretty unlikely, even on a multicore processor. So let’s think about a way of improving the lookup time (and when I say “improve” I mean making the lookup time slower). We can immediately consider two similar approaches:

  1. Make a path which contains one very long name. The lookup process would have to compare the entire name using a string comparison operation to verify it’s accessing the correct object. This should take linear time relative to the length of the string, even if the comparison operation is heavily optimized.
  2. Make multiple small named directories and recurse. E.g. \A\A\A\A\…\EventName. The assumption here is that each lookup takes a fixed amount of time to complete. The operation should again be linear time relative to the depth of recursion of the directories.

At this point we’ve not had to look at any actual kernel code, and we’ll not start quite yet, so instead more empirical testing seems the way to go. Let’s start with the first approach, making a long string and performing a lookup on it.

How long can the path string be? An object manager path is limited to the maximum string size afforded by the UNICODE_STRING structure.

struct UNICODE_STRING {
  USHORT Length;
  USHORT MaximumLength;
  PWSTR  Buffer;
}

We can see that the Length member is a USHORT which is an unsigned 16 bit integer, this limits the maximum length to 216 - 1. This, however, is a byte count so in fact this limits us to 215 - 1 or 32767 wide characters. We’ll need to be able to make the object in a writable directory such as \BaseNamedObject which reduces the length slightly, but not enough to make a significant impact. Therefore we’ll open the event object through names between 1 character and 32000 characters in length using the following code:

std::wstring path;
while (path.size() <= 32000) {
    auto result = RunTest(L"\\BaseNamedObjects\\A" + path, nullptr, 1000);
    printf("%zu,%f\n", path.size(), result);
    path += std::wstring(500, 'A');
}

The results are shown below:

While it’s a little noisy it seems like the assumption of a linear lookup time is correct. The longer the string, the longer it takes to look it up. For a 32000 character long string this seems to top out at approximately 35μs. Still not enough in my opinion for a useful primitive, but it’s certainly a start.

Now let’s look at the recursive directory approach. In this case, the upper bound is around 16000 directories. This is because each path component must contain at least two characters, a backslash and a single character name (e.g. \A\A\A…). Therefore our maximum path limit is halved. Of course we’d make the assumption that the time to go through the lookup process is going to be greater than the time it takes to compare 4 unicode characters, but let’s test to make sure.

ScopedHandle base_dir = OpenDirectory(L"\\BaseNamedObjects");
HANDLE last_dir = base_dir.get();
std::vector<ScopedHandle> dirs;
for (int i = 0; i < 16000; i++) {
    dirs.emplace_back(CreateDirectory(L"A", last_dir));
    last_dir = dirs.back().get();
    if ((i % 500) == 0)
    {
        auto result = RunTest(GetName(last_dir) + L"\\X", iterations);
        printf("%d,%f\n", i + 1, result);
    }
}

The results are shown below:


The results are what we might expect, it seems linear, at least until around 13000 recursive directories where there is a disjoint transition. I ran the test multiple times on the same machine and always got the same issue, however running it on an x64 machine didn’t show the same artifact so I don’t think it’s a problem with the code.

Still, it’s unequivocal that the time to lookup an object is linear based on the number of recursive directories. For a 16000 recursive depth the average lookup time is around 1300μs or approximately 40 times larger than the long path name lookup result. Now of course this comes with downsides. For a start you need to create 16000 or so directory objects in the kernel, each directory takes up some amount of kernel pool memory. On a 64 bit platform this is unlikely to be a problem.

We also have the setup time to consider, too long and we might still miss the race condition. We can speed up the process of creating the directories by using the ability of Windows system calls to create an object relative to an existing directory. This allows us to avoid parsing the full path for every new directory, which is after all what we’re trying to make slow.

Also the process must maintain a handle to each of those directories otherwise they’d be deleted as a normal user can’t make kernel objects permanent. Fortunately our handle limit for a single process is of the order of 16 million so we’re a couple of orders of magnitude below the limit of that.

Now is 1300μs going to be enough for us? Maybe, it’s certainly orders of magnitude greater than 2μs for a normal lookup. But can we do better? We’ve run out of path space now, we’ve filled the absolute maximum allowed string length with recursive directory names. What we need is a method of multiplying that effect without requiring a longer path.

Here we can use object manager symbolic links. By placing the symbolic link as the last component of the long path we can force the kernel to reparse, and start the lookup all over again. On the final lookup we’ll just point the symbolic link to the target.

Through testing we can only redirect using the symbolic link 64 times before receiving an error, why can’t we do this indefinitely? Well for a fairly obvious reason, each time a symbolic link is encountered the kernel restarts the parsing processes, if you pointed a symbolic link at itself you’d end up in an infinite loop. The 64 reparse limit prevents that from becoming a problem. The following code will do this test for us:

ScopedHandle base_dir = OpenDirectory(L"\\BaseNamedObjects");
HANDLE last_dir = base_dir.get();
std::vector<ScopedHandle> dirs;
for (int i = 0; i < 16000; i++) {
    dirs.emplace_back(CreateDirectory(L"A", last_dir));
    last_dir = dirs.back().get();
}
std::vector<ScopedHandle> links;
std::wstring last_dir_name = GetName(last_dir);
for (int i = 0; i < 63; ++i) {
    links.emplace_back(CreateLink(IntToString(i), last_dir, 
                       last_dir_name + L"\\" + IntToString(i + 1)));
}
printf("%f\n", RunTest(links.front().name(), 10, L"63", last_dir));

We only do 10 test iterations to minimize the time we need to run. The results are as we expected, time taken to look up our event is proportional to both the number of symbolic links and the number of recursive directories. For 64 symbolic links and 16000 directories it takes approximately 4.5ms to lookup the event (note I’ve had to change the scale of the result now to milliseconds). That should be enough, right? Maybe, but I’m greedy, I want more. How can we make the lookup time even worse?

At this point, it’s time to break out the disassembler and see how the lookup process works under the kernel. First off, let’s see what an object directory structure looks like. We can dump it from a kernel debugging session using WinDBG with the command dt nt!_OBJECT_DIRECTORY. Converted back to a C style structure it looks something like the following:

struct OBJECT_DIRECTORY {
     POBJECT_DIRECTORY_ENTRY HashBuckets[37];
     EX_PUSH_LOCK Lock;
     PDEVICE_MAP DeviceMap;
     ULONG SessionId;
     PVOID NamespaceEntry;
     ULONG Flags;
     PPOBJECT_DIRECTORY ShadowDirectory.
}

Based on the presence of the HashBucket field, it’s safe to assume that the kernel is using a hash table to store directory entries. This makes some sense, if the kernel just maintained a list of directory entries it’d be pretty poor for performance, however with a hash table the lookup time is reduced as long as the hashing algorithm does a good job of reducing collisions. This is only the case though if the algorithm isn’t being actively exploited. As we’re trying to increase the cost of lookups we can intentionally add entries with collisions to make the lookup process take the worst case time, which is linear relative to the number of entries in a directory. This again provides us with another scaling factory, and in this case the number of entries is only going to be limited by available memory as we’re never going to need to put the name into the path.

So what’s the algorithm for the hash? The main function of interest is ObpLookupObjectName which is referenced by functions such as ObReferenceObjectByName. The directory entry logic is buried somewhere in this large function, however fortunately there’s a helper function ObpLookupDirectoryEntry which has the same logic (it isn’t actually called by ObpLookupObjectName but it doesn’t matter) which is smaller and easier to reverse engineer, the following is a simplified version of that.

POBJECT_DIRECTORY ObpLookupDirectoryEntry(POBJECT_DIRECTORY Directory,
                                          PUNICODE_STRING Name,
                                          ULONG AttributeFlags) {
  BOOLEAN CaseInSensitive = (AttributeFlags & OBJ_CASE_INSENSITIVE) != 0;
  SIZE_T CharCount = Name->Length / sizeof(WCHAR);
  WCHAR* Buffer = Name->Buffer;
  ULONG Hash = 0;  
  while (CharCount) {
    Hash = (Hash / 2) + 3 * Hash;
    Hash += RtlUpcaseUnicodeChar(*Buffer);
    Buffer++;
    CharCount--;
  }

  OBJECT_DIRECTORY_ENTRY* Entry = Directory->HashBuckets[Hash % 37];
  while(Entry) {
    if (Entry->HashValue == Hash) {
      if (RtlEqualUnicodeString(Name, 
            ObpGetObjectName(Entry->Object), CaseInSensitive)) {
        ObReferenceObject(Entry->Object);
        return Entry->Object;
      }
    }
    Entry = Entry->ChainLink;
  }
  
  return NULL;
}

So the hashing algorithm is pretty simple, it repeatedly mixes the bits of the current hash value then adds the uppercase unicode character to the hash. We could work out a clever way of getting hash collisions from this but actually it’s pretty simple, the object manager allows us to specify names containing NUL characters, therefore if we take our target name, say ‘A’ and prefix it with increasing length strings containing only NUL we get both hash and bucket collisions. Due to the path character limit we can only create 32000 or so colliding entries, but as we’ll see that’s not a problem. The following code will test this behavior:

int collision_count = 32000;
ScopedHandle base_dir = CreateDirectory(L"\\BaseNamedObjects\\A");
ScopedHandle test_dir = CreateDirectory(L"A", base_dir.get());
vector<ScopedHandle> dirs;
for (int i = 0; i < collision_count - 1; i++) {
    wstring name = MakeCollisionName(collision_count - i);
    dirs.emplace_back(CreateDirectory(name, base_dir.get()));
    if ((i % 500) == 0) {
        Timer timer;
        for (int j = 0; j < iterations; ++j) {
            OpenDirectory(L"A", base_dir.get());
        }
        printf("%d,%f\n", i, timer.GetTime(iterations));
    }
}

Let’s look at the results of doing this for a single directory:

The chart shows a more or less linear graph. For a given collision count it’s nowhere near as good as the recursive directory approach, around 100μs versus 1300μs but it is a multiplicative factor in the lookup time which we can abuse.

We can apply this additional factor to all our 16000 recursive directories, add in symbolic links and we’ll probably get an insane lookup time. However there’s a problem, insertion time. Every time we add a new entry to a directory the kernel must do a lookup to check that the entry doesn’t already exist. This means that for every new directory entry we add we must do (n-1)2 checks in the hash table just to find that we don’t have the entry before we insert it. This means that the time to add a new entry is approximately proportional to the square of the number of entries, sure it’s not a cubic or exponential increase, but that’s hardly a consolation. On the test machine it takes approximately 2.5s (yes seconds) to create a single collision directory with 32000 entries. If we wanted to do that for all 16000 recursive directory entries it would take around 12 hours!

Okay I think we’re going a bit over the top here, by fiddling with the values we can get something which doesn’t take too long to set up and gives us a long lookup time. But I’m still greedy. I want to see how far I can push the lookup time, is there any way we can get the best of all worlds?

The final piece of the puzzle is to bring in Shadow Directories, which allow the Object Manager a fallback path if it can’t find an entry in a directory. You can use almost any other Object Manager directory as a shadow, which will allow us to control the lookup behavior. A Shadow Directory has a crucial difference from symbolic links, they don’t cause a reparse to occur in the lookup process. This means they’re not restricted to the 64 reparse limit. This doesn’t result in an infinite loop as each lookup consumes a path component, eventually there’ll be no more path to lookup. If we put together two directories in the following arrangement we can pass a similar path to our recursive directory lookup, without actually creating all the directories.

Shadow Directories (1).png
So how does this actually work? If we open a path of the form \A\A\A\A\A… the kernel will first lookup the initial A directory. This is the directory on the left of the diagram. It will then try to open the next A directory, which is on the right which again it will find. Next the kernel again looks up A, but in this case it doesn’t exist so as the directory has a shadow link to its parent it looks there instead, finds the same A directory and repeats the process. This will continue until we run out of path elements to look up.

So let’s determine the performance of this approach. We’d perhaps expect it to be less performant relative to actually creating all those directories but hopefully it won’t be too far behind. We can use the following code to do the test:

wstring dir_name = L"\\BaseNamedObjects\\A";
ScopedHandle shadow_dir = CreateDirectory(dir_name);
ScopedHandle target_dir = CreateDirectory(L"A", shadow_dir.get(), shadow_dir.get());
for (int i = 0; i < 16000; i += 500) {
    wstring open_name = dir_name;
    for (int j = 0; j < i; j++) {
        open_name += L"\\A";
    }
    open_name += L"\\X";
    printf("%d,%f\n", i, RunTest(open_name, iterations, L"X", 
                                 shadow_dir.get()));
}

And the results are as follows, the chart includes the original test for the normal recursive lookup as well for comparison.

Looks good, interestingly based on this test the lookup time is longer for shadow directories than for recursive directories. We still get a weird disjoint region, but in this case it starts earlier, perhaps it’s a cache effect based on the length of the string or something like that?

So the final result is that instead of creating 16000 directories with 16000 collisions we can do it with just 2 directories which is far more manageable and only takes around 5 seconds on my workstation. So to sign off let’s combine everything together with the following code which has the following parameters:

  • 16000 path components using 2 object directories in a shadow configuration
  • 16000 collisions per directory
  • 64 symbolic link reparses
wstring dir_name = L"\\BaseNamedObjects\\A";
ScopedHandle shadow_dir = CreateDirectory(dir_name);
ScopedHandle target_dir = CreateDirectory(L"A", shadow_dir.get(), shadow_dir.get());
vector<ScopedHandle> dirs;
CreateCollidingEntries(shadow_dir, 16000, dirs);
CreateCollidingEntries(target_dir, 16000, dirs);

wstring last_dir_name = dir_name;
for (int i = 0; i < 16000; i++) {
    last_dir_name += L"\\A";
}
vector<ScopedHandle> links;
for (int i = 0; i < 63; ++i) {
    links.emplace_back(CreateLink(IntToString(i), shadow_dir.get(),
                       last_dir_name + L"\\" + IntToString(i + 1)));
}
printf("%f\n", RunTest(last_dir_name + L"\\0", 1, 
                       IntToString(symlink_count), shadow_dir.get()));

And the resulting time for a single lookup on the test system is *drum roll please* 3 minutes. I think we might just be able to win the race condition with that.

Conclusion

So after all that effort we can make the kernel take around 3 minutes to look up a single controlled resource path. That’s pretty impressive. We have many options to get the kernel to start the lookup process. Both file system and registry end up interacting with the object manager namespace, so for example you could plant an NTFS mount point with the initiating path to cause any process which opens that file to lock up for 3 minutes.

After 8 years it’s probably not surprising Microsoft haven’t tried to do anything about this exploit technique. It’s a typical tale of unexpected behavior when facing pathological input, it’s probably not worth the impact on the object manager code to improve performance meaningfully.

Just a final point to note on performance. The timings presented here are going to vary wildly based on the performance of the machine so they should only be taken as guidelines. If you look back at the original publication of this post in PoC||GTFO you’ll find the timings are substantially longer. For example, the final test took 19 minutes on the Xeon workstation I used for testing rather than 3 minutes. I don’t know if this is an indication that the ARM64 CPU used in the Surface Pro was substantially faster than the Xeon, or if it was just the amount of cruft which runs on a typical workstation versus a freshly installed Windows 11 Microsoft PC. Regardless, if you can’t exploit the race condition in 3 or 19 minutes then your bug might truly be unexploitable.

You can find the full test code on Github.

❌
❌