Get more relevant, more accurate answers from Prime Architect by giving your AI agent the context it needs — no more copy-pasting excerpts or describing an incident from memory. In Prime Architect, every chat is a space to work through detection engineering and threat research tasks with AI, whether you’re writing a custom prompt or running one of the built-in Agentic AI tools. Now you can bring your own reference materials into that conversation directly: upload playbooks, incident reports, environment documentation, screenshots, and other reference materials into your chat, and let the AI work from the real source.
Why It Matters
Better context means better output. When an AI tool works from your actual playbook, incident report, or environment documentation, its analysis is grounded in your real data rather than a secondhand summary. You can write your message and attach files together, and the AI agent treats the attached files as context for that message — whether you’re running a custom prompt or one of the purpose-built AI tools in Prime Architect. Instead of retyping the key details of an incident or manually condensing a lengthy report before you can even start your analysis, you simply hand the AI the source document and move straight to the insight.
Flexibility for every workflow. Not every analyst wants to work the same way. That’s why there are three different ways to attach a file — a manual upload button, drag and drop, and clipboard paste — so you can choose whichever fits your current task and habits. Dragging a report straight from your desktop, pasting a screenshot you just captured, or browsing for a file through the upload menu all lead to the same result: your AI agent working with richer, more accurate context.
Built for how security teams actually work. Detection engineers and threat researchers rarely start from a blank page — they start from an existing playbook, a prior incident write-up, environment documentation, or a screenshot of a suspicious event. This feature meets that reality head-on, letting you carry that material directly into your conversation instead of translating it into a prompt by hand.
How to Add a File
There are three simple ways to get a file into your chat message in Prime Architect.
Option 1: Upload manually
Click the + icon in the chat input area and select Add Files and Images.
Select a file from your device.
The file appears in the input area and begins uploading.
Option 2: Drag and drop
Locate the file on your computer — for example, in Finder or File Explorer.
Drag the file into the chat panel in Prime Architect. You can drop it anywhere in the chat window, including the message history area or the input field.
The file appears in the input area and begins uploading.
Option 3: Paste from clipboard
Copy an image, screenshot, or file — take a screenshot, copy an image from another app, or select a file in your OS file explorer and press Cmd+C / Ctrl+C.
Click into the chat input field to make it active.
Paste using Cmd+V / Ctrl+V.
The file appears in the input area and begins uploading.
A few things to know: You can attach up to 3 files per message, with a maximum size of 5 MB per file. Supported formats include PDF, TXT, CSV, JSON, PNG, and JPG/JPEG — covering the most common document, data, and image formats used in security workflows. Depending on the size of your files, it may take a moment to process them before they’re ready to be used as context, especially for documents with many images or visual elements.
Make It Part of Your Workflow
Whether it’s a playbook pulled from your files, a screenshot of a suspicious alert, or an incident report you’ve had open all day, getting it into Prime Architect takes just a click, a drag, or a paste. Stop summarizing your evidence — start uploading it, and let your AI agent do the deeper work.
Security teams don’t have a data shortage — they have a data flood. A single incident can throw off hundreds of thousands, sometimes millions, of log events, and making sense of them under time pressure is exactly the kind of work that breaks people and tooling alike. SOC Prime built LogTotal to take that pressure off, without asking teams to hand over the raw evidence to do it.
The problem: every “send us the logs” request is a privacy decision
Endpoint events, identity logs, cloud audit trails, syslog, Windows Event Logs, application JSON — this is the raw material of detection, hunting, and response. When something breaks, the first ask is almost always the same: send the logs.
That request used to stay inside a closed environment. Now it rarely does. Logs get attached to vendor tickets, dropped into collaboration tools, uploaded to SaaS analyzers, pasted into AI chat windows, copied into shared workspaces. Each hop widens the circle of people, systems, and jurisdictions that can see the original values.
The risk is easy to miss because logs look operational rather than confidential. In practice, one authentication event can carry a username, a source IP, a workstation name, a session cookie, and a bearer token in an Authorization header. A payment-adjacent log can contain a PAN-shaped number. A Windows file path can leak a home-directory username. A field labeled UserName or x-api-key often holds the value in plain text, even when the rest of the line looks harmless. Under GDPR and similar regimes, most of that counts as personal data — and a leaked token or key isn’t a historical record, it’s a live access path.
Refuse to share the logs and you slow down the investigation. Share them raw and you risk violating policy, contracts, or regulation. Manual redaction doesn’t scale, isn’t consistent across analysts, and often strips out the exact identifiers an investigation needs to correlate events.
This isn’t hypothetical. SOC Prime built LogTotal partly in response to HuggingFace’s July 2026 security incident, in which the team’s attempt to send roughly 17,000 events to frontier AI models was blocked by guardrails — forcing a fallback to a local GLM model with GPU and VRAM requirements most organizations simply don’t have. LogTotal is built to handle that same job — at up to 1,700,000 events — without anyone needing frontier-model access or a private GPU cluster.
Why simple redaction doesn’t hold up
Most redaction approaches fail in one of two directions.
Static masking — turning every IP into the same placeholder, every user into USER — destroys the thing that makes investigation possible: correlation. If ten failed logons all collapse to the identical token, you can no longer tell a single compromised account from a credential-spray attack hitting ten different people.
Plain find-and-replace fails the other way. It misses values in unusual encodings or nested JSON, and it over-redacts things that only look sensitive — version numbers shaped like IPs, UUIDs used as message IDs, well-known non-sensitive hostnames. Unkeyed hashing doesn’t solve it either: a raw hash of a common value can be reversed by dictionary-guessing, and identical unsalted hashes across different organizations can accidentally link unrelated incidents together.
LogTotal was built to avoid both failure modes.
How it actually works
Sanitization happens locally, in your browser, before anything is sent anywhere. You can download the sanitized log at any point — you always have a clean copy of exactly what was analyzed.
Your files never leave your control unsanitized, and nothing is stored. LogTotal doesn’t retain your logs after analysis, and SOC Prime has no need to — the platform isn’t training on your data.
Upload in your native format. LogTotal auto-detects EVTX, CEF, JSON/NDJSON, and syslog — no manual conversion.
Your sanitized events are correlated at scale. LogTotal runs them against roughly 1,000,000 detection rules and a dataset of 13,000 labels, then applies Higher Order Sigma Rules and agentic AI correlation to connect related events into a coherent picture — up to 1.7 million events, in under a minute.
You get an investigation, not a dump. Results are structured as findings on the LogTotal site, not a wall of raw matches.
However, log sanitization is only the first stage of LogTotal once it’s out of the preview. Coming soon is something even more powerful: sanitized logs checked against tens of thousands of behaviour rules, with matches correlated around Higher Order Sigma rules for active threats.
Where teams can use this
Incident response with external retainers. Sanitize a log packet with a key you retain. The retainer can still cluster hosts, users, and addresses — and you can map tokens back internally if a specific identity needs to be named in a privileged briefing.
Vendor support and TAC cases. “The log file that shows the error” is famous for containing environment details unrelated to the ticket. Sanitizing before you attach it cuts accidental disclosure without turning the file into noise.
Detection engineering and rule testing. Sample logs are how detections get written and validated — and how production identities leak into git history, CI artifacts, and demo environments. Sanitizing fixtures once, with a key shared inside the team, keeps examples correlatable while stripping secrets.
Pre-SIEM or pre-lake sharing. Not every pipeline needs a commercial processor to redact a batch file. For exports, one-off hunts, and cross-team handoffs, a local sanitizer is the control people will actually use.
GDPR and privacy reviews. Pseudonymization isn’t a blanket exemption, but replacing identifiers with keyed tokens before a file leaves the organization is a concrete technical measure — one you can point to and describe: what was removed, what was retained, how tokens were generated, who holds the key.
AI-assisted analysis without exposing raw telemetry. Whether the destination is LogTotal, an internal model, or a restricted vendor environment, the question is the same: does the model need the actual password, or does it need to know a secret was present and the same user touched three hosts?
Try LogTotal
The SOC Prime Platform exists to help security teams anticipate, detect, validate, and respond to threats faster. That mission has never required collecting customer secrets. LogTotal extends it to private event analysis at community scale.
Security teams should not have to choose between a thorough investigation and a defensible data-handling story. Sanitize first. Correlate on tokens. Keep the key. Analyze the evidence that remains.
Join the SOC Prime Platform to improve visibility into threats most relevant to your business. To help you get started and drive immediate value, book a meeting now with SOC Prime experts.
NVIDIA confirms EA and Ubisoft are adapting anti-cheat software for the RTX SPARK platform, solving critical multiplayer gaming issues on Windows on Arm.
Every day, your SOC drowns in isolated alerts — a suspicious login here, an odd process spawn there, a strange outbound connection somewhere else. Individually, each one looks like noise. Together, they might be the early signature of a coordinated adversary campaign already unfolding inside your environment. The problem isn’t a lack of data — it’s a lack of connection.
Attack Chains changes that equation. Instead of asking your analysts to manually stitch together dozens of low-confidence signals, Attack Chains does it for them automatically — correlating historical scan results across your SIEM, EDR/XDR, and Data Lake (Prime Hunt), or real-time event streams as they’re generated, before that data even reaches your SIEM (Prime Detect). Either way, it doesn’t correlate against a static, generic rule set — it correlates against Active Threats: newly identified, real-world threats as they’re published to detect potential Attack Chains before they become confirmed incidents. That means your detection logic is only ever as current as the threat landscape itself.
Where to find it: Attack Chains lives as its own tab inside both Prime Hunt and Prime Detect. If you’re working with historical data, go to Prime Hunt → Attack Chains. If you want real-time correlation before data hits your SIEM, go to Prime Detect → Attack Chains.
Always Watching for What’s New
Once you’re in Attack Chains, the Monitored Threats tab shows every Active Threat your environment is being correlated against. Attack Chains stays current without any effort on your part. The moment a new threat is identified in the wild, it’s already part of what your environment is being checked against — no waiting for a rule update, no manual research cycle. You still decide what matters most to your organization, focusing correlation on the threats most relevant to your industry or risk profile.
Enable or disable individual threats, or apply bulk actions to manage several at once — right from the Monitored Threats list — so your correlation scope always reflects what actually matters to your organization.
And if a threat’s detection coverage isn’t actually working — whether it hasn’t been scanned yet or a rule isn’t properly connected — you’ll see it right away, instead of finding out after the fact. Here’s what that looks like:
A green checkmark means a threat’s detection coverage is fully in place. An issue label flags a gap — click it to see exactly what’s missing.
The Picture Attack Chains Give You
Once a chain forms, it’s not just a correlated pile of events — it’s an investigation-ready story, at both a program-wide and case-by-case level.
At a glance, your Attack Chains Overview gives you a real-time pulse on your overall exposure: how many chains have been built, how many active threats are currently being watched, how many hosts are involved, and how much of your detection coverage is actually firing. It’s the kind of summary that turns “are we being targeted?” into a number you can check in seconds.
Click into any individual chain from the Attack Chains tab, and your team gets:
An AI-generated summary of the detected activity, so analysts get immediate context
A visual timeline of adversary techniques, showing exactly how the attack progressed step by step — with techniques already confirmed by detection rules, plus activity caught through fuzzy pattern matching (Prime Hunt)
Threat actor and technique attribution, mapped to industry-standard frameworks, so scoping and context-building start immediately instead of from scratch
A clear match, showing how closely the activity lines up with a known attack pattern — so your team knows exactly how seriously to treat it
Full asset and environment context — which host, which part of your infrastructure, and which of your data sources picked it up — so there’s no guessing where to look next
A direct path back into your existing tools, letting analysts pivot straight into the underlying events without losing time or context
A built-in investigation trail, tracking the status of the Attack Chain from first detected to fully resolved, and nothing falls through the cracks
Low-confidence noise is filtered out by the AI, so what reaches your team by default is what actually deserves their attention — with the option to dig into everything else whenever they choose to.
Bringing It All Together: Configuring Attack Chain Correlation
With the threat intelligence and the picture it produces in mind, here’s how you tell Attack Chains exactly how to correlate it:
Set the chain-forming threshold — the minimum percentage of a threat’s technique sequence that must match before Attack Chains are formed
Define the correlation window — how close together in time events must occur to be correlated
Define the lookback window — how far back the engine searches when hunting for related events (Prime Hunt only)
Choose your data sources — include or exclude the SIEM, EDR/XDR, and Data Lake sources (Prime Hunt) or topics (PrimeDetect) feeding correlation, and optionally auto-enroll new ones as they’re added
Review data-sharing settings — hostname data needs to be transmitted and stored for correlation to work, which may require explicit consent (PrimeHunt)
Save and click Run — Attack Chain monitoring is live from that point on, continuously checking your environment against the newest threats as they emerge
Running a threat intelligence program today means operating across more tools, more workflows, and more organizational complexity than most platforms were originally designed to handle. The intelligence is there. The question is whether the platform is keeping up with how your team actually needs to use it.
SOC and CTI teams have spent the last two years integrating AI tools into real investigative work, and the results have been meaningful. Analysts move faster through reports, surface connections more quickly, and spend less time on the mechanical parts of initial triage. But the threat intelligence platform sitting at the center of that work has remained largely separate from it, a destination analysts navigate to rather than an environment agents can operate inside. The gap between understanding a threat and recording it in a TIP is still, in most teams, a human problem. The EclecticIQ MCP Server is built to close it.
Cloudflare provides services that help run 20% of the web, but we don’t do it alone. Developers on our platform use a myriad of tools and services from other companies too. Cloudflare provides a rich API for our platform that enables developers to create automations, CI/CD, and integrations that glue together the various parts of their infrastructure. Earlier this month, we announced self-managed OAuth, making it easier for customers to create and manage their own OAuth clients for delegated access to the Cloudflare API.
Cloudflare isn’t new to OAuth. If you’ve used Wrangler, or used integrations from partners like PlanetScale, then you’ve already used it. However, until now, third-party OAuth was only available through a small number of manually onboarded integrations, and was not available to developers more broadly. That meant developers building their own integrations had to rely on API tokens, which are harder to manage and a poor fit for many delegated application flows.
Over the last year, we onboarded a growing number of early partners while improving the consent, revocation, and security model behind Cloudflare OAuth. But as our Developer Platform grew and agentic tools drove demand for delegated access, it became clear that opening up OAuth to all customers was critical to the success of our platform.
With self-managed OAuth, developers can now offer a standard OAuth flow where customers grant scoped access directly, making it easier to build SaaS integrations, internal developer platforms, and agentic tools while giving users clearer consent, easier revocation, and more control over what an application can do.
Scaling the ecosystem securely
While our earlier OAuth solution was sufficient for a small number of carefully managed partners, we realized that our permissions model, our consent experience, and our ways of mitigating potential abuse vectors were not mature enough.
Earlier this year we updated our consent experience to make it clearer which application is requesting access, and what permissions it will receive. We also added revocation to the dashboard so developers can easily control which applications have access to their data, and made app ownership more visible to prevent OAuth phishing attacks.
Opening self-managed OAuth to all customers also required major upgrades to our underlying OAuth engine. This process required a large amount of planning to do with minimal user interruption, while also ensuring data stability and security.
Planning the upgrade to our OAuth engine
Years ago, we deployed Hydra, an open-source OAuth engine, to power Cloudflare OAuth under the hood. That deployment served us well when usage was limited, but as the developer platform grew and agentic workflows became more common, it became clear that we needed a major upgrade to unlock new capabilities and improve performance.
As we planned the upgrade, we decided to do two smaller sequential upgrades rather than doing one large upgrade. First, we would move to the latest 1.X release, evaluate any behavior or performance changes, and then proceed with the 2.X upgrade.
During our upgrade planning, it became clear that even the 1.X upgrade wouldstill impact customers because the Hydra database required extensive schema migrations that:
Created indexes in a manner that would claim an exclusive lock on critical tables, preventing active users from performing important OAuth operations
Added columns to critical tables, and moved other columns to new tables
There was also a quirk in the version of Hydra we were using in which the SDK would perform SELECT * operations, causing deserialization issues with the schema changes.
To prevent user impact, we rewrote the SQL migrations to use features such as CREATE INDEX CONCURRENTLY, and built a custom version of Hydra which selected explicit columns rather than SELECT *.
With the latest 1.X upgrade planned out, we now needed to create a plan for the even larger 2.X upgrade. We identified three potential options, and weighed the benefits and drawbacks of each one. Doing an in-place upgrade was not going to work for us, due to the sheer amount of schema changes the major version bump brought with it. We decided that a blue-green strategy would work, but there was more that needed to be done than simply flipping a switch to start using the new version. The upgrade and migration process would take multiple hours, and we needed the system to continue functioning correctly in that time window.
The first blue-green option would involve disabling writes to the database, preventing any new authorizations from occurring. This means they would not be lost in the transition, but it also meant that nobody would be able to use existing OAuth apps unless they already had a valid credential. It also presented another large problem: if users needed to revoke access from an application for any reason, it would not be possible while the upgrade was being performed.
To combat these issues, we came up with a way to leave writes to the database enabled, at the cost of losing some of them in the switch to the green version. The first thing to solve was minimizing the number of writes for new tokens. There was an operational lever we pulled: increasing the expiry time of tokens to multiple hours. This would allow apps that received new tokens before the upgrade to continue using them without needing to refresh.
With reducing writes solved, we needed to come up with a way to not lose any revocations our users performed during the upgrade window. To do this, we created a queue system (using Cloudflare Queues!) which, after a revocation event, would have a record written into the queue with information about that revocation. This would allow us to drain the queue with the database flipped to the green version, replaying all revocation events that took place in the time window in which they would have been lost. This was critical to get right, otherwise applications that users had revoked would inadvertently have their access restored.
Executing the upgrade
Upgrading to 1.X
From an operational point of view, our first upgrade to the last 1.X release went off without any hitches. Our custom database migrations ran faster than we expected, with no user impact. We had to do a hard cutover to the new version because the old version was unable to introspect tokens that were created by the newer version.
After the cutover, we saw an increase in refresh token errors that we had not seen before. This ended up being due to stricter refresh invalidation behaviors in the new version; if a refresh token was reused, Hydra would invalidate the whole access and refresh token chain. This is problematic for Wrangler and MCP clients. These clients both have a high request volume, and a single reused refresh token would invalidate the entire session.
We mitigated this by adding refresh token coalescing behavior to our Worker which routes OAuth traffic to the correct destination. This allowed us to briefly cache the refresh token request before it reached Hydra, so that if we detected a retry we could short-circuit the request and respond without invalidating the tokens. Fortunately, 2.X versions of Hydra have a configurable “refresh token grace period”, which resolves this by allowing a refresh token to be retried for a period of time without invalidating the whole chain.
Upgrading to 2.X
Since multiple hours of high user-facing impact would not be acceptable, we had our blue-green upgrade strategy set. At a high level, this sounds simple; the migrations would run on a copy of our production database, and then cut over along with the new Hydra version after they complete. In reality, there were a lot more moving parts:
Enable revocation replay capture queue
Copy and restore our database to the new target
Targeted data cleanup — existing data violated some new constraints introduced in the newer versions, which could prevent migrations from succeeding
Perform cutovers on the Hydra service along with two additional critical internal systems simultaneously to prevent any errors
Post-cutover monitoring and validation
We chose an upgrade window when Hydra had the lowest request volume per second to minimize lost token writes. Other than some timeout tuning, our production migrations ran well against the new database: the net runtime in production was approximately three hours. After the migrations completed, we carefully rolled out the new version of the Hydra service, along with two additional system configs to flip our systems to use the new SDK version.
Shortly after cutting traffic over, we observed that a data cleanup job in our authorization service (which relies on the Hydra consent session API) was being overeager in its purging of OAuth policy data. After investigation, we discovered that there was an issue in one of the Hydra migrations that corrupted the state of certain valid OAuth sessions, which resulted in the migration marking them as invalid. The valid sessions being corrupted caused a disagreement between Hydra and our authorization service, manifesting as an increase in 403s. To mitigate this, we did data restorations and began work on improvements for OAuth authorization behaviors to remove reliance on static policy data.
Beyond the data cleanup issue, there were some additional small fixes more driven by specific client behaviors which we landed quickly.
With the Hydra version upgrade complete, OAuth traffic has remained stable with improved system performance and reliability for our customers. It also brought production onto the same foundation our newer OAuth APIs had already been validated against in staging, clearing the way for our self-managed OAuth release on June 3.
Performance improvements
After completing a large upgrade like this, it is always rewarding and illuminating to look at some broad metrics about the impact. We gathered additional metrics during the database migrations, and observed considerable performance improvements after the upgrade was complete.
Database
Hydra performance
Self-managed OAuth for all
Opening up OAuth to all customers is an important step toward a broader Cloudflare app ecosystem. Today, any Cloudflare customer can create their own OAuth applications and build integrations on top of Cloudflare. We’re extremely excited to launch Cloudflare self-managed OAuth for all.
To get started, take a look at our documentation or jump straight to the OAuth apps page in the dashboard and create your first OAuth app.
For years, defense organizations have adapted commercially developed cyber threat intelligence platforms to fit military intelligence processes. This arrangement was often accepted as a practical necessity. Commercial platforms delivered valuable capabilities, while intelligence teams developed processes to align outputs with doctrinal requirements, reporting structures, and command expectations.
The security industry spent the last decade solving detection. Endpoint. Cloud Workloads. Identities. AI. We built better models. We moved beyond signatures. We reduced false positives. We got the alert into the right queue. Then, we discovered the harder problem had been waiting behind it.
The constraint in every SOC today is not detection. It’s investigation capacity. Security teams are generating more critical alerts than any staffing plan can possibly accommodate. The queue grows. Triage waits on analyst availability. Coverage drops on nights, weekends, and surges, exactly when adversaries know to move.
Frontier AI is about to make this exponentially worse. The same models reshaping every industry are being weaponized to chain hidden gaps and vulnerabilities, accelerate attacks, and compress attacker timelines. Investigation cannot stay a human-paced or human-scaled activity. If it does, defenders lose. We built Purple AI® to change that.
Every Alert. Investigated. Now.
Starting today, we’re opening up Purple AI Agentic Investigation to all new and existing SentinelOne® EDR customers. In the Singularity console. Activated with a single click.
The moment a new EDR alert is flagged Critical and Malicious, Purple AI acts, using flags you can trust. It is the output of over a decade of AI and ML models running natively at the edge, from behavioral analysis to real-time threat intelligence. Purple AI investigates signal vs. noise.
It collects evidence. It correlates telemetry across endpoint, identity, cloud, and third-party data. It builds the attack timeline and delivers a verdict: True Positive, False Positive, or Unknown. The complete evidence chain arrives with it before an analyst opens the console. We call it ‘zero-click’ investigation: Automated trigger, zero wait, coverage gaps closed.
Open the Alerts view, and you see it live: Purple AI retrieving context, running threat hunts, querying host telemetry, building the investigation in real time. Then, the verdict lands, supported and traceable, ready for a decision. This is investigation at machine speed. Continuous. At scale. Integrated into existing workflows.
The Native Platform Advantage
Purple AI investigates at this depth because it operates natively on the Singularity Platform. Zero integrations required. Where your team already works. Where your security data already lives.
Bolt-on AI tools layered onto other platforms start from a disadvantaged position. They require connectors, data mapping, and integrations before they can reason. Purple AI reasons directly on telemetry already in Singularity: endpoint, identity, cloud, and third-party data in the Singularity Data Lake. Nothing to configure. One click to activate.
The intelligence is distinct. Purple AI takes a multi-model approach that keeps customers at the edge of frontier AI reasoning capability. Models from leading frontier providers like Anthropic (Claude) and OpenAI (GPT) are part of that architecture. So is SentinelOne’s own Ultraviolet family of models, purpose-built on petabytes of real security telemetry and trained for SOC investigation reasoning. Here, frontier AI reasoning combines with Autonomous Security Intelligence.
Autonomy With Accountability
Agentic AI without defined limits and guardrails is a liability. As an AI-first company, we get that. So we built the limits first. Investigations run autonomously. Response stays on your terms. You decide your human-in-the-loop comfort zone.
Every verdict connects to one-click or policy-driven response actions in Singularity, including governed automated execution through Hyperautomation, SentinelOne’s workflow automation layer. Nothing fires outside the guardrails your team defines. Activation is admin-controlled and reversible at any time. Access is role-based. Every verdict carries a complete, auditable evidence chain. We’ve eliminated black-box decisions. Your analysts can see and review every AI step. The agentic SOC keeps humans in control of what happens next, by design.
What Customers Are Doing With It
Purple AI customers are already seeing the shift. Agentic Investigation is built to extend it further.
“By using Purple AI, we’re saving between 40% and 50% of the time to investigate incidents, allowing us to respond much quicker. It gives us readily available information on alerts — which systems, which users, and why they may be malicious,” said Rod Goldsmith, Cybersecurity Leader at YKK Americas.
“Purple AI really increases our efficiency. It allows users to search logs quickly without knowing any query languages and get answers faster, reducing our Mean Time to Respond,” said John McLeod, CISO at NOV Inc.
“SentinelOne helps us with our incident response process tenfold. We have so many options, from automation to using Purple AI, to give my analysts more confidence in their abilities,” said Zack Moody at KYOCERA AVX.
AI designed to give human defenders a decisive operating advantage. The machine removes the ceiling on what humans can cover.
Singularity Credits
Alongside Agentic Investigation, we are introducing Singularity Credits: a new unified currency for AI-powered workflows across the Singularity Platform. AI should be accessible. Utilization should be visible. Spending stays in the hands of those who set the limits. Credits are built around all three.
Every eligible SentinelOne customer gets free access starting this week. No payment method required. After the trial, Credits are available through partners, direct billing, and eCommerce channels. The balance is visible in real time. Built-in spending controls keep consumption bounded.
Agentic SOC, Autonomous SOC, AI SOC, ISOC: Call it what you want. Just don’t call it a roadmap item.
What we are delivering today is real, accessible and, for the next couple of months, complimentary. It is the agentic SOC in operation. GA, now. Critical alerts automatically investigated. Verdicts autonomously reached. Workflows automatically triggered. Governed authorization. Responses that execute within the policies your team controls and human-in-the-loop gates that your team decides.
The industry has called this many things: The Autonomous SOC, the Agentic SOC, the AI SOC. Gartner now has a name for this model: the Integrated Security Operations Center. Modern threat detection, investigation, and response as a single, continuous, AI-driven loop vs. the historic siloed functions and tool sprawl. More than solving alert fatigue, the new model has the potential to solve the investigation capacity gap and shrink MTTR to a scale and speed that cybersecurity will require in the frontier AI era. At SentinelOne, we have been building for this moment for years.
Investigation capacity should never again be the reason a critical alert goes unexamined. Frontier AI belongs where the data and the analysts already are: In the console, in the workflow, governed by the human customer. We put it there.
Activate Purple AI Agentic Investigation in your Singularity console or visit s1.ai/agentic.
Why Most AI SOC Deployments Stall. How the Fastest Teams Don't.
Join the webinar on Wednesday, June 24, 2026 at 10:00AM PT/ 1:00PM ET.
All third-party product names, logos, and brands mentioned in this publication are the property of their respective owners and are for identification purposes only. Use of these names, logos, and brands does not imply affiliation, endorsement, sponsorship, or association with the third-party.
ASEC Blog publishes Ransom & Dark Web Issues Week 2, June 2026 Black X Ransomware Attacks on Korean and U.S. Organizations Data from South Korean Education Platform Leaked on BreachForums by Hasan Breach of French Secure Government Messaging Data Discovered on PwnForums
ASEC Blog publishes Ransom & Dark Web Issues Week 3, May 2026 Nova Ransomware Attack on South Korean Cosmetics and Chemical Firm CoinbaseCartel, Data Leak Claim Against Open-Source Visualization Platform TeamPCP Claimed Source Code Leak and Sale from Major Developer Platform
The Cyber Express previously reported the ChipSoft cyberattack, in which ransomware actors stole patient data. Now, reports have surfaced from the Dutch medical software provider, noting that the compromised data has been destroyed, though key details about the incident remain undisclosed.In an update issued on April 28, 2026, ChipSoft stated that all data collected during the cyberattack had been deleted. According to the company, cybersecurity specialists verified that the destruction was carried out in a “technically sound manner,” although no further explanation was provided about the methods used.The company emphasized that preventing the publication of stolen data was a top priority. “With the support of cybersecurity experts, we managed to prevent the data from being published. Furthermore, the stolen data has been destroyed,” the statement read. However, ChipSoft has not clarified whether it paid a ransom to the attackers, despite earlier indications that negotiations had taken place.“Protecting our customers’ data has always been our top priority. In this exceptional situation, that priority weighed very heavily,” the company added, hinting at the difficult decisions made during the ransomware attack response.
Timeline of the ChipSoft Cyberattack
The ChipSoft cyberattack first came to light in early April 2026. On April 12, ChipSoft disclosed that it had fallen victim to a cyberattack on its systems earlier that week. As an immediate precaution, the company disabled connections to several key services, including its Care Portal, Care Platform, and HiX Mobile applications, starting April 8.At the time, ChipSoft confirmed it had engaged Z-CERT, the Dutch healthcare cybersecurity expertise center, and external cybersecurity professionals to conduct a forensic investigation. The company acknowledged the disruption caused to healthcare providers and patients, noting that patient portals were temporarily unavailable and data exchange via the platform had been halted.
Data Theft Confirmed in the Netherlands
By April 16, the investigation revealed that cybercriminals behind the ransomware attack had successfully stolen personal and medical data from several Dutch healthcare institutions. ChipSoft confirmed that affected organizations were being notified directly.Hans Mulder, CEO of ChipSoft, addressed the breach, stating: “After forty years of dedication to reliable healthcare IT, it pains us that this situation has arisen. We cannot undo this data theft. However, we are doing everything we can to support the affected customers as best as possible in this situation.”In contrast, a separate update on the same day confirmed that Belgian patient data had not been compromised in the cyberattack on ChipSoft systems.
Systems Shutdown and Gradual Recovery
The cyberattack forced ChipSoft to shut down multiple services as a preventive measure. Systems such as Zorgplatform, Zorgportaal, and HiX Mobile were temporarily taken offline, affecting daily operations in healthcare institutions.By April 17, after extensive analysis conducted in collaboration with cybersecurity experts and Z-CERT, ChipSoft announced that the affected systems were safe to use again. A phased rollout began shortly afterward, with healthcare institutions being informed directly about the restoration process.Further progress was reported on April 24, when ChipSoft confirmed that most healthcare institutions had regained access to Zorgplatform. Connections to Zorgportaal were also being restored, allowing many patient portals to become operational again. The HiX Mobile app became available once institutions reactivated their systems.Despite these advancements, ChipSoft cautioned that the recovery process required time and careful handling. The company acknowledged the strain placed on healthcare providers, stating that the precautionary measures had significantly impacted daily workflows and patient care.
When More Tools Create More Problems For years, organizations have approached cybersecurity with a simple mindset-add more tools to strengthen defenses. Firewalls, endpoint solutions, intrusion detection systems, and monitoring platforms have all been layered together to create what appears to be a comprehensive security posture. Yet, despite this growing investment, security outcomes have not improved
Agents let you build software faster than ever, but securing your environment and the code you write — from both mistakes and malice — takes real effort. Open Web Application Security Project (OWASP) details a number of risks present in agentic AI systems, including the risk of credential leaks, user impersonation, and elevation of privilege. These risks can result in extreme damage to your environments including denial of service, data loss, or data leaks — which can do untold financial and reputational damage.
This is an identity problem. In modern development, "identities" aren't just people — they are the agents, scripts, and third-party tools that act on your behalf. To secure these non-human identities, you need to manage their entire lifecycle: ensuring their credentials (tokens) aren't leaked, seeing which applications have access via OAuth, and narrowing their permissions using granular RBAC.
Today, we are introducing updates to address these needs: scannable tokens to protect your credentials,OAuth visibility to manage your principals, and resource-scoped RBAC to fine-tune your policies.
Understanding identity: Principals, Credentials, and Policies
To secure the Internet in an era of autonomous agents, we have to rethink how we handle identity. Whether a request comes from a human developer or an AI agent, every interaction with an API relies on three core pillars:
The Principal (The Traveler): This is the identity itself — the "who." It might be you logging in via OAuth, or a background agent using an API token to deploy code.
The Credential (The Passport): This is the proof of that identity. In this world, your API token is your passport. If it’s stolen or leaked, anyone can "wear" your identity.
The Policy (The Visa): This defines what that identity is allowed to do. Just because you have a valid passport doesn't mean you have a visa to enter every country. A policy ensures that even a verified identity can only access the specific resources it needs.
When these three pillars aren't managed together, security breaks down. You might have a valid Principal using a stolen Credential, or a legitimate identity with a Policy that is far too broad.
Leaked token detection
Agents and other third-party applications use API tokens to access the Cloudflare API. One of the simplest ways that we see people leaking their secrets is by accidentally pushing them to a public GitHub repository. GitGuardian reports that last year more than 28 million secrets were published to public GitHub repositories, and that AI is causing leaks to happen 5x faster than before.
If an API token is a digital passport, then leaking it on a public repository is like leaving your passport on a park bench. Anyone who finds it can impersonate that identity until the document is canceled. Our partnership with GitHub acts like a global "lost and found" for these credentials. By the time you realize your passport is missing, we’ve already identified the document, verified its authenticity via the checksum, and voided it to prevent misuse.
We’re partnering with several leading credential scanning tools to help proactively find your leaked tokens and revoke them before they could be used maliciously. We know it’s not a matter of if, but rather when, before you, an employee, or one of your agents makes a mistake and pushes a secret somewhere it shouldn’t be.
GitHub
We’ve partnered with GitHub and are participating in their Secret Scanning program to find your tokens in both public and private repositories. If we are notified that a token has leaked to a public repository, we will automatically revoke the token to prevent it from being used maliciously. For private repositories, GitHub will notify you about any leaked Cloudflare tokens and you can clean these up.
How it works
We’ve shared the new token formats (below!) with GitHub, and they now scan for them on every commit. If they find something that looks like a leaked Cloudflare token, they verify the token is real (using the checksum), send us a webhook to revoke it, and then we notify you via email so you can generate a new one in Dashboard settings.
This means we plug the hole as soon as it’s found. By the time you realize you made a mistake, we've already fixed it.
We hope this is the kind of feature you don’t need to use, but our partners are on the lookout for leaks to help keep you secure.
Cloudflare One
Cloudflare One customers are also protected from these leaks. By configuring the Credentials and Secrets DLP profile, organizations can activate prevention everywhere a credential can travel:
Network Traffic (Cloudflare Gateway): Apply these entries to a policy to detect and block Cloudflare API tokens moving across your network. A token in a file upload, an outbound request, or a download is stopped before it reaches its destination.
Outbound Email (Cloudflare Email Security): Microsoft 365 customers can extend this same prevention to Outlook. The DLP Assist add-in scans messages before delivery, catching a token before it’s sent externally.
Data at Rest (Cloudflare CASB): Cloudflare’s Cloud Access Security Broker applies the same profile to scan files across connected SaaS applications, catching tokens saved or shared in Google Drive, OneDrive, Dropbox, and other integrated services.
The most novel exposure vector, though, is AI traffic. Cloudflare AI Gateway integrates with the same DLP profiles to scan and block both incoming prompts and outgoing AI model responses in real time.
Other credential scanners
The only way credential scanning works is if we meet you where you are, so we are working with several open source and commercial credential scanners to ensure you are protected no matter what secret scanner you use.
How it works
Until now, Cloudflare’s API tokens were pretty generic looking, so they were hard for credential scanners to identify with high confidence. These automated security tools scan your code repositories looking for exposed credentials like API keys, tokens or passwords. The “cf” prefix makes Cloudflare tokens instantly recognizable with greater confidence, and the checksum makes it easy for tools to statically validate them. Your existing tokens will continue to work, but every new token you generate will use the scannable format so it’s easily detected with high confidence.
Getting started
If you have existing API tokens, you can roll the token to create a new, scannable API token. This is optional, but recommended to ensure that your tokens are easily discoverable in case they leak.
While API tokens are generally used by your own scripts and agents, OAuth is how you manage access for third-party platforms. Both require clear visibility to prevent unauthorized access and ensure you know exactly who — or what — has access to your data.
Improving the OAuth consent experience
When you connect third-party applications like Wrangler to your Cloudflare Account using OAuth, you're granting that application access to your account’s data. Over time, you may forget why you granted a third party application access to your Account in the first place. Previously, there was no central place to view & manage those applications. Starting today, there is.
Going forward, when a third party application requests access to your Cloudflare account, you’ll be able to review:
Which third-party application is requesting access, along with information about the application like Name, Logo, and the Publisher.
Which scopes the third-party application is requesting access to.
Which accounts to grant the third party application access to.
Not all applications require the same permissions; some only need to read data, others may need to make changes to your Account. Understanding these scopes before you grant access helps you maintain least-privilege.
We also added a Connected Applications experience so you can see which applications have access to which accounts, what scopes/permissions are associated with that application, and easily revoke that access as needed.
Getting started
The OAuth consent and revocation improvements are available now. Check which apps currently have access to your accounts by visiting My Profile > Access Management > Connected Applications.
For developers building integrations with Cloudflare, keep an eye on the Cloudflare Changelog for more announcements around how you can register your own OAuth apps soon!
Fine-grained resource-level permissioning
If the token is the passport, then resource-scoped permissions are the visas inside it. Having a valid passport gets you through the front door, but it shouldn't give you access to every room in the building. By narrowing the scope to specific resources — like a single Load Balancer pool or a specific Gateway policy — you are ensuring that even if an identity is verified, it only has the "visa" to go where it’s strictly necessary.
Last year, we announced support for resource scoped permissions in Cloudflare’s role-based access control (RBAC) system for several of our Zero Trust products. This enables you to right size permissions for both users and agents to minimize security risks. We’ve expanded this capability to several new resources-level permissions. The resource scope is now supported for:
Access Applications
Access Identity Providers
Access Policies
Access Service Tokens
Access Targets
We’ve also completely overhauled the API Token creation experience, making it easier for customers to provision and manage Account API Tokens right from the Cloudflare Dashboard.
How it works
When you add a member to your Cloudflare account or create an API Token, you typically assign that principal a policy. A Permission Policy is what gives a principal permission to take an action, whether that’s managing Cloudflare One Access Applications, or DNS Records. Without a policy, a principal can authenticate, but they are unauthorized to do any actions within an account.
Policies are made up of three components: a Principal, a Role, and a Scope. The Principal is who or what you're granting access to, whether that's a human user, a Non-Human Identity (NHI) like an API Token, or increasingly, an Agent acting on behalf of a user. The Role defines what actions they're permitted to take. The Scope determines where those permissions apply, and historically, that's been restricted to the entire account, or individual zones.
New permission roles
We’re also expanding the role surface more broadly at both the Account & Zone level with the introduction of a number of new roles for many products.
Account scope
CDN Management
MCP Portals
Radar
Request Tracer
SSL/TLS Management
Zone scope
Analytics
Logpush
Page Rules
Security Center
Snippets
Zone Settings
Getting started
The resource scope and all new account and zone-level roles are available today for all Cloudflare customers. You can assign account, zone, or resource-scoped policies through the Cloudflare Dashboard, the API, or Terraform.
For a full breakdown of all available roles and how scopes work, visit our roles and scope documentation.
Secure your accounts
These updates provide the granular building blocks needed for a true least-privilege architecture. By refining how we manage permissions and credentials, developers and enterprises can have greater confidence in their security posture across the users, apps, agents, and scripts that access Cloudflare. Least privilege isn’t a new concept, and for enterprises, it’s never been optional. Whether a human administrator is managing a zone or an agent is programmatically deploying a Worker, the expectation is the same, they should only be authorized to do the job it was given, and nothing else.
Following today’s announcement, we recommend customers:
Review your API tokens, and reissue with the new, scannable API tokens as soon as possible.
Review member & API Token permissions in your accounts and ensure that users are taking advantage of the new account, zone, or resource scoped permissions as needed to reduce your risk area.
We at Cloudflare have aggressively adopted Model Context Protocol (MCP) as a core part of our AI strategy. This shift has moved well beyond our engineering organization, with employees across product, sales, marketing, and finance teams now using agentic workflows to drive efficiency in their daily tasks. But the adoption of agentic workflow with MCP is not without its security risks. These range from authorization sprawl, prompt injection, and supply chain risks. To secure this broad company-wide adoption, we have integrated a suite of security controls from both our Cloudflare One (SASE) platform and our Cloudflare Developer platform, allowing us to govern AI usage with MCP without slowing down our workforce.
In this blog we’ll walk through our own best practices for securing MCP workflows, by putting different parts of our platform together to create a unified security architecture for the era of autonomous AI. We’ll also share two new concepts that support enterprise MCP deployments:
Remote MCP servers provide better visibility and control
MCP is an open standard that enables developers to build a two-way connection between AI applications and the data sources they need to access. In this architecture, the MCP client is the integration point with the LLM or other AI agent, and the MCP server sits between the MCP client and the corporate resources.
The separation between MCP clients and MCP servers allows agents to autonomously pursue goals and take actions while maintaining a clear boundary between the AI (integrated at the MCP client) and the credentials and APIs of the corporate resource (integrated at the MCP server).
Our workforce at Cloudflare is constantly using MCP servers to access information in various internal resources, including our project management platform, our internal wiki, documentation and code management platforms, and more.
Very early on, we realized that locally-hosted MCP servers were a security liability. Local MCP server deployments may rely on unvetted software sources and versions, which increases the risk of supply chain attacks or tool injection attacks. They prevent IT and security administrators from administrating these servers, leaving it up to individual employees and developers to choose which MCP servers they want to run and how they want to keep them up to date. This is a losing game.
Instead, we have a centralized team at Cloudflare that manages our MCP server deployment across the enterprise. This team built a shared MCP platform inside our monorepo that provides governed infrastructure out of the box. When an employee wants to expose an internal resource via MCP, they first get approval from our AI governance team, and then they copy a template, write their tool definitions, and deploy, all the while inheriting default-deny write controls with audit logging, auto-generated CI/CD pipelines, and secrets management for free. This means standing up a new governed MCP server is minutes of scaffolding. The governance is baked into the platform itself, which is what allowed adoption to spread so quickly.
Our CI/CD pipeline deploys them as remote MCP servers on custom domains on Cloudflare’s developer platform. This gives us visibility into which MCPs servers are being used by our employees, while maintaining control over software sources. As an added bonus, every remote MCP server on the Cloudflare developer platform is automatically deployed across our global network of data centers, so MCP servers can be accessed by our employees with low latency, regardless of where they might be in the world.
Cloudflare Access provides authentication
Some of our MCP servers sit in front of public resources, like our Cloudflare documentation MCP server or Cloudflare Radar MCP server, and thus we want them to be accessible to anyone. But many of the MCP servers used by our workforce are sitting in front of our private corporate resources. These MCP servers require user authentication to ensure that they are off limits to everyone but authorized Cloudflare employees. To achieve this, our monorepo template for MCP servers integrates Cloudflare Access as the OAuth provider. Cloudflare Access secures login flows and issues access tokens to resources, while acting as an identity aggregator that verifies end user single-sign on (SSO), multifactor authentication (MFA), and a variety of contextual attributes such as IP addresses, location, or device certificates.
MCP server portals centralize discovery and governance
MCP server portals unify governance and control for all AI activity.
As the number of our remote MCP servers grew, we hit a new wall: discovery. We wanted to make it easy for every employee (especially those that are new to MCP) to find and work with all the MCP servers that are available to them. Our MCP server portals product provided a convenient solution. The employee simply connects their MCP client to the MCP server portal, and the portal immediately reveals every internal and third-party MCP servers they are authorized to use.
Beyond this, our MCP server portals provide centralized logging, consistent policy enforcement and data loss prevention (DLP guardrails). Our administrators can see who logged into what MCP portal and create DLP rules that prevent certain data, like personally identifiable data (PII), from being shared with certain MCP servers.
We can also create policies that control who has access to the portal itself, and what tools from each MCP server should be exposed. For example, we could set up one MCP server portal that is only accessible to employees that are part of our finance group that exposes just the read-only tools for the MCP server in front of our internal code repository. Meanwhile, a different MCP server portal, accessible only to employees on their corporate laptops that are in our engineering team, could expose more powerful read/write tools to our code repository MCP server.
An overview of our MCP server portal architecture is shown above. The portal supports both remote MCP servers hosted on Cloudflare, and third-party MCP servers hosted anywhere else. What makes this architecture uniquely performant is that all these security and networking components run on the same physical machine within our global network. When an employee's request moves through the MCP server portal, a Cloudflare-hosted remote MCP server, and Cloudflare Access, their traffic never needs to leave the same physical machine.
Code Mode with MCP server portals reduces costs
After months of high-volume MCP deployments, we’ve paid out our fair share of tokens. We’ve also started to think most people are doing MCP wrong.
The standard approach to MCP requires defining a separate tool for every API operation that is exposed via an MCP server. But this static and exhaustive approach quickly exhausts an agent’s context window, especially for large platforms with thousands of endpoints.
We previously wrote about how we used server-side Code Mode to power Cloudflare’s MCP server, allowing us to expose the thousands of end-points in Cloudflare API while reducing token use by 99.9%. The Cloudflare MCP server exposes just two tools: a search tool lets the model write JavaScript to explore what’s available, and an execute tool lets it write JavaScript to call the tools it finds. The model discovers what it needs on demand, rather than receiving everything upfront.
We like this pattern so much, we had to make it available for everyone. So we have now launched the ability to use the “Code Mode” pattern with MCP server portals. Now you can front all of your MCP servers with a centralized portal that performs audit controls and progressive tool disclosure, in order to reduce token costs.
Here is how it works. Instead of exposing every tool definition to a client, all of your underlying MCP servers collapse into just two MCP portal tools: portal_codemode_search and portal_codemode_execute. The search tool gives the model access to a codemode.tools() function that returns all the tool definitions from every connected upstream MCP server. The model then writes JavaScript to filter and explore these definitions, finding exactly the tools it needs without every schema being loaded into context. The execute tool provides a codemode proxy object where each upstream tool is available as a callable function. The model writes JavaScript that calls these tools directly, chaining multiple operations, filtering results, and handling errors in code. All of this runs in a sandboxed environment on the MCP server portal powered by Dynamic Workers.
Here is an example of an agent that needs to find a Jira ticket and update it with information from Google Drive. It first searches for the right tools:
The model now knows the exact tool names and parameters it needs, without the full schemas of tools ever entering its context. It then writes a single execute call to chain the operations together:
This is just two tool calls. The first discovers what's available, the second does the work. Without Code Mode, this same workflow would have required the model to receive the full schemas of every tool from both MCP servers upfront, and then make three separate tool invocations.
Let’s put the savings in perspective: when our internal MCP server portal is connected to just four of our internal MCP servers, it exposes 52 tools that consume approximately 9,400 tokens of context just for their definitions. With Code Mode enabled, those 52 tools collapse into 2 portal tools consuming roughly 600 tokens, a 94% reduction. And critically, this cost stays fixed. As we connect more MCP servers to the portal, the token cost of Code Mode doesn’t grow.
Code Mode can be activated on an MCP server portal by adding a query parameter to the URL. Instead of connecting to your portal over its usual URL (e.g. https://myportal.example.com/mcp), you attach ?codemode=search_and_execute to the URL (e.g. https://myportal.example.com/mcp?codemode=search_and_execute).
AI Gateway provides extensibility and cost controls
We aren’t done yet. We plug AI Gateway into our architecture by positioning it on the connection between the MCP client and the LLM. This allows us to quickly switch between various LLM providers (to prevent vendor lock-in) and to enforce cost controls (by limiting the number of tokens each employee can burn through). The full architecture is shown below.
Cloudflare Gateway discovers and blocks shadow MCP
Now that we’ve provided governed access to authorized MCP servers, let’s look into dealing with unauthorized MCP servers. We can perform shadow MCP discovery using Cloudflare Gateway. Cloudflare Gateway is our comprehensive secure web gateway that provides enterprise security teams with visibility and control over their employees’ Internet traffic.
We can use the Cloudflare Gateway API to perform a multi-layer scan to find remote MCP servers that are not being accessed via an MCP server portal. This is possible using a variety of existing Gateway and Data Loss Prevention (DLP) selectors, including:
Using the Gateway httpRequestURI selector to scan for MCP-specific URL paths like /mcp and /mcp/sse
Using DLP-based body inspection to find MCP traffic, even if that traffic uses URI that do not contain the telltale mentions of mcp or sse. Specifically, we use the fact that MCP uses JSON-RPC over HTTP, which means every request contains a "method" field with values like "tools/call", "prompts/get", or "initialize." Here are some regex rules that can be used to detect MCP traffic in the HTTP body:
The Gateway API supports additional automation. For example, one can use the custom DLP profile we defined above to block traffic, or redirect it, or just to log and inspect MCP payloads. Put this together, and Gateway can be used to provide comprehensive detection of unauthorized remote MCP servers accessed via an enterprise network.
For more information on how to build this out, see this tutorial.
Public-facing MCP Servers are protected with AI Security for Apps
So far, we’ve been focused on protecting our workforce’s access to our internal MCP servers. But, like many other organizations, we also have public-facing MCP servers that our customers can use to agentically administer and operate Cloudflare products. These MCP servers are hosted on Cloudflare’s developer platform. (You can find a list of individual MCPs for specific products here, or refer back to our new approach for providing more efficient access to the entire Cloudflare API using Code Mode.)
We believe that every organization should publish official, first-party MCP servers for their products. The alternative is that your customers source unvetted servers from public repositories where packages may contain dangerous trust assumptions, undisclosed data collection, and any range of unsanctioned behaviors. By publishing your own MCP servers, you control the code, update cadence, and security posture of the tools your customers use.
Since every remote MCP server is an HTTP endpoint, we can put it behind the Cloudflare Web Application Firewall (WAF). Customers can enable the AI Security for Apps feature within the WAF to automatically inspect inbound MCP traffic for prompt injection attempts, sensitive data leakage, and topic classification. Public facing MCPs are protected just as any other web API.
The future of MCP in the enterprise
We hope our experience, products, and reference architectures will be useful to other organizations as they continue along their own journey towards broad enterprise-wide adoption of MCP.
We’ve secured our own MCP workflows by:
Offering our developers a templated framework for building and deploying remote MCP servers on our developer platform using Cloudflare Access for authentication
Ensuring secure, identity-based access to authorized MCP servers by connecting our entire workforce to MCP server portals
Controlling costs using AI Gateway to mediate access to the LLMs powering our workforce’s MCP clients, and using Code Mode in MCP server portals to reduce token consumption and context bloat
Discovering shadow MCP usage by Cloudflare Gateway
For organizations advancing on their own enterprise MCP journeys, we recommend starting by putting your existing remote and third-party MCP servers behind Cloudflare MCP server portals and enabling Code Mode to start benefitting for cheaper, safer and simpler enterprise deployments of MCP.
Acknowledgements: This reference architecture and blog represents this work of many people across many different roles and business units at Cloudflare. This is just a partial list of contributors: Ann Ming Samborski, Kate Reznykova, Mike Nomitch, James Royal, Liam Reese, Yumna Moazzam, Simon Thorpe, Rian van der Merwe, Rajesh Bhatia, Ayush Thakur, Gonzalo Chavarri, Maddy Onyehara, and Haley Campbell.
We have thousands of internal apps at Cloudflare. Some are things we’ve built ourselves, others are self-hosted instances of software built by others. They range from business-critical apps nearly every person uses, to side projects and prototypes.
All of these apps are protected by Cloudflare Access. But when we started using and building agents — particularly for uses beyond writing code — we hit a wall. People could access apps behind Access, but their agents couldn’t.
Access sits in front of internal apps. You define a policy, and then Access will send unauthenticated users to a login page to choose how to authenticate.
Example of a Cloudflare Access login page
This flow worked great for humans. But all agents could see was a redirect to a login page that they couldn’t act on.
Providing agents with access to internal app data is so vital that we immediately implemented a stopgap for our own internal use. We modified OpenCode’s web fetch tool such that for specific domains, it triggered the cloudflared CLI to open an authorization flow to fetch a JWT (JSON Web Token). By appending this token to requests, we enabled secure, immediate access to our internal ecosystem.
While this solution was a temporary answer to our own dilemma, today we’re retiring this workaround and fixing this problem for everyone. Now in open beta, every Access application supports managed OAuth. One click to enable it for an Access app, and agents that speak OAuth 2.0 can easily discover how to authenticate (RFC 9728), send the user through the auth flow, and receive back an authorization token (the same JWT from our initial solution).
Now, the flow works smoothly for both humans and agents. Cloudflare Access has a generous free tier. And building off our newly-introduced Organizations beta, you’ll soon be able to bridge identity providers across Cloudflare accounts too.
How managed OAuth works
For a given internal app protected by Cloudflare Access, you enable managed OAuth in one click:
Once managed OAuth is enabled, Cloudflare Access acts as the authorization server. It returns the www-authenticate header, telling unauthorized agents where to look up information on how to get an authorization token. They find this at https://<your-app-domain>/.well-known/oauth-authorization-server. Equipped with that direction, agents can just follow OAuth standards:
The agent dynamically registers itself as a client (a process known as Dynamic Client Registration — RFC 7591),
The agent sends the human through a PKCE (Proof Key for Code Exchange) authorization flow (RFC 7636)
The human authorizes access, which grants a token to the agent that it can use to make authenticated requests on behalf of the user
Here’s what the authorization flow looks like:
If this authorization flow looks familiar, that’s because it’s what the Model Context Protocol (MCP) uses. We originally built support for this into our MCP server portals product, which proxies and controls access to many MCP servers, to allow the portal to act as the OAuth server. Now, we’re bringing this to all Access apps, so agents can access not only MCP servers that require authorization, but also web pages, web apps, and REST APIs.
Mass upgrading your internal apps to be agent-ready
Upgrading the long tail of internal software to work with agents is a daunting task. In principle, in order to be agent-ready, every internal and external app would ideally have discoverable APIs, a CLI, a well-crafted MCP server, and have adopted the many emerging agent standards.
AI adoption is not something that can wait for everything to be retrofitted. Most organizations have a significant backlog of apps built over many years. And many internal “apps” work great when treated by agents as simple websites. For something like an internal wiki, all you really need is to enable Markdown for Agents, turn on managed OAuth, and agents have what they need to read protected content.
To make the basics work across the widest set of internal applications, we use Managed OAuth. By putting Access in front of your legacy internal apps, you make them agent-ready instantly. No code changes, no retrofitting. Instead, just immediate compatibility.
It’s the user’s agent. No service accounts and tokens needed
Agents need to act on behalf of users inside organizations. One of the biggest anti-patterns we’ve seen is people provisioning service accounts for their agents and MCP servers, authenticated using static credentials. These have their place in simple use cases and quick prototypes, and Cloudflare Access supports service tokens for this purpose.
But the service account approach quickly shows its limits when fine-grained access controls and audit logs are required. We believe that every action an agent performs must be easily attributable to the human who initiated it, and that an agent must only be able to perform actions that its human operator is likewise authorized to do. Service accounts and static credentials become points at which attribution is lost. Agents that launder all of their actions through a service account are susceptible to confused deputy problems and result in audit logs that appear to originate from the agent itself.
For security and accountability, agents must use security primitives capable of expressing this user–agent relationship. OAuth is the industry standard protocol for requesting and delegating access to third parties. It gives agents a way to talk to your APIs on behalf of the user, with a token scoped to the user’s identity, so that access controls correctly apply and audit logs correctly attribute actions to the end user.
Standards for the win: how agents can and should adopt RFC 9728 in their web fetch tools
RFC 9728 is the OAuth standard that makes it possible for agents to discover where and how to authenticate. It standardizes where this information lives and how it’s structured. This RFC became official in April 2025 and was quickly adopted by the Model Context Protocol (MCP), which now requires that both MCP servers and clients support it.
But outside of MCP, agents should adopt RFC 9728 for an even more essential use case: making requests to web pages that are protected behind OAuth and making requests to plain old REST APIs.
Most agents have a tool for making basic HTTP requests to web pages. This is commonly called the “web fetch” tool. It’s similar to using the fetch() API in JavaScript, often with some additional post-processing on the response. It’s what lets you paste a URL into your agent and have your agent go look up the content.
Today, most agents’ web fetch tools won’t do anything with the www-authenticate header that a URL returns. The underlying model might choose to introspect the response headers and figure this out on its own, but the tool itself does not follow www-authenticate, look up /.well-known/oauth-authorization-server, and act as the client in the OAuth flow. But it can, and we strongly believe it should! Agents already do this to act as remote MCP clients.
To demonstrate this, we’ve put up a draft pull request that adapts the web fetch tool in Opencode to show this in action. Before making a request, the adapted tool first checks whether it already has credentials ; if it does, it uses them to make the initial request. If the tool gets back a 401 or a 403 with a www-authenticate header, it asks the user for consent to be sent through the server’s OAuth flow.
Here’s how that OAuth flow works. If you give the agent a URL that is protected by OAuth and complies with RFC 9728, the agent prompts the human for consent to open the authorization flow:
…sending the human to the login page:
…and then to a consent dialog that prompts the human to grant access to the agent:
Once the human grants access to the agent, the agent uses the token it has received to make an authenticated request:
Any agent from Codex to Claude Code to Goose and beyond can implement this, and there’s nothing bespoke to Cloudflare. It’s all built using OAuth standards.
We think this flow is powerful, and that supporting RFC 9728 can help agents with more than just making basic web fetch requests. If a REST API supports RFC 9728 (and the agent does too), the agent has everything it needs to start making authenticated requests against that API. If the REST API supports RFC 9727, then the client can discover a catalog of REST API endpoints on its own, and do even more without additional documentation, agent skills, MCP servers or CLIs.
Each of these play important roles with agents — Cloudflare itself provides an MCP server for the Cloudflare API (built using Code Mode), Wrangler CLI, and Agent Skills, and a Plugin. But supporting RFC 9728 helps ensure that even when none of these are preinstalled, agents have a clear path forward. If the agent has a sandbox to execute untrusted code, it can just write and execute code that calls the API that the human has granted it access to. We’re working on supporting this for Cloudflare’s own APIs, to help your agents understand how to use Cloudflare.
Coming soon: share one identity provider (IdP) across many Cloudflare accounts
At Cloudflare our own internal apps are deployed to dozens of different Cloudflare accounts, which are all part of an Organization — a newly introduced way for administrators to manage users, configurations, and view analytics across many Cloudflare accounts. We have had the same challenge as many of our customers: each Cloudflare account has to separately configure an IdP, so Cloudflare Access uses our identity provider. It’s critical that this is consistent across an organization — you don’t want one Cloudflare account to inadvertently allow people to sign in just with a one-time PIN, rather than requiring that they authenticate via single-sign on (SSO).
To solve this, we’re currently working on making it possible to share an identity provider across Cloudflare accounts, giving organizations a way to designate a single primary IdP for use across every account in their organization.
As new Cloudflare accounts are created within an organization, administrators will be able to configure a bridge to the primary IdP with a single click, so Access applications across accounts can be protected by one identity provider. This removes the need to manually configure IdPs account by account, which is a process that doesn’t scale for organizations with many teams and individuals each operating their own accounts.
What’s next
Across companies, people in every role and business function are now using agents to build internal apps, and expect their agents to be able to access context from internal apps. We are responding to this step function growth in internal software development by making the Workers Platform and Cloudflare One work better together — so that it is easier to build and secure internal apps on Cloudflare.
Expect more to come soon, including:
More direct integration between Cloudflare Access and Cloudflare Workers, without the need to validate JWTs or remember which of many routes a particular Worker is exposed on.
wrangler dev --tunnel — an easy way to expose your local development server to others when you’re building something new, and want to share it with others before deploying
More announcements to come during Agents Week 2026
Enable Managed OAuth for your internal apps behind Cloudflare Access
Managed OAuth is now available, in open beta, to all Cloudflare customers. Head over to the Cloudflare dashboard to enable it for your Access applications. You can use it for any internal app, whether it’s one built on Cloudflare Workers, or hosted elsewhere. And if you haven’t built internal apps on the Workers Platform yet — it’s the fastest way for your team to go from zero to deployed (and protected) in production.

 Entrar
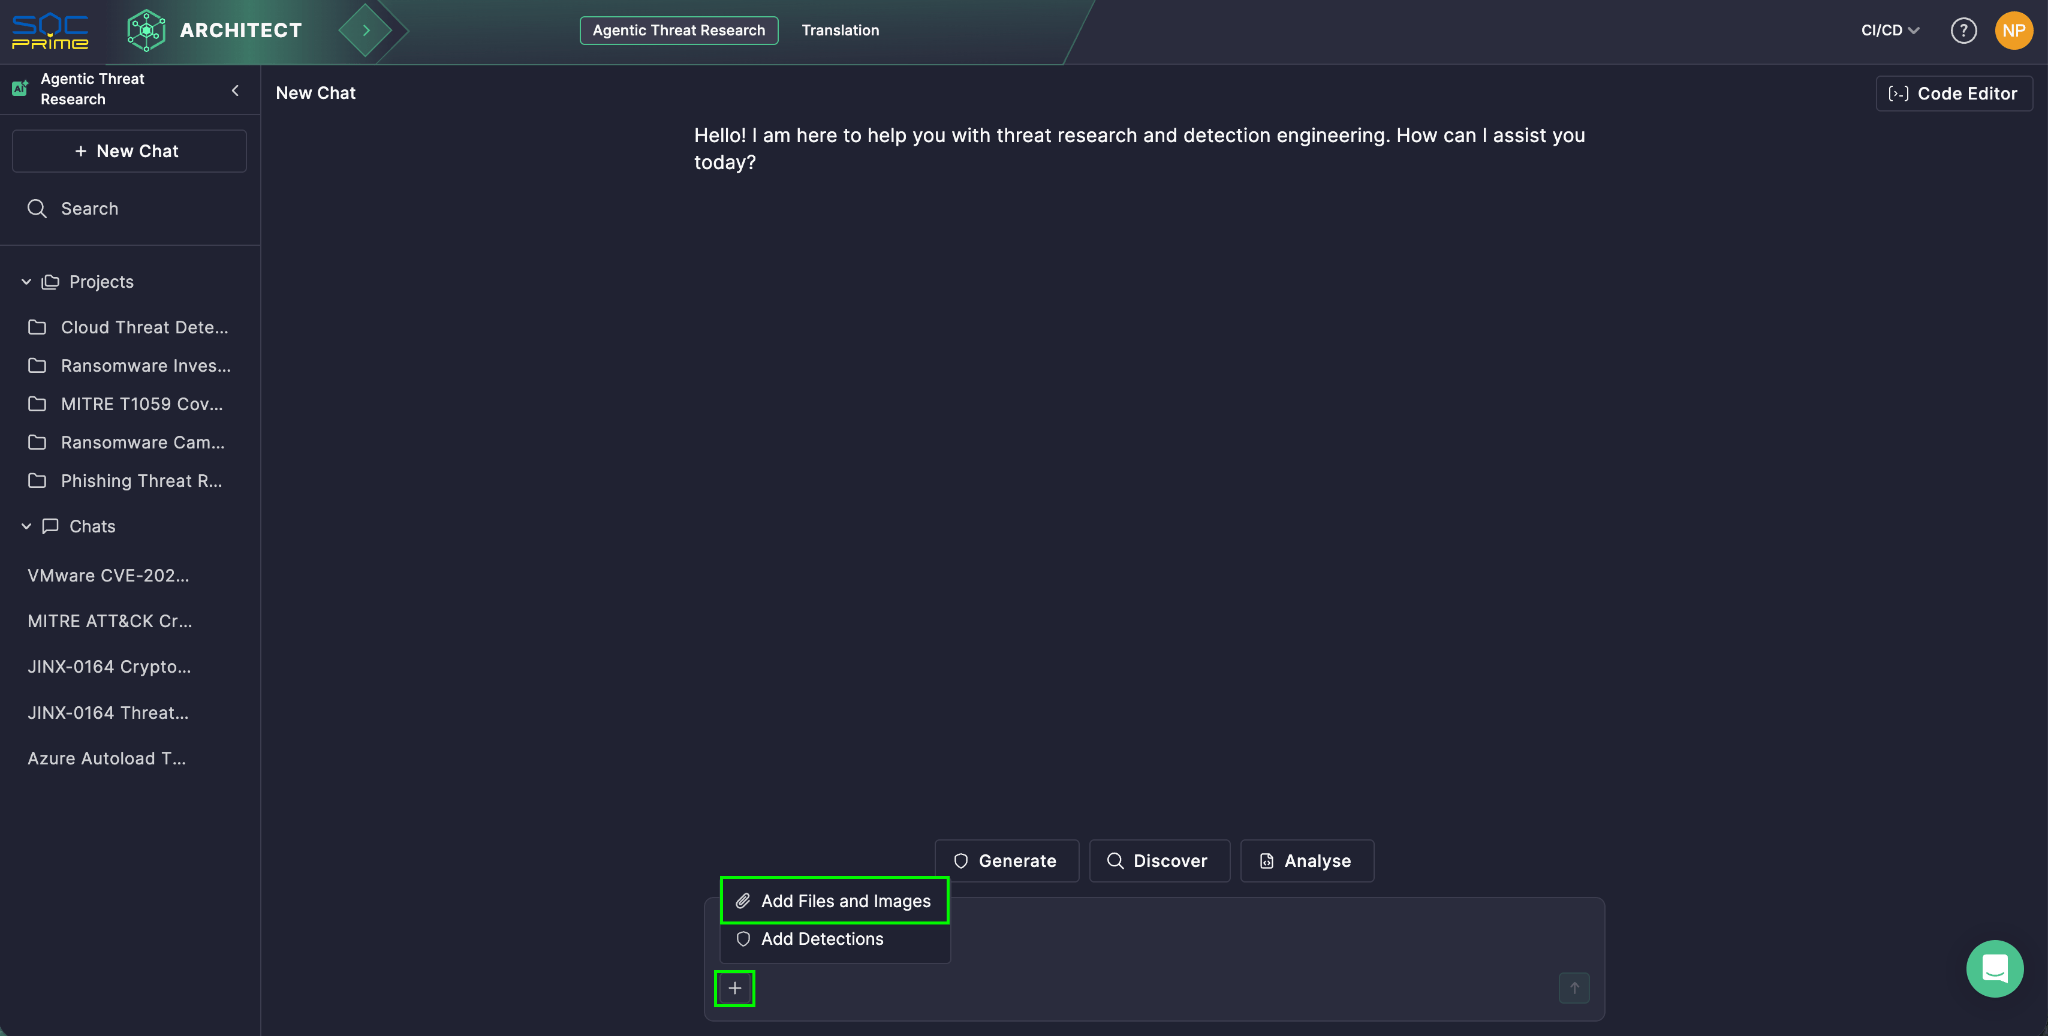
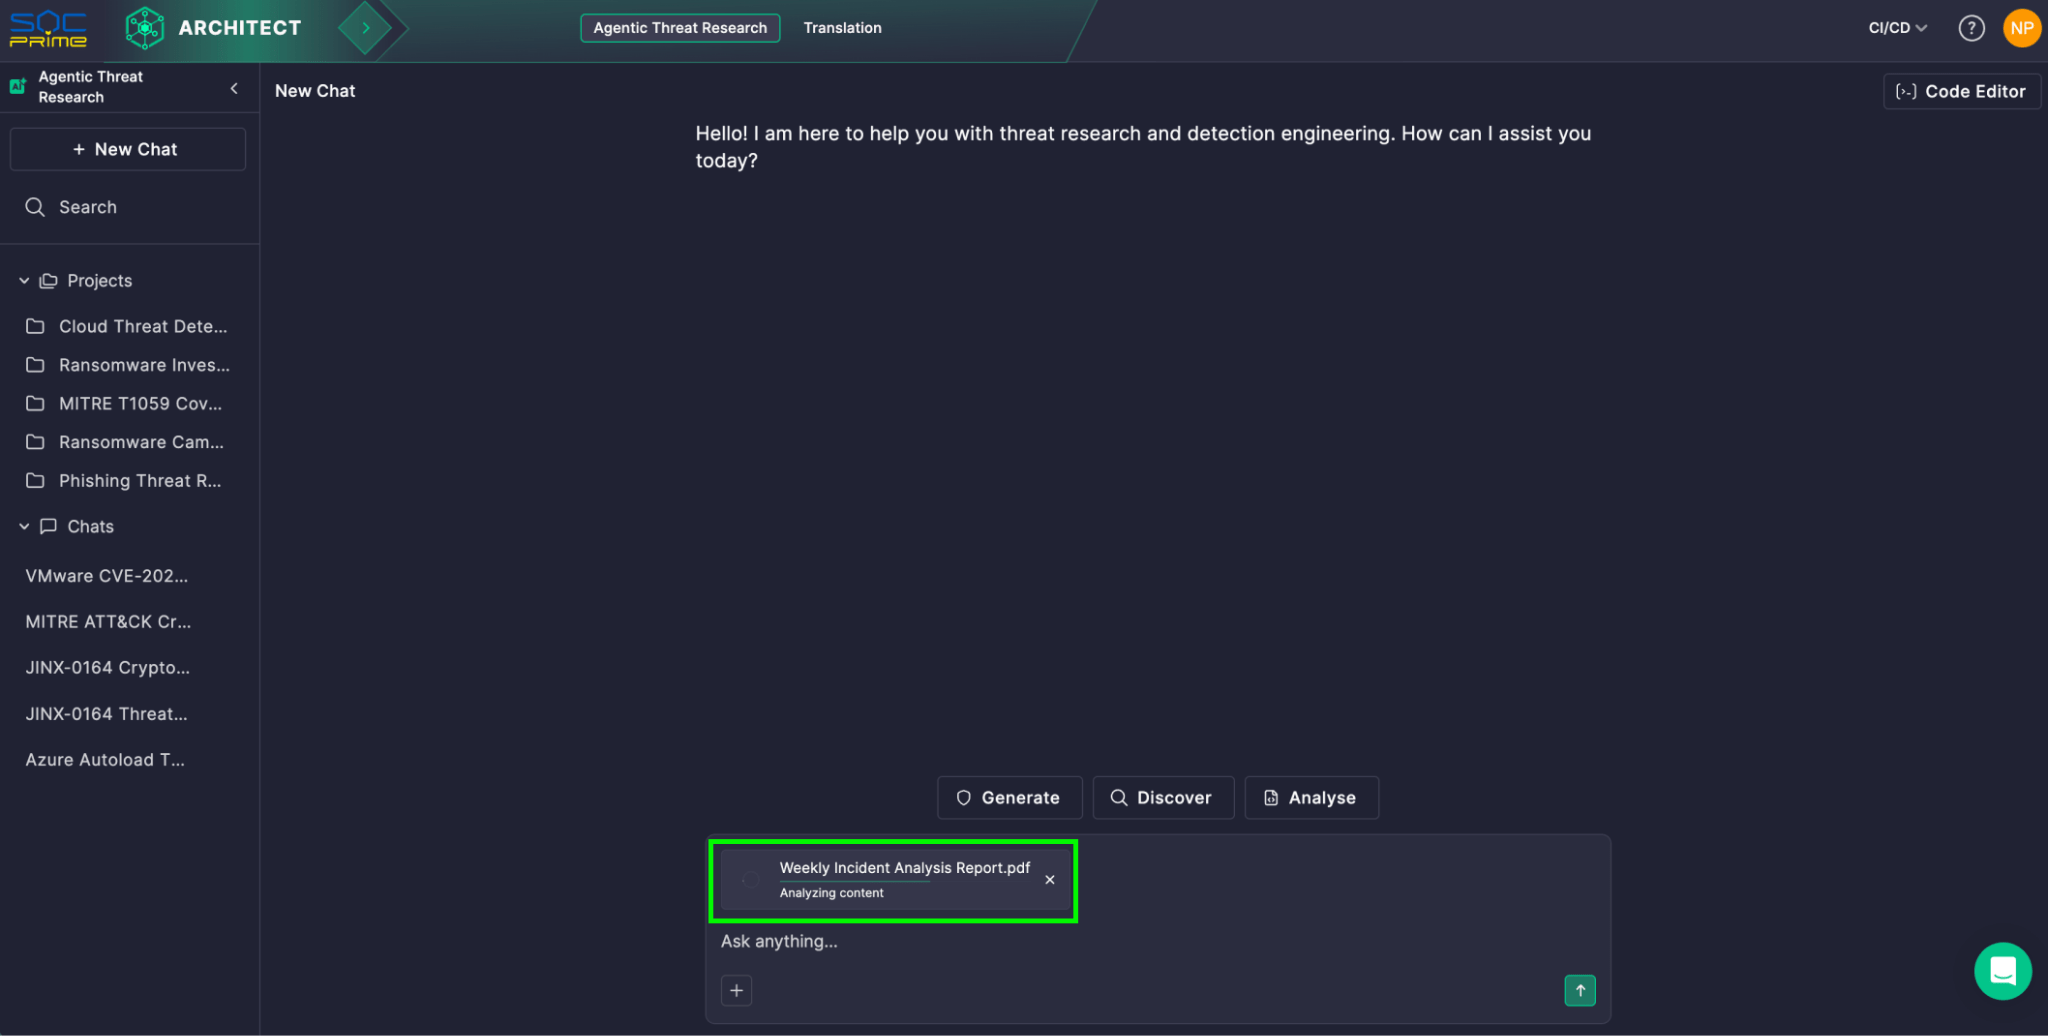
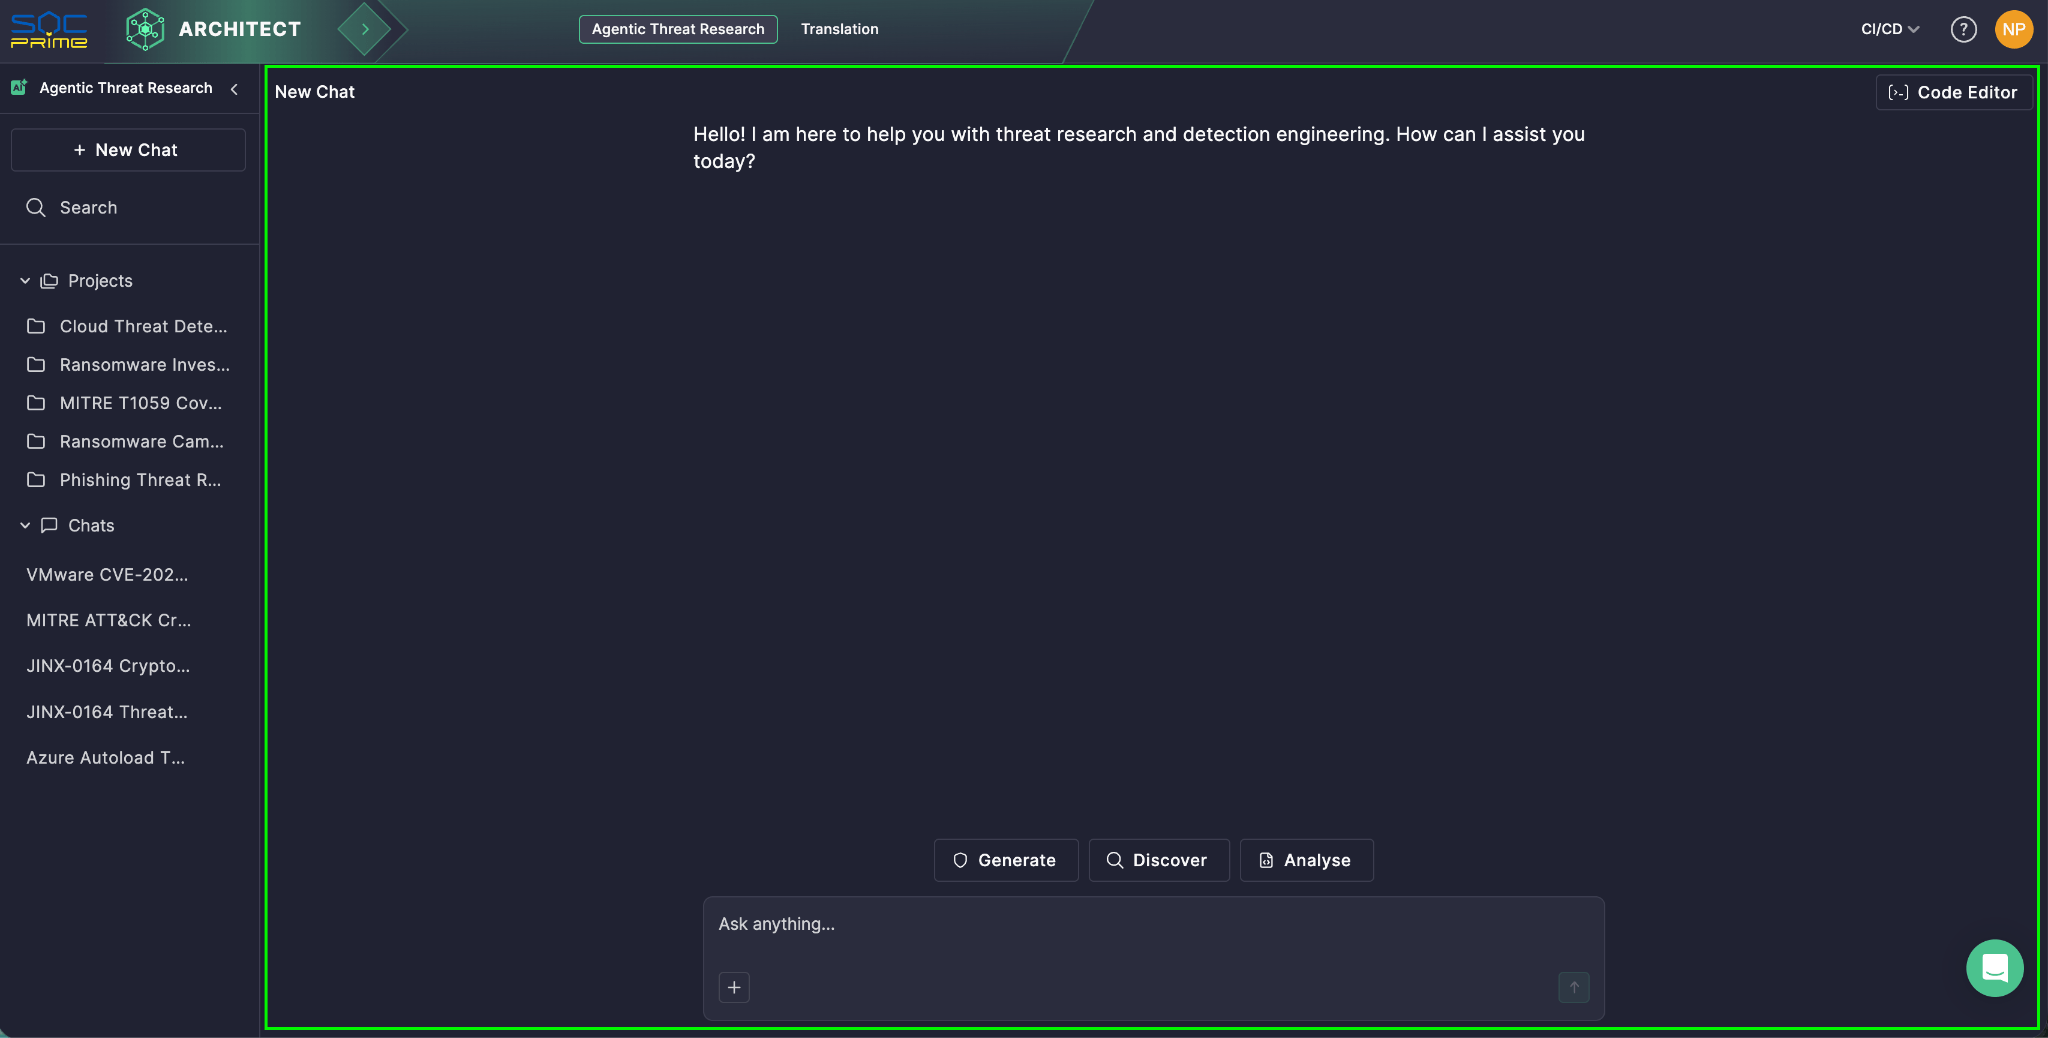
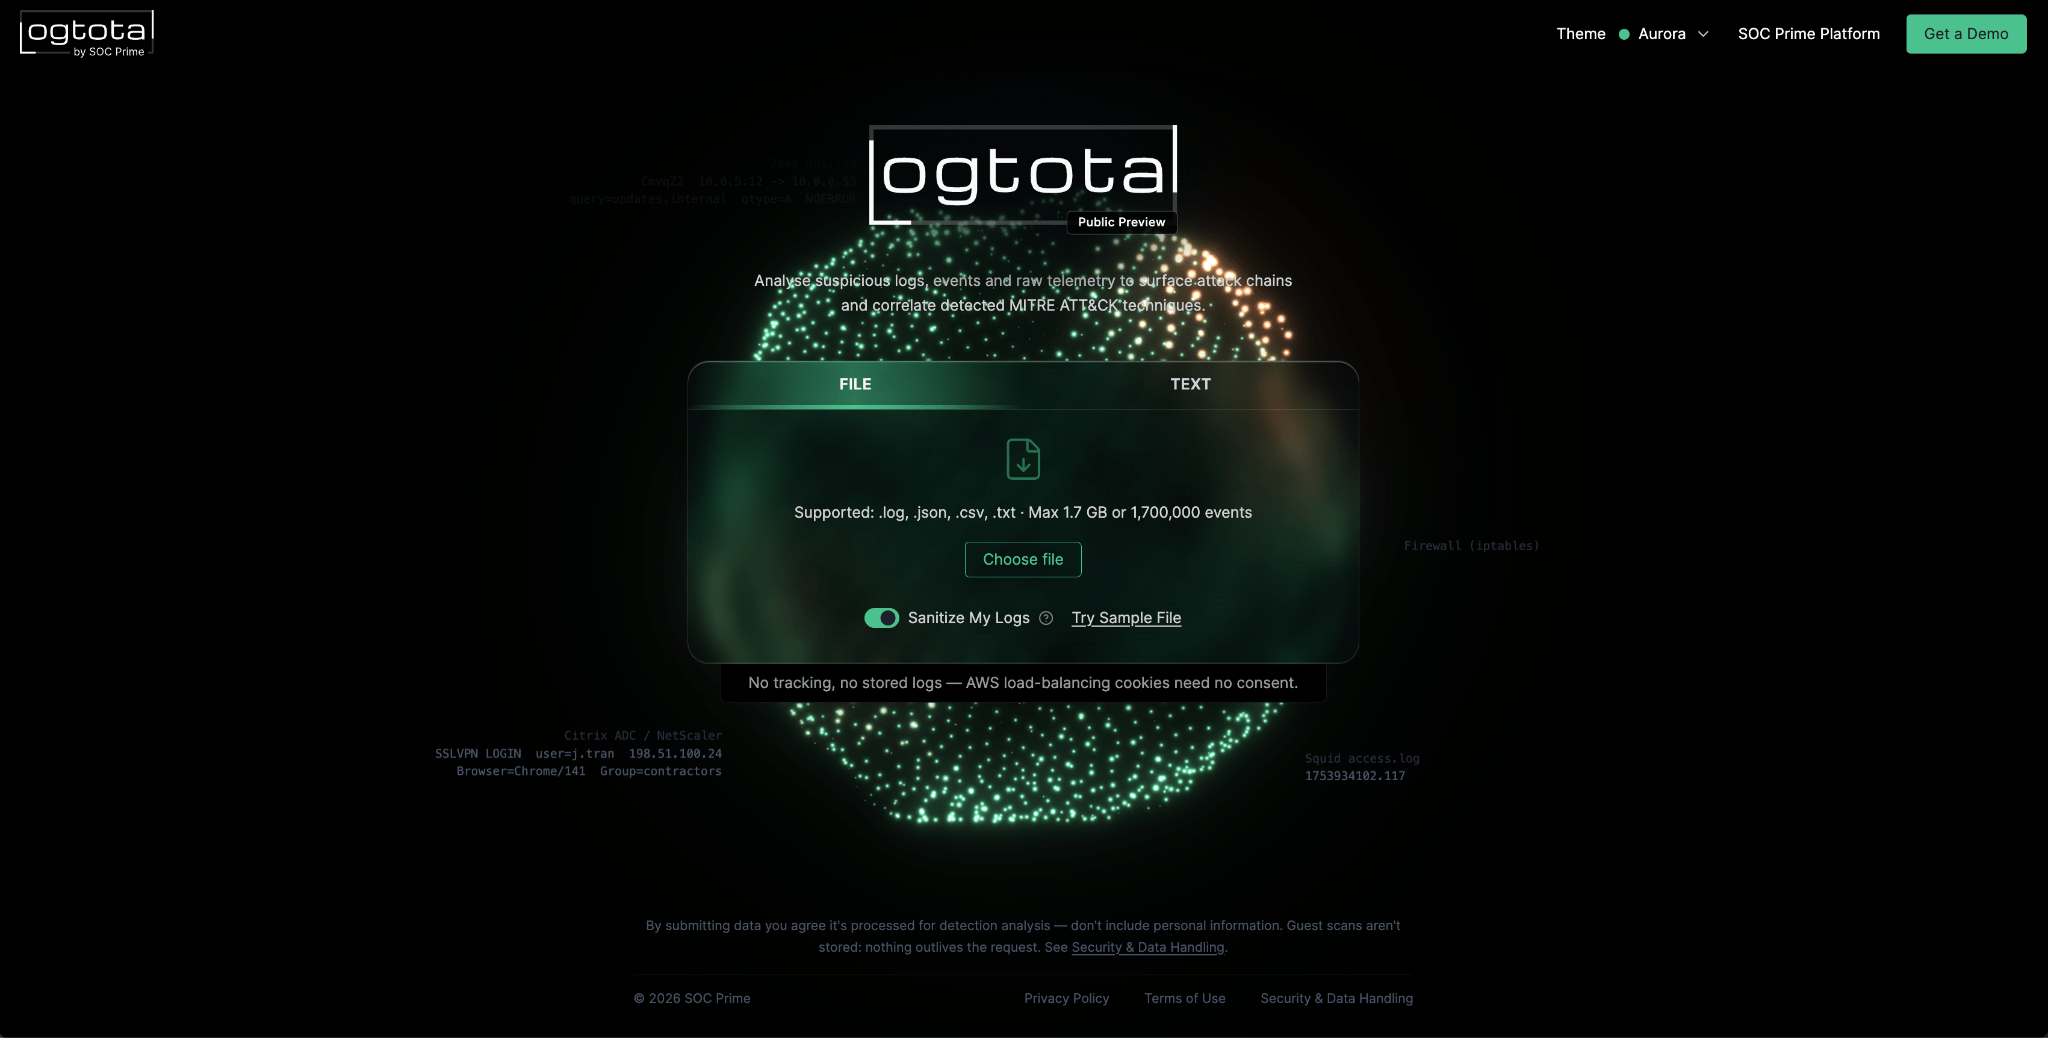
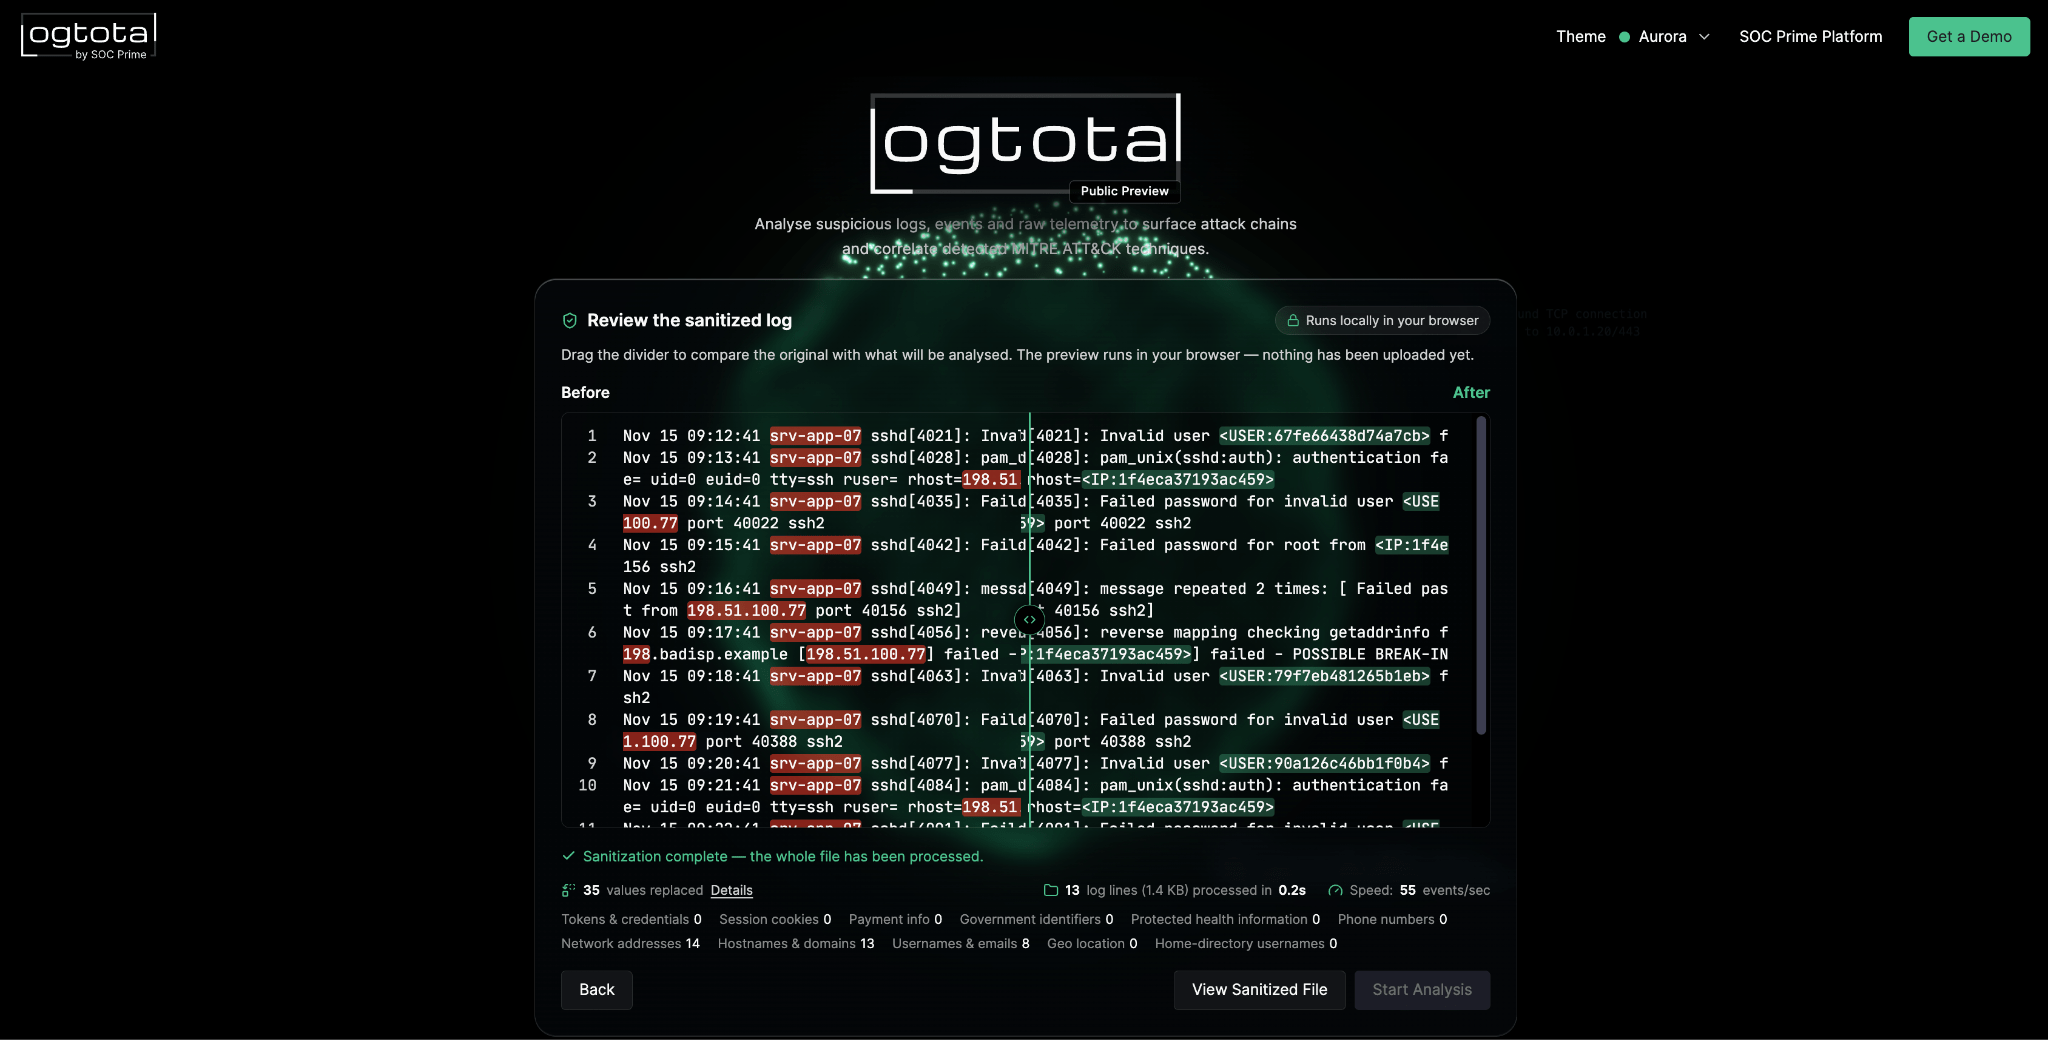


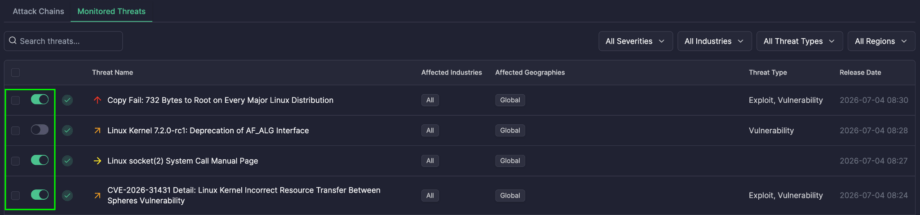

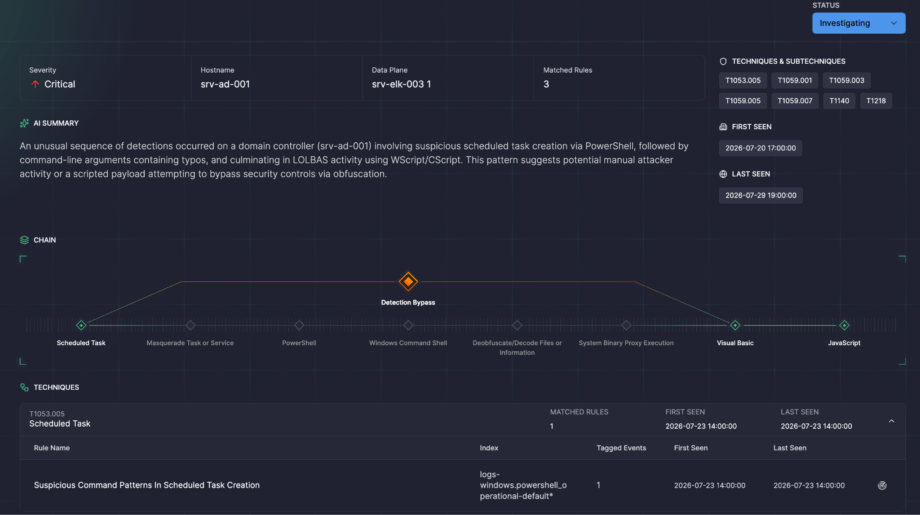



 console. Activated with a single click.